Fragrant and porous sourdough rye bread is a real homemade product that you can easily prepare in your own kitchen. It turns out so delicious that you will forget about store-bought bread options, creating this every day. bakery product, since the starter will always be at your fingertips. Cooked rye bread does not go stale within 2-3 days, it can be used not only as an independent snack, but also as a base for sandwiches, you can take it with you on a trip or on a picnic. Remember that sourdough bread is not too airy, so do not expect an extraordinary "rise" from the dough.
Ingredients

- 100 ml starter
- 150 ml warm water
- 1.5 st. rye flour
- 1.5 st. wheat flour
- 0.5 tsp salt
- 2 tbsp. l. vegetable oil
How to bake sourdough rye bread
 1. We will create a starter from rye flour 3-5 days in advance and store it in the refrigerator. It is created very simply: every day mix 100 ml of warm water and 100 g of rye flour, leaving it at room temperature. Every day, supplement the starter with a new batch of dough from flour and water, mixing. Day after day, the sourdough will ferment more and exude a sour aroma - this means that the yeast in its composition has become more active.
After 3 or 4 days, the starter must be transferred to a container and stored in the refrigerator, using as needed and feeding from time to time.
Pour sourdough, warm water into a deep container, add salt and add 4 tbsp. l. rye and wheat flour. Wheat flour is used necessarily, since rye flour is very heavy and the dough will not grow only on its basis.
Mix everything with a whisk or fork, turning into a viscous mass. Leave for 2-3 hours at room temperature, but not less than 23 C. The lower the temperature, the longer the dough will rise.
 2. As soon as bubbles fall on the surface of the dough, pour vegetable oil into the dough, add the remaining flour and knead not a tight dough - it should be sticky and viscous, but not dense!
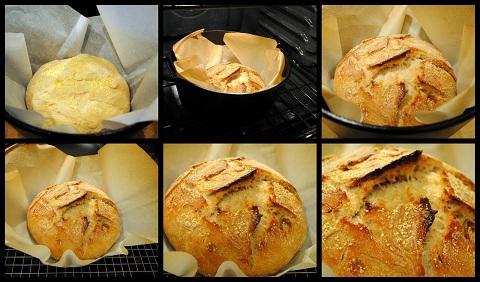
 3. Lubricate the bread pan with vegetable oil and pour the dough we created into it. Leave it warm for proofing for about 4-5 hours - sourdough dough does not rise as quickly as yeast!
 4. After the specified time, we will see that the dough has filled the entire form with itself - we will heat the oven to 220 C and place the form in it for 40-50 minutes. After 20 minutes, reduce the heat to 180-200 C.
Ecology of consumption. Food and recipes: As the old Russian proverb says: "Bread is the head of everything." But do you know what modern bread is made of, which is sold in stores and supermarkets? ..
As the old Russian proverb says: "Bread is the head of everything." But do you know what modern bread is made of, which is sold in stores and supermarkets? Many people do not even realize that in addition to water, flour and yeast, the manufacturer adds various flavors, baking powder, flavor enhancers and other components that make bread softer, tastier, give it a marketable appearance, but nullify its benefits.
For me, the question of the quality of bread became acute just a few months ago. It was then that I thought about how to learn how to cook sourdough and bake homemade, delicious yeast-free bread on my own. To be honest, I relied on recipes that were found on the Internet, but over time I brought out my own, which I will talk about today.
So, my recipe for yeast-free sourdough bread is quite simple, and if you follow the tips and recommendations given below, then very soon you will be able to cook delicious, fragrant, fluffy bread that will forever make you forget about the purchase.
What ingredients are needed?
To prepare yeast-free bread, you will need a minimum of ingredients and no more than 6 hours of time (4-5 of which will take the process of raising the dough).
So we need:
- Flour - 500 grams
It doesn't matter what flour you use. You can use coarse grinding, because they say that it is more useful, you can use regular, peeled, white. I always use regular flour and yeast-free bread comes out delicious, fluffy and soft. It is also worth noting that 500 grams is only a "starting" amount of flour. In total, there should be at least 700 grams, because you can not calculate with sourdough or add a lot of water, and then the dough will turn out to be liquid. In such cases, I always add flour and bring the dough to the desired consistency.
- Sourdough for yeast-free dough - 100 grams
You can use any starter, since there are hundreds of different recipes on the Internet. The sourdough is prepared for 5 days, but then it becomes "eternal". I have already baked several dozen sourdough breads, which have ripened a month and a half ago.
- Water
Water is needed in order to bring the dough to the desired consistency. I can't say exactly how much it will take. I always gain about 500 grams and add a little, kneading the dough. When I see that the dough is on the way, I stop adding water. Everything is quite simple and clear. My advice is, you don’t need to immediately pour 1/2 liter of water into the flour, because you can get a very batter and then you have to add flour, add sourdough, and carry out unnecessary manipulations.
- Salt and spices
Here, too, everything is done to taste. The last bread I made with the addition of dry garlic powder and one tablespoon of salt per kilogram bread. This recipe for yeast-free bread will be very pleasant. Garlic added a special aroma, while there is no sharp taste and smell. Yes, and I guessed with salt, because the bread turned out to be moderately salty. My advice is to add salt gradually so as not to oversalt and spoil everything.
- Soda - 1 teaspoon
Previously, my recipe for yeast-free bread did not contain soda. But just a few days ago I decided to add it as an experiment. The bread turned out even softer and fluffier. As practice has shown, soda does not harm either the taste of bread or its properties, but on the contrary, it makes it even softer.
Getting to the cooking steps
1. Pour the flour into a large bowl and add all the sourdough that you have to it. I make the ratio of flour and sourdough about 1 to 5. If we take 500 grams of flour, then at least 100 grams of sourdough. After looking at other recipes for yeast-free bread, I realized that the authors put less sourdough. But my recipe has already been tested in practice more than once and it has always turned out excellent bread. I also want to note that I do not use scales and do not put everything right clearly up to a gram. The sense of proportion comes with experience, so at first you can use cups and measuring cups, and then such a need will disappear.
2. Next, we begin to gently pour water into a bowl with flour and sourdough, and knead the dough. It should turn out quite dense and should not stick to your hands. As a rule, the dough will turn out to be initially watery and sticky, because a novice baker does not yet have experience and knowledge. But don't be discouraged if that's the case. Just add flour, continuing to knead the dough, and bring it to the desired consistency. The ideal dough should not stick to your hands, be soft like children's plasticine, should be of a uniform consistency and density. On average, I knead the dough for at least 10 minutes. I do it manually, but you can use various electronic devices. By kneading by hand, I can feel the dough and know when to add water or flour.
3. In the process of kneading, salt and spices should also be added to the dough. How much and what spices to add - it depends entirely on your preferences and desires. If you want sweetish bread - you can add raisins and nuts, if you want more spicy - then garlic, if you prefer spicy bread - then experiment with chili peppers. I, in most cases, limit myself to just salt. My advice is to add salt carefully and gradually. Added 1/2 teaspoon, kneaded well, tasted the dough a little. If you feel that there is not enough salt, then add more. I also used to follow recipes and pour in a tablespoon at once, and as a result I got salted yeast-free bread.
As I wrote above, the process of kneading the dough takes me at least 10 minutes. In the end, the dough for yeast-free bread should be dense, but at the same time quite soft and elastic. If you interfere with it, then it should easily take any form, should not crumble or fall apart. If the dough crumbles, then it is too dry, you need to add a little water. If the dough is very sticky to your hands and dishes, then it is too wet, and you should add a little more flour.
4. After you have kneaded the dough, we form a "bun" out of it, sprinkle with a small amount of flour, cover with a slightly damp towel (or dry) and set aside in a warm place to rise for 3-5 hours. If you added a lot of sourdough, then the dough will rise in just 3 hours, if there is not enough sourdough, then it can rise for 10 hours. On average, my dough rises in 5 hours. The last time I added a little sourdough, and left the dough to "ripen" overnight. In the morning it has already risen and as a result it turned out quite delicious bread ears. Another tip - do not pour too much sourdough. Although this will speed up the "ripening" of the dough, it will affect the taste. Your unleavened bread will have a sour taste that many may not like.
5. After the dough has risen, put it into molds and send it to the oven. I usually put it in square pans, or I just bake round bread on a baking sheet. You can make several cuts on the dough so that it bakes better. Also, these cuts will add aesthetic beauty to the finished yeast-free bread.
In the picture you can see how my yeast-free bread rose in just 4 hours. It has increased in size by about 2 times. Therefore, when you send it to "ripen", keep this in mind so that later you do not collect the dough on the table and floor.
6. The last step is baking. I set the oven to 200 degrees and send the dough into it. The first 20 minutes I bake at this temperature, then I reduce it to 180 and continue baking for another 40 minutes. In total, the bread bakes for 60 minutes, resulting in a crispy baked crust, and all the bread is perfectly baked. I used to bake for 40 minutes, as I read in one recipe, but there was always a taste of damp and sticky dough. I decided to increase the baking time and everything fell into place.
I want to say that for the first time I didn’t get bread, but some kind of incomprehensible hot mass, which remotely resembled bread. I made the sourdough incorrectly, did not follow the recommendations from the recipe, added a lot of water, as a result of which the dough did not rise. But now every bread is something unusual, tasty, soft and fragrant. Therefore, if you do not succeed the first time - do not be discouraged, everything comes with experience. However, here are some helpful tips:
1. Don't add too much sourdough because it gives the bread a specific sour taste. It is better to knead the dough during the day, setting it to rise for 6-8 hours and cook fragrant yeast-free bread in the evening, than to add a lot of sourdough, and after 2 hours send the dough to bake.
2. Be careful with salt. Add it gradually. At the same time, knead the dough well and constantly taste it. You can always add salt, but with salted dough there is much more trouble.
3. Consider the fact that the dough will increase in size by 2 or 2.5 times. Therefore, take suitable dishes so that it does not "run away".
4. After you take the finished yeast-free bread out of the oven, cover it with a damp towel and let it cool. If this is not done, then the crust of the bread will turn out to be hard, it will be poorly cut and crumble a lot. And if you cover with a damp towel, then the whole crust will be soft.
That, perhaps, is all. I presented my yeast-free bread recipe, which I hope many will like. I want to say that I have been preparing this bread for several months, I treat my friends and relatives to it. Once you try homemade yeast-free bread, you will no longer want to buy unleavened store baked goods. published
Cooking with love ! Bon Appetit!
Cooking Ingredients
In order to bake delicious homemade bread, we need:
- Whole grain flour - 100 g.
- Rye or wheat flour of the 2nd grade - 100 g.
- Mature sourdough - 30 g.
- Water - 1 glass.
The secret to a good dough is any coarse flour: whole grain, coarse, with bran or germ. For sourdough bread to be successful in the oven, it is important to avoid premium wheat flour, which is emasculated.
How to cook brew?
So, the flour should not be emasculated. It is better if half of the total amount is of one variety, and the rest is of another. Housewives can combine different combinations, the quality of bread will not suffer from this. First, beat the ripe sourdough into a fluffy foam, then add the flour and mix everything thoroughly. It is necessary to withstand a sufficient amount of time for the mass to rise well. So, if you plan to bake in the morning, leave the dough in a warm place overnight. For evening cooking, you can make a batch, leaving for work in the morning. The complete approach of the dough is influenced by temperature factors, as well as the grade of flour.

Aging time for quality dough
In order for the bread to rise faster, the housewives put the pan with the dough in a warm place on a slightly heated oven or in an oven that maintains a temperature of no more than 32 degrees. Under such conditions, the bread fully rises in 6-8 hours. When it is not possible to withstand such a temperature regime and the dough reaches a temperature of 22 degrees, its full maturation will pass in 9 hours. If you adapt to compliance with the given conditions, then delicious sourdough rye bread in the oven is easy to cook.
What should be the volume of the resulting mass in the first stage?
Few novice bakers know how many times the initial volume of dough increases. The dough should rise exactly 2 times. If at first it is difficult to navigate purely visually, you can adopt a container with measured marks. In the future, everything will go intuitively. If the process seems complicated enough, you can try baking sourdough bread in the oven without dough.
Dough kneading
This is the second stage of the whole process. So, to make sourdough bread in the oven, we proceed to direct kneading. We take the following ingredients:
- Ready steam.
- Water in the amount of 1 glass.
- Bread flour - 450 g.
- Dry yeast - 0.5 teaspoon.
- Salt - 2 teaspoons.
First parting
Many bread makers have a bowl covered with a plastic lid. Therefore, for pre-fermentation, you can leave the dough right there. The time of the first parting is 50 minutes, during which the mass rises well. With the naked eye, swelling of the base and an increase in size are noticeable. After the required time has been maintained, you can proceed to the next stage of kneading, already using salt and vegetable oil. To properly cook sourdough bread in the oven, the recipe of which is given here, you need to knead the salt until completely absorbed, and only then pour in 2 tbsp. tablespoons of oil. The dough will be ready when it completely moves away from the walls and bottom of the bowl. The resulting bread mass looks quite impressive thanks to whole wheat flour or flour with bran.
The final proofing stage
But that's not all. The resulting mass needs to lie down a little more before going to bake. Now you practically know how to cook sourdough bread in the oven, there are very few manipulations left. And if at first it may seem that this process is quite laborious and time-consuming, then it is not. Having stuffed your hand, in the future you can bring the kneading of the dough to automatism. So, our bread mass needs another 20-30 minutes of rest, during which you can drink a cup of coffee, check the lessons of the children or view the latest news. The process of loaf formation will be carried out on a smooth surface, lightly powdered with flour, using a special scraper. For the final stage of proofing, a bowl or salad bowl covered with a layer of parchment paper is suitable.

Inventing a proofing cabinet
In the conditions of the kitchen of an ordinary apartment, any dark enclosed space can be adapted for the last proofing. A microwave oven is good, you just need to put a glass of boiling water inside. Sourdough bread in the oven detailed description which you have carefully studied, will not turn out well baked if you do not make cuts in random order on the surface. But first, the future loaf is lightly sprinkled with flour. Experienced bakers use proofing under the film. However, if the hostess takes up baking bread for the first time, it is better not to experiment.
We send the loaf to the preheated oven
From the moment the cuts are made, the bread must be sent to an oven heated to 300 degrees. We will immediately lower the temperature to 220 degrees. Of course, the oven must be turned on in advance. The baking container must have a lid. The workpiece itself is transferred there directly with the paper. To make rich, rather than dry, sourdough bread in the oven, the recipe recommends sprinkling the mass before closing the lid several times with water. To do this, you can use a spray gun. Baking time with lid is 15 minutes. Then the lid is removed and left in the oven until fully cooked.
Concern for healthy eating and showing love for the family
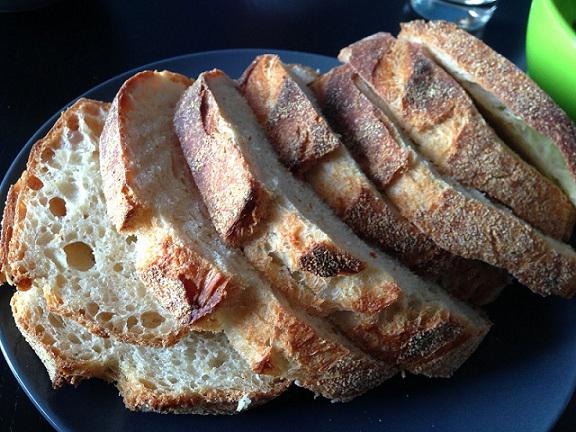
No scent compares to the smell of freshly baked homemade bread. Households will be sure of absolute love his mother and wife. Everyone who inhales the unsurpassed smell will be intoxicated by it. And when it comes to cutting the handsome loaf, an elastic crumb with large pores will be born. The taste qualities of the resulting culinary masterpiece are so excellent that the family will ask their hostess to bake homemade bread again and again. After such an ideal taste, not only a gourmet, but also a completely undemanding person will not want to return to the store version. Such delicious bread is worth learning how to bake.
The question arises: “Will the strong half of humanity manage to please their family at least at their leisure with a delicious fragrant bread?” Yes, men are great cooks, but usually they don't like to mess with the dough, considering this process rather tedious. We believe that sourdough bread in the oven, the recipe of which is presented in this article, will become branded specifically for housewives.
Alternative baking method
Now the reader is aware of how to bake sourdough bread in the oven, the recipe with the photo has been studied. By itself, a logical question emerges: “Are there alternative ways of baking?” Skilful bakers, honing their skills, experimenting, are in search of the best options to create this indispensable component on the table. So, many craftswomen adapted for this business a round deep Chinese frying pan with a convex bottom, called a wok. However, traditional, albeit more time-consuming, is baking in an oven on a stone. This method is akin to what our ancestors used when sending bread to
The sourdough matures for several days, but we do it once. Then just feed it and keep it in the refrigerator until the next baking.
Leaven:
A glass of rye flour and about half a glass of warm water. The dough should have a consistency similar to pancake batter. You can (but not necessarily) add a pinch of dry yeast to speed up the process.
We put in a warm place, cover, but leave a slit so that the sourdough can breathe. Mix once or twice a day. After a few days, the sourdough starter should smell sour and bubble, the dough becoming thinner.
Then you can feed the starter for the first time. If it is stratified, then just mix it. Add about a glass of rye flour and half a glass of water (so that the consistency of the dough remains similar to dough for pancakes), mix and leave for a day in a warm place (preferably 25-26 degrees). It should be actively bubbling.
Now we prepare the dough.
This is also a slow process:
1. Take a glass of flour, half a glass of warm water, 100 g of sourdough. Cover, leaving a slit for air, set for 6-8 hours in a warm place.
2. Add a glass of flour, half a glass of warm water, mix, leave to walk for another 6-8 hours in a warm place
3. Add another glass of flour, half a glass of warm water, and set for another 3-4 hours in a warm place.
4. We separate 200 grams of the finished dough into another container and put it in the refrigerator - this is our sourdough for the future.
If you do not use the starter for a long time, feed it once a week with flour and water. For the next bread, repeat steps 1-4.
I bake very porous bread in a bread maker(I don't like thick bread):
To the remaining dough I add flour, warm water and 1 teaspoon of salt (I select the amount of flour and water by eye, about 2.5-3 cups of flour and half a glass of water). I add a handful of crumbly rye or wheat bran. I mix everything and pour it into the bread machine.
Bake like regular bread. If there is a mode for choosing a dark or light crust, then we set it to dark.
The same bread can be baked and in the oven, only it needs a form, because otherwise the dough will simply spread. If there is no form, then it is better to make denser bread:
For 500 g of cooked dough, we take a kilogram of rye flour, a teaspoon of salt, and about a glass of warm water to make a medium dough, approximately like for buns or pies.
We mix flour, salt, preliminary dough, and only then, slowly, add water. It is not necessary to knead for a long time, just make sure that all the components are mixed and there are no lumps.
We spread the finished dough on a baking sheet covered with baking paper sprinkled with flour, cover with a towel (you can sprinkle the dough on top with flour) and let it rise.
The oven must be heated to the maximum. Before baking, sprinkle the loaf with plenty of water; during the first ten minutes of baking, repeat this procedure several times, spraying not only on the bread itself, but also on the walls of the oven.
So - warming up at 250 degrees, starting baking at 220 degrees (15-20 minutes), then reduce the heat to 200 degrees and bake for about an hour. Readiness can be checked by sound: the crust hardens and, if you tap it with your fingernail, there should be a dull sound.
Take the loaf out of the oven and cool.
You can cut it after it has completely cooled.
What to do if the husband lives in two families Husband and wife live in two pockets
How to dissuade a wife who filed for divorce?
How to get rid of dependence on a woman?
Life without a man: how to learn to live alone?
What to do if the husband is a drug addict, and how to help him return to a normal life My husband is a drug addict wife's advice