An ISO is an archive file (you may also know it as a display image) of an optical disc. It covers all data files contained in a CD / DVD archive, or any other disk format. Many people love to save their favorite DVD as ISO files for backup on a computer. However, ISO is not supported by most players and video editing.
So you can convert ISO to AVI in order to play ISO files on a computer with Windows Media Player or edit ISO files with Adobe Premiere, Sony Vegas, Pinnacle Studio, etc. To do this, you need a tool that can read ISO files and convert ISO image files to AVI video files.
The best solution for converting ISO to AVI and AVI to ISO
Aimersoft Video Converter Ultimate
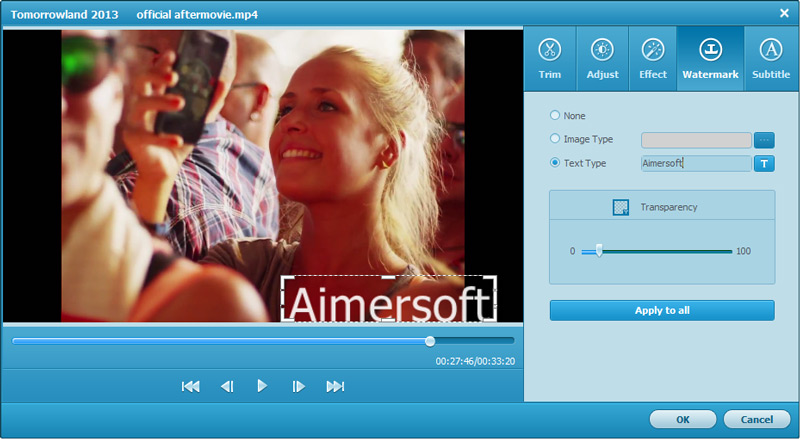
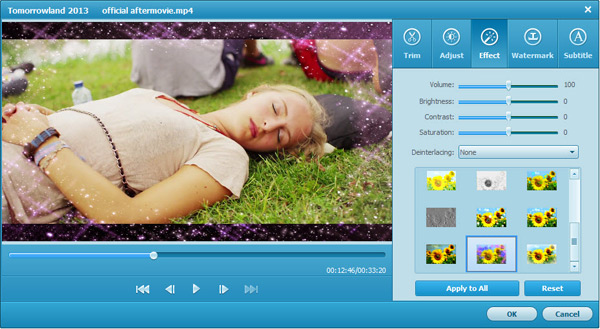
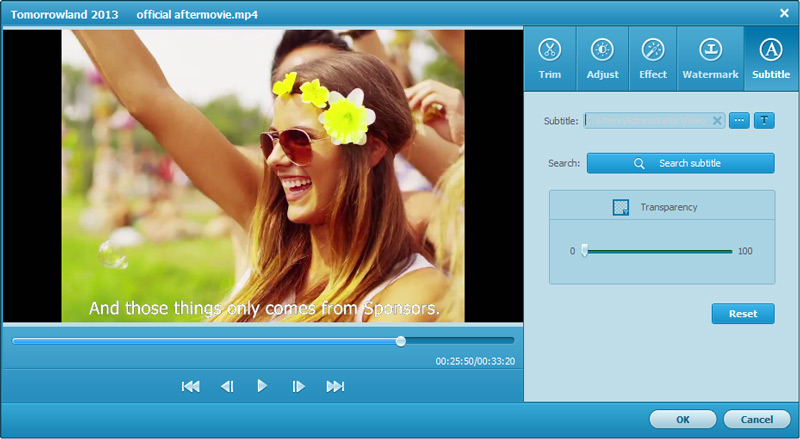
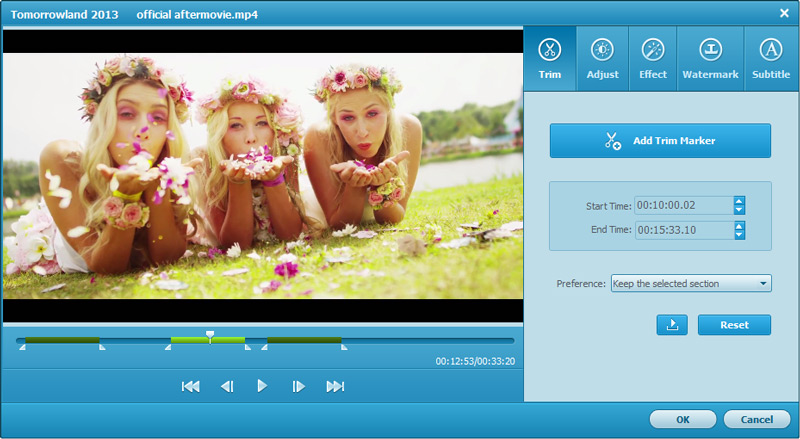
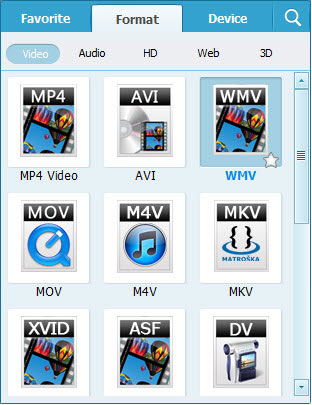
One of the best solutions available for people who want to convert their ISO files to AVI or AVI to ISO is Aimersoft Video Converter Ultimate. This is a professional DVD ripping software to convert ISO to AVI and all other popular video formats such as WMV, FLV, MOV, MKV, MP4, etc. It also allows you to edit the video as you like, for example, cropping, cropping, adding watermarks and subtitles, and so on.
To convert AVI to ISO, Aimersoft Video Converter Ultimate can also fulfill your needs. This AVI to ISO Converter is a multifunctional program that uses NTSC and PAL format options. You can also adjust the video aspect ratio (4: 3 or 16: 9). Burning videos to DVD is also on the offer list. In addition to this, it can also work as a video converter (converting video between different video formats), DVD / video editor, DVD ripper (rip DVD for video or audio files) and burning DVDs (burning video to DVD) .
What makes Aimersoft ISO to AVI Converter better than others
Why you should choose this ISO to AVI, AVI ISO Converter? What makes it better than other ISO file converter? The answer is here. Aimersoft Video Converter Ultimate comes with a number of different top of the line features, some of which have been highlighted below:
Support for 250+ weekend formats
It doesn’t matter which format you want to convert video files to, thanks to Aimersoft Video Converter Ultimate, you can easily do it! The program includes over 250 different input and output file formats that will allow you to convert your files quite easily.
Ready-made settings for 175+ devices
You do not have to worry about converting video for use on mobile devices. If you have to convert video from a computer so that they can be used later for mobile viewing, there are a number of different presets, such as iPod, iPad, iPhone, Zune, Windows Phone and even game consoles! Therefore, you should not dig into supported formats.
Editing Functions
Thanks to the listing of the various editing functions that are already available in the program, all you have to do before starting the conversion process is to check if your video needs any editing or not! If this happens, you can simply choose from a variety of different editing functions, such as cropping, trimming, or introducing new effects!
Download online video
One of the finest features of Aimersoft Video Converter Ultimate is that it allows you to watch and download videos over the Internet. Whether it’s YouTube, Daily Motion, or many other online streaming sites based on. You can simply drag and download videos for later viewing.
How to convert ISO to AVI and AVI to ISO format in 3 steps
- ISO to AVI
- AVI to ISO
In the manual below, we will take ISO to convert AVI to Windows (Windows 8 is included), for example. The equivalent Mac version is Aimersoft Video Converter Ultimate for Mac, which is compatible with Mac OS X 10.6, 10.7, 10.8 (Mountain Lion) and 10.9 (Mavericks). Just get the correct version according to the situation and follow the instructions in the manual below.
Step 2. Choose output format
From the "Output Format" drop-down list, you can select "AVI" as the output format. When you have selected the output format, you must select the folder for the output file by clicking the "Output Folder" button, you can also let it be one by default.
Step 3. Start converting ISO files to AVI
After all, they were prepared, just click the "Convert" button to start the conversion.

Step 2. Setting up the DVD menu
Select the Change template to select a DVD menu template and set the background music / images from the local hard drive (option).
Tips: If you want to change your AVI video, just click the “Edit” button on the menu bar or simply use the four buttons at the bottom of the file list to crop, add a watermark, connect subtitles or adjust video effects.

Step 3. Choose output format and proper folder
Select “ISO files” as the output files and select the correct folder to save the ISO files. Once everything is ready, just click the “Record” button to convert AVI to ISO. For your special needs, you can customize your TV Standard (NTSC or PAL), aspect ratio (4: 3 or 16: 9), Video quality (high, medium or low) and type of DVD disc (DVD5 or DVD9).
After the above three steps, you can easily get the avi converted to iso image files on your computer. To play back ISO files, you can use tools such as Daemon Tools or burn files to a CD or DVD.
Video tutorial on how to convert ISO to AVI in Windows (Windows 8)
4746782 people downloaded it.
AVI vs ISO
AVI is a video container that was created by Microsoft more than two decades ago, and has become a very popular container for SD video. An ISO file, on the other hand, is basically a disk image that includes all the contents of a disk. It can only be accessed through the disk installation tool.
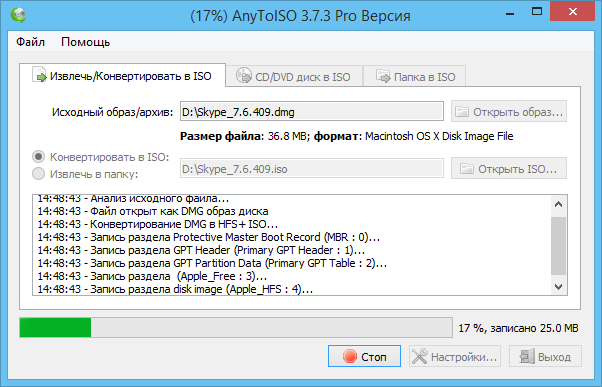
Have you downloaded the CD / DVD image or archive in an unknown format? Now there is no need to search and buy expensive commercial software that works with this format: one AnyToISO utility supports all formats, including 7Z, BIN, DAA, DEB, DMG, IMG, ISO, ISZ, MDF, NRG, PKG, RAR, TAR.GZ, TAR.BZ2, XAR, ZIP ... (A complete list is available in the "List of Supported Formats" section below).
List of supported formats
The following table lists the formats of all supported AnyToISO optical disk images and archives. A file of any of these formats can be extracted or converted to the ISO format.
| File Format (Extension) | Format description |
|---|---|
| Archive 7Z, a free archive format with a high degree of data compression. | |
| B5I, B6I | B5I / B6I is a disk image created in BlindWrite versions 5 and 6. |
| Bin | The BIN optical disk image is supported by Roxio Toast, NTI Dragon Burn, Roxio Easy Media Creator, Golden Hawk Technology CDRWin, Daemon Tools, IsoBuster, EZB Systems UltraISO. |
| Cdi | Optical disk image created in DiscJuggler. |
| CPIO CPGZ CPBZ2 | Linux archives and its variants with various compression algorithms applied. |
| DAA | Compressed proprietary image created in PowerISO. It supports compression and password protection with encryption, as well as images segmented into several files. |
| DEB | Archive used by Debian (Ubuntu) Linux, compressed format. |
| DMG | The disk image used by Apple macOS can use various compression and encryption algorithms. When converting this format to ISO, the final ISO image will contain the HFS + file system used by Apple. |
| GBI | Compressed proprietary image created in the program. It supports compression and password protection with encryption, as well as images segmented into several files. |
| IMG | An optical disk image created in the CloneCD program. With this extension, there can also be a FAT32 / FAT16 disk image that AnyToISO can also extract. |
| ISO | AnyToISO extracts ISO images using the following file systems: ISO9660 (including Joliet) Hfs +, UDF and Microsoft xbox. |
| ISZ | Closed-format optical disk image created in UltraISO. It supports compression and password protection with encryption, as well as images segmented into several files. |
| MDF | Closed-format optical disk image created in the Alcohol 120% program. |
| Nrg | NRG is a disc image created by Nero Software (Nero Burning ROM). AnyToISO can also extract audio tracks. WAV from NRG audio disc images. |
| PDI | Optical disc image created by InstantCopy (the Pinnacle Instant CD / DVD Suite software group). |
| PKG | MacOS installation package. |
| Rar | Proprietary archive format with a high compression ratio. AnyToISO also supports the latest version of the RAR5 format. |
| RPM | Installation archive used in various Linux distributions (RedHat / Madriva / Fedora / Suse and others). |
| TAR TAR.GZ GZIP TAR.BZ2 TGZ TBZ2 TAR.XZ | Linux TAR archive and its other variants, compressed with various algorithms. |
| UIF | Proprietary optical disc format used by MagicISO. Supports compression and password protection with encryption. |
| Xar | The XAR archive used by macOS since version 10.5. Used for installation packages. |
| ZIP | ZIP archive, the most popular archive format in the world. |
Need other format support? Contact us and we will do our best to add it.
Instruction manual
Special programs have been developed to convert the ISO image. One of them is Active ISO File Manager. Run the program on your computer. It has an intuitive user interface. As practice shows, this software is often found on the installation disks of the operating system.
In the upper part of the application that opens, specify the path to the ISO file in the special field by left-clicking on the button with three dots. Click on the Add button. Next, select the location of the file you want to convert. Immediately after selecting an image, the program prompts you to burn it to disk. To do this, select the drive, recording speed and press the BURN ISO button. You can also add files using the transfer method, that is, in the program field, transfer the files that you want to write.
To convert the contents of an ISO file to a regular folder on the hard drive, specify the path for unpacking in the third part of the program window by clicking on the button with three dots. After selecting the unpacking point, press the EXTRACT ISO button to start the process. You will need to wait a while until the program completely copies all the data. Time depends on the power of your computer.
In the lower part of the program window, you can create an ISO image from any number of files specified in the selected folder and in the list below. The image formation procedure will be visually presented in the form of an indicator - a gradually filling green bar.
If you put a standard set of files in the ISO image without installation components, then information in the form of simple files will be written to the disk, that is, in the future, you won’t be able to run this disk from the console. ISO images must be created for boot disks with test programs or the installation disk of the operating system.
Sources:
- how to translate from iso
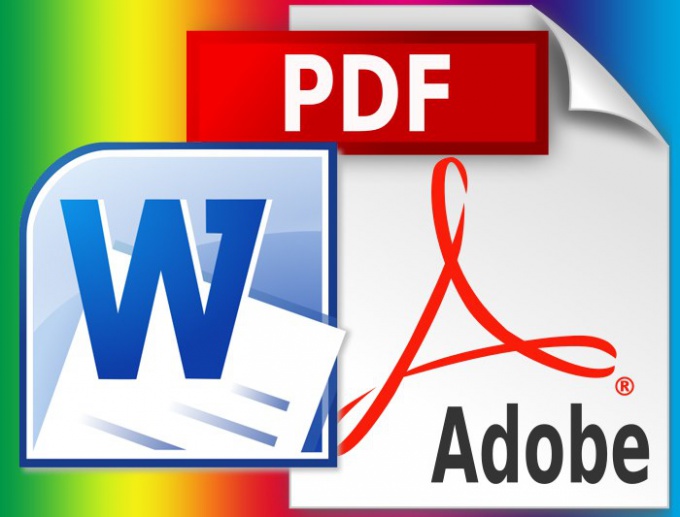
The pdf format is one of the most popular formats for saving documents. Unfortunately, it does not allow in the process of further work to “pull out” the necessary information from the document. If you often encounter this, then a program that allows you to convert a document in pdf format to a document in word (doc) format, a format convenient for editing text, will be very useful for you. One such ABBYY PDF Transformer helper program.
You will need
- ABBYY PDF Transformer is a simple program that successfully converts PDF files into popular, easy-to-edit Microsoft Word, Excel, HTML and TXT formats.
- In order to transform a document in pdf format, you need to download and install ABBYY PDF Transformer on your computer into the document of the required format.
Instruction manual
note
The free demo version of the program allows you to process only 15 documents.
Helpful advice
If the source file contains pictures or tables, or other graphic images, its conversion can take quite a while. But, on the other hand, the result will be very good.
Sources:
- itua.info, Latest IT News
Form drive - This is a special type of archive that contains not only files, but also accurate information about their location on the disk. The most commonly used files for storing CD and DVD-ROM images are ISO files, since the file system also corresponds to the ISO 9660 system used on optical media. It is not necessary to transfer information to a disk to use an image from an ISO file — you can use the program -emulator, which makes the OS believe that this image is a real optical disk.

You will need
- Daemon Tools Lite
Instruction manual
Select one of the programs simulating CD / DVD-ROM drives. A lot of them can be found on the Internet. For example, it can be Alcohol 120%, Ultra ISO, PowerISO and others. The following is the sequence of actions when using the Daemon Tools program in the Lite version - it is free, has a Russian interface and features that are more than enough to run disk images.
Download, install and run the program, and then right-click its icon in the notification area of \u200b\u200bthe taskbar (in the "tray"). This will open the context menu in which you need to select the options for mounting the disk image.
Go to the "Virtual CD / DVD-ROM" section in the context menu and expand its only item ("Setting the number of drives"). Select the line “1 drive” in the list - emulating one optical disc reader is enough to work with one ISO-file. If necessary, this version can simultaneously simulate up to four drives and support four disk images.
Right-click the Daemon Tools tray icon again after the panel with the caption “Update virtual images” disappears from the screen. In the context menu, expand the “Virtual CD / DVD-ROM” section again and hover over the line that appears there, which begins with the words “Drive 0”. In the drop-down list of operations, click "Mount image" and the program will open a dialog box for searching and opening a file.
Find the desired ISO file and click the "Open" button. The program will mount the disk image contained in it into its virtual reader and after a few seconds it will be used by the operating system in the same way as a regular disk. In addition to the fact that the OS finds and activates the autorun program on this disk, it will be available in Windows Explorer as one of the external media.
note
You need to download the archive, unzip it and use it. How to work with the program I will tell below. After unpacking, locate the UltraISO.exe file and run it. You should see this window in front of you. In order to open a file in iso format, click: “File -\u003e Open” and select the file that you want to open. Congratulations, you did it, now you can copy the files that were stored in the iso file.
Helpful advice
Have you downloaded a lesson or course from the Internet and don’t know how to run an .ISO file? A special program is needed for the .ISO file, one of them is DAEMON TOOLS LITE, for personal use it is free (when you install, select “Free”).
Mdf is a format used to create an optical disc image. He is needed to make an exact lint without data loss. Later, the mdf format can be converted. How to do this?
Instruction manual
Rename the mdf file to iso. This is for simplicity and ease of use. You won’t be able to do this manually, so download and install on your personal computer applications designed to burn discs and work with their images. The most popular are Nero and Alcohol. After that, open the installed program and do the following.
Select all files with the mdf extension, hold down the left mouse button and drag them into the working field of the program. Then find the button "Convert to iso". Click her. The conversion time depends solely on the size of the files. As a rule, it does not exceed half an hour. The result is a file with the iso format, which you can use at your own discretion: copy the image to a laser disk, use the additional software to install information on your personal computer, etc.
Ask your friends for help. If for some reason you can’t convert the mdf file, ask for help from more experienced comrades in this matter. But this is an extreme case. Correctly install the necessary software on your personal computer, activate it in accordance with the terms of the license agreement, and convert images from one format to another. By and large, the mdf and iso formats are not so different.
Think about whether it makes sense to convert mdf? Images of the same disk in these two formats occupy the same volume on the hard disk, are used by the same applications, the only difference is that iso reads a little faster due to the fact that it is better structured. But again, this difference is not so significant.
Do not run too many files for conversion, this may lead to incorrect software operation, or the process will take too long. Convert groups of a maximum of 5-10 files, depending on the specifications of your personal computer.
Sources:
- how to convert mdf to iso in 2017
If you decide to change the Windows operating system to Mac OS and even uploaded a disk image, then you will encounter one problem. The fact is that the Mac OS image is made in dmg format, which is not supported by other operating systems. For recording dmg- file it will be necessary to convert it to iso format or use special software.

You will need
- - UltraISO;
- - TransMac.
Instruction manual
Search the Internet and download the UltraISO program. For example, you can use the link to the official source http://ultraiso.info/download. This application is designed to create, edit and convert various formats, including converting dmg files to iso.
Install and run the UltraISO program. Open the “File” menu and click on the “Open” link. Specify the path to the file in dmg format, which must be converted to iso format. Click on the “File Type” pop-up menu and check Mac (* .dmg, * .timg, * .hfs) so that files with the desired extension are displayed in the folder. Confirm the opening of the image.
Right-click on the loaded dmg-file and click the “Extract to” button. Specify the path to save the file in iso format. After that, you can freely burn a disc image using standard operating system programs or other applications.
Use the TransMac program, which is designed to work directly in dmg files under the Windows operating system. You can download the application at http://www.asy.com/sharetm.htm or at another alternative source. The program is paid, but has a trial for 15 days. This is quite enough to write a dmg file once, so you should not immediately spend money on its activation.
Launch the TransMac program and open the Tools - Burn CD / DVD Image command. Indicate the drive for recording, recording speed, as well as a link to the dmg-file with the image. Click OK. If the program prompts you to unzip the file, then agree and specify the storage location. After that, try recording again with the new path. After that, the dmg-image for Windows will be written to the disk. It is worth noting that the image of Mac OS is quite voluminous, so prepare a two-layer DVD disc in advance.
Related videos
The ico extension is an icon storage format in Microsoft Windows. This format also supports saving images with the extension JPEG and PNG.
The popularity of Windows has made it important to create iso files.

Using ico format
All the icons of various applications in the Windows system, regardless of version, have the extension ICO (icon). In addition, this format is also used for favicons, website icons, which are visible in the address bar of the browser immediately before the URL or in the search results. When creating your own graphics in the form of icons, cursors, icons or using ready-made graphic elements as such, there is a need to save in ico format.
Icons (icons) - raster images of a square format and certain standard sizes.
Ways to create an ico file
1. Using specialized programs or online services to create icons. Of the most famous and popular programs, IcoFX can be distinguished. This small-sized application has good functionality for editing and drawing icons from scratch and saving in icon format (ico).
2. The use of Photoshop (photoshop). The program itself does not have the ability to save files in ico. However, there are third-party plugins that allow you to save graphics in this format, as well as convert ico files with other extensions: png, jpeg, etc.
The plugin is designed to expand the capabilities of the program or the possibility of its use in general.
3. Using online converters to change the graphic file extension to ico format. There are a lot of such resources with similar functionality and capabilities on the network.
The ico extension in Adobe Photoshop
Of greatest interest is the creation of graphics with the extension ico in the Photoshop program. This Adobe software has rich capabilities and does not limit the imagination in creating your own graphics. Therefore, it is worth learning how to do it.
Depending on the version of Photoshop and the system installed on the PC (32 or 64 bits), you need to install the ICOFormat plugin. To do this, it must be placed in the directory with the plugins. This is usually: C: \\ Program Files \\ Adobe \\ Adobe Photoshop CS5 \\ Plug-ins \\ File Formats. Then run photoshop. Next, if you want to save the graphics in ico format, you need to click the menu item "File" and Save as (save as). In the drop-down list, select the ico format. It should be noted that the maximum size of the saved image cannot exceed 256x256 pixels.
Using the various methods described, you can convert almost any graphic image into an ico file or create a graphic in this format from scratch.
The PDF format (Portable Document Format), was developed by Adobe Systems and three years ago was its property. This meant that other companies did not have the right to distribute their software products with the included editing tools for documents of this format without buying the appropriate rights from Adobe Systems. However, since mid-2008, PDF has become an open standard, which has significantly increased the choice of ways to convert documents into this format.
You will need
- Microsoft Office Word 2007/2010 word processor or Internet access.
Instruction manual
Use, for example, a Microsoft Office Word word processor to convert native to it files with extension doc to pdf format. The last two versions of this application (Word 2007 and 2010) have already been released with built-in functions for saving documents in this standard - now it complies not only with the internal Adobe standard, but also with the international ISO 32000.
Launch Word and load the document you want to convert into it. To open the file open dialog in this application, you can use the keyboard shortcut Ctrl + O or the "Open" item in the Word main menu. This menu in Word 2007 is opened by clicking on the large round button in the upper left corner of the window, and in Word 2010 instead of it, a blue button with the word “File” has the same purpose in approximately the same place. Using the launched dialog, find the desired doc-file, select it and click the "Open" button.
Save the downloaded document in pdf format. To do this, re-open the main menu of the word processor and select "Save As". In the “File name” field, you can change the original file name, if necessary. Expand the "File Type" drop-down list and select the line with the text PDF (*. Pdf). As a result, another section is added to the dialog where you can choose one of two options for optimizing the document - this is about the same as choosing the quality when saving the image. By clicking on the “Options” button in the additional section, a wider set of settings for the saved document opens. When everything is set up, click OK and the document will be saved in pdf format.
If you don’t have the opportunity to use Word versions with support for this format, you can convert via scripts of some online. The most common applications for opening or emulating dmg images are UltraISO, Daemon Tools, Alcohol 120%, Nero Image Drive, Xilisoft ISO Burner . In addition, you can convert dmg to iso format using utilities such as AnyToISO, DMG2IMG and some others.
How to work with dmg files using UltraISO
Launch the program and in its main window use the menu “File” - “Open”. Or apply a hotkey combination (Ctrl + O). In the "Open ISO File" dialog box that appears, use Explorer to locate the folder with the desired document. Double click on its name and the contents of the image will open in the program window. Now you can work with it in the same way as with any other folders located on the hard drive.To extract all files from an image uploaded to UltraISO, you need to click on the “Actions” button and select “Extract” from the drop-down menu. Indicate the folder where you want to save the files and confirm the selection with the OK button. In this case, you can select an existing folder or create a new one. If you need to extract a separate file, right-click on it and select "Extract to ..." from the context menu. Specify the destination folder.
To convert the dmg file to other formats, click on the "Tools" button. From the menu that opens, select the "Convert" item. Indicate the program image in dmg format and the folder where you want to save the resulting file. Choose the format you want to convert the document to and click "Convert". After a few minutes, you will receive a disk image in the desired format. The file can be converted into the formats iso, isz (compressed iso), bin / gue (Bin), nrg (Nero), mdf / mds (Alcohol), img / ccd / sub (CloneCD).
After converting to iso, you can mount the resulting image by going to the "Tools" tab and selecting "Mount to virtual drive"
Converters
AnyToISOVery easy to use, the utility has several obvious advantages: all data, including boot sectors, will be saved during conversion. The program works with various formats: mdf, bin, nrg, deb, dmg, img and many others. But there are drawbacks - when working in Windows 7, the application does not understand the Cyrillic alphabet in the names of files and folders.
Even the most inexperienced user can use the application. You only need to specify the location of the source and converted files in the dialog box and wait for the process to complete.
DMG2IMG
Dmg files have a block structure, and compression and encryption are often used inside them. This makes it difficult to convert them to other formats. Unlike many converters, the DMG2IMG application does an excellent job and does not fail.
The utility works from the command line. Using it is quite simple. In the menu “Start” - “Run” you need to type “cmd” without quotes and write the name of the program and the path to the source and output file. Everything else will be done automatically. The DMG2ISO converter developed by the same author works in a similar way.
You just have to burn the resulting image to a CD using applications such as UltraISO, Nero Burning Rom. And also mount the image in a virtual drive. For this, the programs Alcohol 120%, Nero Image Drive, Daemon Tools and others can be applied.
Using Daemon Tools
A small but versatile utility for working with disk images. Supports many different formats. Integrates into the explorer context menu. The application can be used as a virtual drive. If Daemon Tools is installed on the computer, then to emulate a disk image in dmg format, you need to right-click on it and select “Mount” in the menu that appears.Transmac
The utility has wide functionality and will be useful to users on the computer with both operating systems installed. The program integrates into the Explorer context menu and supports the ability to read / write compressed disk images-dmg. In addition to reading data from Mac’s drives, it is possible, while in Windows, to work with HFS and HFS + disks (copy, move, delete and rename files and folders), search, create images, write them, and much more.Instruction manual
If you only need to access the contents of the disk image in mdf format in the absence of an application that is designed to work with files of this extension, then simply changing its extension will be enough. You can perform this operation in the same way as renaming a file of any other format. In Windows, for this you need to launch Explorer - press the key combination Win + E, or double-click the shortcut "Computer" on the desktop.
Go to the folder containing the desired mdf file using the directory tree on the left side of the file manager interface. If Explorer displays only file names, hiding their extensions, then change the appropriate setting. To do this, in Windows 7, first open the "Arrange" drop-down list located above the directory tree and select the "Folder and search options" line. Then go to the “View” tab and in the “Advanced Settings” list, find the line “Hide extensions for registered file types”. Uncheck this line and click OK.
Right-click the mdf file and select the “Rename” line in the context menu. Then click the End button to move the input cursor to the extension, and replace it with iso. Press Enter and this completes the process of renaming mdf to iso. Access to the contents of the renamed disk image can be obtained, for example, using the popular WinRAR archiver. However, keep in mind that you cannot use the resulting iso-file as a disk image, but only as a regular archive.
If you need not only to change the extension of the mdf file, but to transcode its contents into the iso format while preserving all the information of the original optical disk, then you will need the appropriate application. This can be done, for example, using the UltraISO program or the specialized utility MDF2ISO. After installing the application, find and activate the corresponding option in its interface. This procedure, as a rule, requires a considerable amount of time (up to an hour), since this first involves extracting the disk image from the mdf and mds files, and then packing it into an iso file. But the result is a full-fledged image of the original media, which can be used both for recording on media and for mounting a virtual optical disk.
Related videos
Sources:
- how to rename files by
Mdf is a format used to create an optical disc image. He is needed to make an exact lint without data loss. Later, the mdf format can be converted. How to do this?
Instruction manual
Rename the mdf file to iso. This is for simplicity and ease of use. You won’t be able to do this manually, so download and install on your personal computer applications designed to burn discs and work with their images. The most popular are Nero and Alcohol. After that, open the installed program and do the following.
Select all files with the mdf extension, hold down the left mouse button and drag them into the working field of the program. Then find the button "Convert to iso". Click her. The conversion time depends solely on the size of the files. As a rule, it does not exceed half an hour. The result is a file with the iso format, which you can use at your own discretion: copy the image to a laser disk, use the additional software to install information on your personal computer, etc.
Ask your friends for help. If for some reason you can’t convert the mdf file, ask for help from more experienced comrades in this matter. But this is an extreme case. Correctly install the necessary software on your personal computer, activate it in accordance with the terms of the license agreement, and convert images from one format to another. By and large, the mdf and iso formats are not so different.
Think about whether it makes sense to convert mdf? Images of the same disk in these two formats occupy the same volume on the hard disk, are used by the same applications, the only difference is that iso reads a little faster due to the fact that it is better structured. But again, this difference is not so significant.
Do not run too many files for conversion, this may lead to incorrect software operation, or the process will take too long. Convert groups of a maximum of 5-10 files, depending on the specifications of your personal computer.
Sources:
- how to convert mdf to iso in 2017
Format file in most cases, it is determined by its extension, that is, by that part of the name that is to the right of the last point. The extension is used by the components of the operating system and application programs to identify file types and formats of the data recorded in them. If for some reason you need to rename this part of the name file, then you can do this in the standard Windows Explorer.

Instruction manual
Launch Explorer by pressing the key combination WIN + E (Russian letter U), or by double-clicking the “My Computer” shortcut on the desktop. The default Windows settings prevent Explorer from showing file extensions. If you have already changed these settings, then proceed to the next step. If you see only file names without extensions, then in the Explorer menu open the "Tools" section and select the "Folder Options ..." line in it. On the “View” tab of the window that you open in this way, there is a list of “Advanced options” with the line “Hide extensions for registered file types”. Uncheck the box for this setting. If the file you need is a system file, uncheck the box next to "Hide protected system files", and vice versa, in the line "Show hidden files and folders", check the box. Click “OK” to commit the settings.
Go to the folder containing the file whose extension you want to change and right-click it. In the context menu, select the Rename command and replace the extension with the designation of the format you need. Explorer will require confirmation of the operation - click the "Yes" button.
If Explorer displays an error message, then perhaps this file has protection against any changes. To find out, right-click it and select "Properties". In the properties window on the General tab, there should be a label next to the Read Only attribute - uncheck it. Click “OK” and repeat the renaming operation. Another reason for the inability to change the name file maybe some of the programs work with him at that moment. If this is an application program, then just close it and repeat the operation. And if the file is used by any component of the operating system, then you can try renaming it by rebooting the computer in safe mode. If this proves impossible, then you can use a boot disk and some file manager.
Related videos
Sources:
- how to rename a file in windows 7
There are 2 similar terms in computer topics: format file and type of file. Some personal computer users do not see the difference between these concepts, in addition, they can add the concept of extension to the previous terms filecollecting everything in a heap. When working with operating systems of the Windows line, it is possible to rename only the extension file, and the format file can only be changed by converting it.

You will need
- Windows operating system
Instruction manual
If you look in the "Explorer", you can make sure that you can not change the extension file. To change the extension file you need to enable the display of letters after the period in the name file. This option can be activated in the "Explorer" folder settings. Open any folder or “My Computer” by double-clicking on the item with the left mouse button. Click the top menu "Tools", in the list that opens, select "Folder Options."
In the window that opens, go to the "View" tab and select "Hide extensions for registered users in the" Advanced settings "section type offiles ". Uncheck this item, you can also uncheck the next item "Hide extensions for registered type offiles ”, if the file whose extension you want to change has the attributes“ Hidden ”or“ System ”. Then click the “Apply” and “OK” buttons.
Now you just have to go to the folder that contains the file to be changed and rename its extension. You can rename an extension in several ways:
- right-click on the file and select "Rename";
- double click on the name file;
- select the file and press the F2 key.
After performing any of the above actions, you can change the extension file. As soon as you do this, do not forget to press the Enter key or left-click on a free field of a folder or desktop. You will see a dialog box asking you to confirm the extension change, click the "Yes" button if you are sure, or click the "No" button if you did something wrong.
If an error or inability to perform the requested action appears on the screen, then the structure file closed for change or file active read-only attributes. Right-click on your file and select "Properties". In the "Attributes" block, uncheck the "Read only" item and click the "Apply" and "OK" buttons.
Sources:
- how to rename file extension
In an organization, there are situations when you need to change position employee. This can happen, for example, due to an initially incorrect wording or for other reasons. Here, immediately before the cadre workers, the question arises: how to make out this change?

Instruction manual
According to the Labor Code, Article 72 of Chapter 12, any changes to the labor contract are made only with the consent of the employee, moreover, in writing. But this regulatory document does not prescribe a change in position, but interprets that it is necessary to complete such an operation as a transfer to another position.
After the agreement is received from the employee, the manager draws up an order to change the position and make this information in the staffing table. The content of the order should be something like this: “I order from (indicate the date) to make changes to the staff list No. ... from (date) - replace (indicate position) on (register a new one). ” If it is necessary to increase or decrease the salary, then this is also prescribed in the order.
Then the staffing table changes, where all the changes are indicated. It is signed by the head of the personnel department and chief accountant.
Next, the entry is made in the workbook: “Translated to position (indicate which one). ” In practice, they also use the following abbreviation: “Position ... renamed position... " But how legitimate this record is is unknown. In order to avoid problems with the labor inspection, it is better to document these changes according to the first option.
After that, do not forget to draw up an additional agreement to the employee’s employment contract, where it is necessary to indicate at which point the changes have occurred and which ones. If the change of position has led to an increase or decrease in salary, then this should also be prescribed in an additional agreement. This document is compiled in duplicate and signed by both parties.
If the employee does not agree with the change of position, the manager should offer all possible solutions to this problem. In the end, find a compromise.
Unlike conventional archives, disk images contain not only data files, but also information about their location on the source medium. This allows specialized programs to accurately simulate the operation of the original optical disc. There are more than a dozen formatsthat specify the order in which the disk image is recorded. Some of them use two separate files to store the source data and information about their placement on the disk. These include the mds / mdf format developed by Alcohol Soft.

Instruction manual
If the operating system does not recognize files of this type, then it has not yet installed an application for working with this format. Select one of the programs commonly called “emulators” to install on your computer. The most logical way is to use programs from the same company that worked on it to work with mds / mdf files. Emulators Alcohol 120% and Alcohol 52% can be downloaded from the manufacturer's website (http://alcohol-soft.com). However, both of them are not free, while other companies and private authors distribute some of their own versions of emulators without requiring anything in return. For example, you can download the free Daemon Tools Lite application (http://daemon-tools.cc/eng/products/dtLite) from the DT Soft website.
After selecting and installing the program, it will be possible to run files with the mds and mdf extension just like any others - for example, by double-clicking the left mouse button. If you use Windows, as an alternative way to mount a disk image, select the desired file in the Explorer window and click on the "Open" button in its menu. Another option: right-click the object, in the context menu open the “Open with” section and select the name of the installed program from the list. The application will write all the information necessary for using these functions to the system registry during installation without your participation.
You can do without the file manager of your operating system, only the window of the installed emulator itself. To do this, run the program using its shortcut on the desktop or an item in the main menu of the OS. Then select the option to mount the disk image from the menu. For example, in the Daemon Tools Lite emulator, for this you need to either double-click the line in the list of recently opened images, or click the “Add Image” icon. As a result, a window opens in which you need to find and select the mdf-file, and then click the "Open" button. The program will do the rest itself - one more device will be added to the list of optical disk readers that simulates the disk from which the image file was copied.
Second way
Select the desired file. Right-click on the file and select “Properties”. Find the line where the file extension (format) is written. Enter in this line a new file name, as well as the original or new format. Click “Apply” and then OK.
You can find the necessary file from the search bar in the Start menu. To do this, enter the first letters of the name of the file you are looking for in the search bar and press Enter. A list of found files with a similar name will appear. From them you must select the file that you want to rename.
For convenience, the interface language should be changed to the language in which the file will be named, before clicking on the “Rename” item.
It is not necessary to change the file format without the need, as this may cause the file to not open. When using the second renaming method, the file extension may be automatically erased from the line. In this case, you must enter the extension again. Unlike Windows 8, in Windows 7, the file extension must be registered in the file properties. The extension is written in Latin letters after the file name through the dot without spaces. A file without an extension cannot be opened.
After changing the name, the file moves up or down in the folder. To find the file and check the correctness of the entered name, scroll through the contents of the folder and find the highlighted file. This is the file that has just been renamed.
Additional way for graphic and text files
In addition to the described methods, text and graphic documents can be saved under a different name from a text or image editor. To do this, open the file in the editor. If this image is in a graphics editor such as Gimp, Photoshop or Paint. If it is a text document, then in a text document, for example, Word, WordPad, LibreOffice or Notepad.
Then click on the icon located in the upper left corner of the editor. This icon can be called a “File” or just be an icon. Select "Save As" from the drop-down list of actions. If you simply select “Save,” the file will be saved with the same name. In the line that appears, delete the file name and enter a new name. Select the format under which to save the file.
Press Enter. If an additional window appears, also press Enter. This will create a copy of the file with a new name. If the file with the old name is no longer needed, you can delete it.
Related videos
Pinosol spray: instruction
Analgin tablets: instructions, reviews, analogues Terms and conditions of storage of Analgin
Ginipral - description of the drug, instructions for use, reviews
Topical solution tantum verde
Chophytol and side effects