Today we will talk how to equip a water supply in a private house. I have a considerable experience in this business, ready to tell how to make a project, pick up materials and mount the system quickly and efficiently without help. With these knowledge, almost any master will cope with the task!

Description of the workflow
We share work on 3 parts:
- Calculations and acquisition of materials;
- Laying the external part of the system;
- Laying the inside of the system.
Calculations, Design and Purchase of Materials
Water can be supplied in three ways:
- Water fence from well. Most often, this option is found in rural areas. In this case, the house has a pumping station, which shakes water to the house. The scheme of such a system indicating all components is shown below;

- Water fence from well. The pump shakes water directly from the water source, so there is no extraneous noise in the house, and the system itself consists of simple components that are in every plumbing store;

- Connect to central water supply. This is the most preferred option, but the water supply is not far from each settlement, especially when it comes to countryside. If you are lucky and you can connect to the central system, then your scheme will look something like that in the figure below.

Now we will analyze the features of the preparation of the water supply scheme of the private house with their own hands. There is no universal option, you must decide in advance where water consumers will be located and, based on this, make an exemplary sketch.

Necessary materials:
| Illustration | Description |
 |
Pump. We are needed if the water fence is carried out from a well or well. Its configuration depends on the system and is selected separately in each case. |
 |
Pipe PND (low pressure polyethylene).Used to lay out the external part of the communications.
|
 |
PND pipe fittings. Accurate number and configuration of components are determined by the project. As an example, use the schemes that are presented above, it is shown in detail where those or other fittings are used. |
 |
Polypropylene tube. Use the reinforced version (in the photo is shown how to define it on the eye), it is suitable for communications with cold and hot water. The optimal diameter is 20 mm, it is enough even with a large amount of water consumption. The amount is considered through the length of all pipelines in the house. |
 |
Distribution manifold. We are needed to maintain the same pressure on all system lines. A sequential connection without a comb (so also called the collector) is allowed in small houses, where no more than 3 people constantly live. |
 |
Fittings for polypropylene pipes.Calculated by the project of the system. Each turn, branch and connection is fitting, so in each house the range and quantities are different. |
 |
FastenersFor fixing pipes, special clips are used, which can be connected to each other if you need to lead several highways. The mounting of elements to the wall is made by dowels or self-drawing, it all depends on the type of surface. |
Now we will deal with the tool that is necessary when working with your own hands:
- Machine for welding polypropylene pipes. In common, he is called a soldering iron. This is the main tool with which the installation of water supply in the house is carried out, the price of the easiest options is about 1,500 rubles;

- Scissors for pipes. Special device that allows you to cut plastic pipes under an ideal direct angle. With it, you can cut the elements with a diameter of up to 63 mm;

- Acute knife. Sometimes burgers come on the ends. To cut them down, keep any knife at hand.
- Composition for degreasing pipes. Solutions on an alcohol basis are sold with which the ends of the elements are processed before the connection. Also on sale you can find special wet wipes for these purposes.

System Outdoor Laying
This part of the work consists of the following steps:
| Illustration | Stage description |
 |
Rolled trench. It can go to the well, well or tube of centralized water supply. The depth should be below the soil freezing point in your region. If it is impossible to proceed on the desired depth, then you need to lay the pipe in a special. |
 |
If you have a well, then the pipe is connected to the pump. It is done simply and quickly with a special fitting. Power cable is attached to the pipe with plastic clamps. |
 |
If you have a well, then a fence pipe is put. It is fastened through the knee, on the end there is a mesh filter to protect the system from sand and other impurities. |
 |
Box in the central water supply is performed using a coupling. It is put on the pipe, after which the hole is drilled and the crane is screwed. No welding is needed. |
 |
The pipe stacked in the trench.Here everything is simple - the main thing is gently putting the communications and bring them to the house. Make sure the lengths are enough. |
 |
Pipe is displayed in the house.Before you start it under the foundation, I advise you to insulate the part of the structure that goes up, since it is that the water input to the house freezes at low temperatures. |
 |
Mounted input to the house.A swivel coupling is put, the crane is attached behind it. Next comes a strainer with a sump and a water meter (if you have a centralized option), followed by a splitter for hot and cold water. If water supply from a well or well, then the counter and the splitter is not needed, the pressure gauge is located in their place. |
Laying system in the house
The wiring of the water supply in a private house is performed as follows:
| Illustration | Stage description |
 |
Preparation of soldering iron. To do this, the instrument first put nozzles of size you need, after which it is located on a flat surface or fixed on the tabletop if the clamp is provided in the design. Includes instructions, be sure to read it to know the heating time and other rules for the operation of the equipment. |
 |
Pipe cuts into pieces of the desired size. Initially, measurements are made, after which the pipes are placed. You need to cut carefully, keeping the tool strictly perpendicularly. After cutting, check the ends if there are burrs there, then gently cut them down with a knife. |
 |
Ends of pipes and fittings are degreased. To do this, use a rag moistened in a special composition or wet alcohol napkin. It is important to carefully process the connected areas. |
 |
On the parts connected items are made labels of the depth of welding. Tags are set at a distance of 16 mm from the edge. Before making them wait for the surface dried after degreasing. Do not miss this nuance to make a reliable water supply in the house you need to carefully comply with technology. |
 |
Elements are put on the nozzle and heated. It is necessary to do it on a completely preheated soldering iron (when the red light goes out). As for the heating time, if there is no indicator on the tool, the details must be kept 7-8 seconds and immediately remove. |
 |
Elements are connected. The pipe is inserted into the fitting, tightly compressed and keeps in this position for a few seconds. In no case do not turn the pipe, the reliability of the connection will decrease. By collecting water pipes with your own hands, look at the connections, it should be obtained by rollers from polypropylene as in the photo, this is a sign of high-quality spike. |
 |
Each branch is done separately.The water supply system assembly is made strictly according to the scheme. It is important to gently connect each joint to ensure the reliability of the water supply. |
 |
Clips are attached.The pipe is neatly shifted aside, after which the fastener is installed along its location. You can put fasteners and in advance. Often communication on the supply of water in a private house are hiding in, in this case, the shoes are made in advance. |
Water in the house is paired in 2-3 days. Works are simple and you save huge funds, because installation most often costs almost as much as materials.

Output
Using an article as an instruction, you can draw up a project, purchase materials and pave the water supply in the house. The video in this article will help to deal with the topic even better, and if something is unclear - ask your questions in the comments.
Each dachanik, especially accustomed to comfort, is aware of the importance of water supply in the house outside. It is difficult to imagine without it worthy of the territory near the estate, and the use of household appliances becomes impossible. Build a plumbing in the country with your own hands for each owner of the country manor!
How the autonomous water supply is arranged
Installation of the water supply system ideally is considered in the process of creating a house project. At this stage, a clear plan of action is drawn up, the diagram of the pipeline and mechanisms is drawn. Previously, the estimate must be calculated, the purchase of the necessary material and equipment is made. It is best that for the installation of the boiler-water-based node, a separate, small room on the first floor of the house, with an area of \u200b\u200b2-3 m 2 was allocated. If you set the input node and technical devices that way, then during operation it will be convenient for you to adjust the water supply and, if necessary, repair the system.

So, the water supply system consists of such units:
- Pipeline complete with shut-off reinforcement and fittings. In this case, the pipes used should not necessarily be metallic, they can be polypropylene or metal-plastic.
- Mechanisms for water supply - submersible pump or pumping station.
- Devices for regulating pressure in the system. It can be a relay, pressure gauge and an expansion tank.
- Equipped with automatic electrical support.
List of tools
To mount the water supply of any complexity, you will need tools such as:
- Set of keys: gas №2, adjustable and wrench - №17, 19, 22, and 24.
- Pipe cutter.
- Pencil, knife and roulette.
- Grinding paper.
- If you have chosen polypropylene pipes, then you should purchase an electric soldering iron.
- If the pipes are metallic, then the saw specially intended for this purpose.
- Hacksaw.
- Scrap and shovel.

Before you start digging the trench, you should conduct a marking of the plumbing track on the household plot. To do this, spend all measurements using pegs, twine and measuring roulette.
Note! A thoughtful approach to work will help you to save not only costs, but also precious time, so carefully calculate the number of pipes, cranes, corners, valves, fittings and other important elements.
Summer water pipe

Summer water supply is called the water supply system that can be used exclusively in the warm season. It is usually used for watering plantings, connecting the summer soul and household needs. Operation of such a system is impossible in winter struran. Summer water supply can be both collapsible and constant.
The simplest way of installation is to carry out hoses right on the ground. To do this, use silicone or rubber pipes connected by adapters among themselves. They are sold in all building stores. Adapters made of galvanized steel have better characteristics, but they are more expensive, therefore many prefer their plastic counterparts. In addition, special latches can be used as a connector for hoses. From one side there are some "Yershi" to which the hose is worn, and from the opposite side there is a spring-loaded connector. In one movement, you can combine and disconnect the latch. The joke is very reliable. If you are interested in purchasing a durable material, then pay attention to the thick-walled rubber hose, because it is reinforced by the bypass fibers. The service life is at least 15 years.

If you prefer to create a permanent system of summer water pipeline, then the pipes should be paved in the ground, and to remove the watershed cranes on the surface. The depth of the trench should not be big. The pipeline falls asleep the earth in order not to stumble on the pipe and hide them for the period of lack of owners of the dacha.
Note! In the process of installing the system, you will have to lay all pipes under a slope, which should be directed towards the connection to the highway. This will be the lowest point of the water supply system. Here you should screw the drain valve, with it you can drain the water from the system for the winter period. Otherwise, water after freezing the pipe will give the pipe, even if they are plastic!
Winter water pipe

The capital system of winter water can be used all year round, regardless of that cold on the street or not. If there is a well on your household plot, the water supply can be done without difficulty. For this purpose you will need a submersible pump. The choice of the power of the device largely depends on the depth of the well, from which the water supply will be organized. You can read the technical characteristics of the unit in the relevant documentation for it or talking with a specialist.

Submersible pump always connects to electricity. All electrical wires can fit into one casing with water pipes. So, you can prevent mechanical damage to communications and protect them from cold exposure. High-quality installation of the plumbing system implies compliance with all the above technical conditions and norms. The pipeline must be laid below the level of lability of the Earth. Trench dig about 60-100 cm deep. The water supply itself you will have to fall asleep with the insulation, its thickness should be about 30 cm. It can be a foam crumb, claymzite and other suitable insulating material. The main thing is that it is moisture-proof and durable.
Near the well build a pit, about 70x70 cm in size and a depth of about 1 m. It is needed to connect the pump. Walls should be lowered by boards, concrete rings or bricks. If you prefer the boards, then note that they should be treated with antiseptic drugs. The bottom can be flooded with concrete or simply falling asleep with a layer of gravel. A pipe with a special fastening for the hose, which departs from the pump, and also electrical wires should be removed. So, you can disconnect and attach the unit when necessary, for example, for repair work. Conduct It is important to protect against freezing, for this insulate it. To create a secure connection to electricity, use sealed contact connectors or moisture-proof outlets.
Note! Regardless of what type of water supply you choose: Summer or winter, make it so that when a failure, the malfunction can be eliminated without performing a complete dismantling of the system.
Installation of water supply system

To safely mount the plumbing in the country, you should be stockpore and patience. Distributed trenches should be carefully checked - whether the depth is correct, the bottom is cleaned correctly, if the tilt is correct, etc. Now you can immerse in the well or well deep pump.
Connect the device according to the instructions attached to the aggregate. The pipe should approach the fitting to which the hydroaccumulator or pressure gauge is connected, pressure switch. After connecting the mechanisms, to last conclusion you will need to connect the main pipe and on the trench to start it into the house. Here and the armored cable is laid for the nutrition of all equipment. It is very important that at the entrance to the building a well is made with locking cranes, which will ensure good access to the plumbing system during preventive work or repair. Now you can start installing filters, laying the water supply directly throughout the house, water heating and closing connection.
Do you already have experience in installing the water pipeline in the country? Maybe you have any difficulties in the process? What helped you cope with them? Maybe you invented an innovative way of installation? Write us a comment, your experience is valuable!
What appears the very first on any country site? Do you think the fence? No, water appears first on the site. Without it, neither construction or accommodation nor the content of the beds is possible. At the beginning of the "country" stage of life, the hosts are engaged in the arrangement of housing, a garden and a garden, but after a few years a comfort is coming to the fore. And when to run with a bucket to the well, the dackets are solved to equip the summer water supply.
We choose the type of construction
Before proceeding with pipe laying, you need to decide on the type of water supply: permanent or collapsible.
Advantages and disadvantages of permanent installation:
- pipes are underground and do not lie under the legs;
- installation is carried out once;
- with a long absence of the pipe, they do not steal (thieves, unlikely, they will dig in the ground);
- to prepare the system to wintering, you just need to open the drain valve and wait until all the water strokes;
- material costs are somewhat larger than when organizing collapsible design;
- the process is time consuming, especially if you have to dig a deep trench;
- the need to lay pipes under a slope;
- if there is a breakdown, it is more difficult to find and fix it.
If the collapsible plumbing is selected, the pipes can lie on Earth or be raised above it.
Pros and minuses of collapsible design:
- quickly going and disassembled if necessary;
- if the pipes were damaged, then find and eliminate the hole will not be difficult;
- the cost of the collapsible device is slightly lower than permanent;
- pipes lie under the legs;
- if in the summer you will leave for a long time left without supervision of pipes or hoses can just steal;
- the need to build-disassembly at the beginning and at the end of the season.
How to make a summer water pipe in the country with your own hands - step-by-step actions
The device of the water supply system primarily implies the preparation of the project. It should be marked by water consumption, existing underground communications, tracks and buildings. If in the future it is planned to place any structures, flowerms or structures, it is also desirable to note, especially if the design is constant.
Layout scheme
When drafting a water supply project, it is necessary to take into account the placement of all buildings and objects, as well as to schedule the appearance of new
When designing an unbearable design, it is important to remember that all pipes should be laid under a slope for the location of the water intake.
Pipes in the trench must be laid under a slope. This will allow water to drain water from the system and avoid breaking pipes.
They come out of the ground only in consumption places. At the lowest point of the system, a drain valve is installed. In the fall, all the water needs to merge, otherwise it will ruin the pipe.
Pipes are better to acquire plastic or polyethylene. It is convenient to connect them with flexible hoses. This will easily remake the design of the constant water supply. You can connect pipes with plastic fittings or soldering. There will also be needed tees, cranes and corners.
In addition, you must unscrew the trench, in which the pipes will be laid. Depth is usually 30-40 centimeters.
However, if the pipes will be passed directly under the beds, and the likelihood that they can be hooked up with a shovel or cultivator, it is better to increase it to fifty-seventy centimeters. Of course, this is a large amount of work, but if the pipes are punched, it will be much more difficult to look for flow.
The depth of the trench for the summer water supply is significantly less than for the usual. She fluctuates from thirty to seventy centimeters
If the choice is made in favor of the collapsible scheme, then not only plastic pipes can be used, but also conventional rubber hoses. They are connected by jumpers, pieces of pipes or special scrapers, which allows one movement to disconnect or connect two segments of the water supply.
Necessary materials
Most often, the laying of pipes is carried out due to the need for watering the garden. To provide water a garden with a square of ten acres, the following materials will be needed:
The use of fittings allows you to assemble the summer water pipe for watering only in one day. At the same time, the place of connection is hermetically, and it is easy to disassemble
Stages of mounting

Summer plumbing is not only a great way to avoid unnecessary work, but also the ability to create a "urban" standard of living for those who have been living outside the city from April to October, you can wash the dishes under the crane, and the washing machine is connected, and organize a hot shower.
Motored the old water supply in the apartment. Spirin on the pipes, fistula for fistula; To block the water, and then again feed - rust is harvested from the cranes. And it is planned to repair a kitchen with a bathroom, and old pipes are not something that touch or breathe - it is afraid to look at them. It is necessary to change, but the work is expensive. Is it possible to replace the apartment water pipe? Yes, it is possible, and without any permissions. It will only be necessary to negotiate with the DAZ mechanic to overlap the flow of water in the risers to the maximum per hour; Most likely, it will be possible to manage the minutes for 10 minutes. Or warn neighbors, if not harmful, and overlapping / again to file yourself.
Procedure for replacement
Replacing the water supply is performed in a specific sequence. The work "On the eye" and "along the course of the case" in non-professional execution, often ends with a leak. The work plan is approximately as follows:
- Selection of material new pipes.
- Selection of hot and cold water wiring scheme.
- Development of the water supply scheme of the apartment.
- Calculation of diameter of pipes by selected material and diagram.
- Preparation of the mounting tool.
- Purchase of materials.
- Assembly of selected sites, installation of them for risers and registration.
- Disassembly of old pipes and plumbing devices.
- Connecting the HMS and Aquastop, if provided.
- Connecting the flask filter (with the HMS required).
- Installation of pipes of hot and cold water water pipes.
- Installing and connecting plumbing, former or new.
- Trial water supply; Elimination of detected defects.
- Installing and connecting a boiler.
HMS, Filter and Aquastop
HMS, or hydromagnetic system, has long been used in industry to prepare water to filter. In everyday life, this device, without going into details, translates the impurities in the water into a thin suspension, which then settles in the filter in the form of a sludge and periodically deleted. The HMS is absolutely harmless, does not require power supply and care during operation, but necessarily requires the installation of the water meter in the anti-magnetic version (such more expensive) and, after the current water, the combined flask filter.
The column filter consists of three consecutively connected sections: in the first one is assembled by sludge, the second removes chlorine, the third water purification occurs and its softening occurs. The latter (no one drinks water from the crane for a long time) is especially important for a washing machine boiler.

The HMS with flasks cost a lot, but they protect well not only equipment, but also health. Complain or not, outraget - do not outraget, and drinking water is firmly held in a dozen most deficiting resources of the world, and global programs that can withdraw its quality at least the middle of the last century, not foresee. In general, the salvation of drowning is the work of the hands of the drowning.
Aquastop is also a useful device, also does not require power and care, but its function is different. With a sharp strengthening of the current (breakthrough) of water, the aquastop is triggered and its valve cuts off the entire apartment from the riser. Aquastopes are different systems, including electrodynamic, so that the anti-magnetic meter during the installation of aquastop is also needed.
Choosing pipes
The new plumbing in the apartment begins with the selection of pipes. Steel in everyday life has taken its own, and choose from metal plastic, plastic and solder copper. This stage of work is perhaps the most responsible - the wrong choice will negate all the efforts, expenses and troubles.
Copper
 You can say about copper water pipes at once: their propagandists do not know what they say. Or you know, but do not put yourself. Firstly, the copper is formed on copper in contact with water - the same Medeanka, about which Tom Sawyer interpreted Geclberry Finn. Yes, copper is needed, but in insignificant quantities in the form of a trace element, and not in the composition of a strong poison. As a counterragement, they say, copper with chlorine from the water forms a protective film. Absurd for any, remembering at least school chemistry.
Secondly, the composition of the solder for copper includes tin. White tin, soft metal, over time turns into another, as chemists say, allotropic modification - gray tin, crumbly powder. That is, putting copper pipes (very expensive) at home, we also guarantee leakage by 100%. And payment of the work of the company specializing in copper pipes, since it is impossible to easily solder them.
Metalplastic

Metal-plastic pipes are quite expensive, but they can be connected with their own hands without having experience. Metal-plastic water supply is assembled on special threaded nodes with gaskets or under crimping - fittings. In addition, metal plastic pipes can be smoothly bending. Hydrodynamic resistance and pressure loss in metalplastic are very small.
For entering the pipe in the fitting, we need pipe cutters, press clamps and a set of sweeps (rimeers) by pipe diameter. With their help, the work is played, and prickly means - a complete leakage guarantee. In addition, the service life of the pads in fittings is limited, and with time the joint starts to drip. Therefore, it is unacceptable to stir up metal plastic into the walls, and it is strongly recommended not to hide in the shutters.
Water pipes with metal plastic is recommended in separate open areas, where the minimum stream resistance of water and the possibility of simple and fast joint bulkhead is: when connecting a boiler, washing, washing, etc. Adapters from metal plastic on other types of pipes are always on sale.
Plastic
The plastic apartment water supply is now standard, but plastics are different. For the right choice, you need to know their properties and features.
Polbutylene (PB)
Burning plastic with good, for plastic, thermal conductivity. Holds a temperature of up to 90 degrees. That's right, the soldering junction is absolutely reliable. Pretty roads. Apply for a warm floor device.
Polyethylene (PE)
Cheap, but for DHW need polyethylene reinforced pipes; Ordinary polyethylene does not hold 60 degrees. You can not bend and glue, the soldering joint reliably keeps the pressure of no more than 3.5 AT, and the water pressure in the urban water supply can be up to 6 AT (0.6 mbar) for cold water and 4.5 at hot, so the likelihood of sudden breakthrough. Hydraulic resistance, though the smallest of all.
It seems to all the poor polyethylene pipes, but they have the dignity that they can cost all their flaws: not afraid of freezing. Ice cork cuts them, and how melts - shrink again, and do not burst, even though you are crazy. Therefore, the device of polyethylene water supply is highly recommended in the premises of non-heated, seasonal and soil. There are no alternatives to polyethylene. But with a constantly filled system, aquastop is necessary.
PVC (PVC)
The properties of the polyvinyl chloride (PVC) are well known: chemically racks, inexpensive, heat resistance up to 80 degrees, easy to glue, but not very durable and afraid of ultraviolet. The joints, like soldering and adhesive, are more fragile than one-piece material, so the risk of a breakthrough remains and need aquastop. The replacement of individual sections of glued PVC, of \u200b\u200bcourse, is more complicated than in the collapsible metalplastic, but it is simpler than for soldering joints: heating the connection is a household hairdryer, the joint can be discharged, and then glue again. In general, the option is budgetary or for a novice master with the length of the main branch from the riser to the very long point of the water-based point of not more than 10 m and with no more than 7 selection points.

Propylene (PP)
Laying the apartment water pipeline by polyisopropylene pipes (propylene) is now generally accepted. The material is not very expensive, durable, racks, soldering joints retain all the qualities of the base, heat resistance - up to 130 degrees, it is properly established to 12 AT. Hydraulic resistance is higher than PVC, but still the accumulation of plaque in the lumen is minimally, and the GMS is excluded. Disadvantages with independent execution only two:
- It is not glued, and for soldering it is necessary for special equipment and accurate compliance with technology.
- It has a rather high coefficient of temperature expansion. Struled into the wall or stubborn in the stroke can argue and break the tile, so it is necessary to wear a stocking from merilone or synthesis to each pipe when laying, which increases the cost of work.
However, the propylene pipeline today is the only one that can be done once and forget. Therefore, we will dwell on the soldering of propylene separately, especially since the soldering of other plastics differs only by a lower temperature (110-130 degrees for polyethylene and about 150 for PVC).
Soldering propylene
Solding is propylene with a handicraft soldering iron - "Iron" jack (see Fig. Right) is unacceptable:
- In the "sausage" inside the contamination accumulates, and the pipeline assembled in this way turns out to be more prone to clogging than steel.
- Water pressure, cutting pipes, seeks to break the joint. At 16 degrees in the pipe and 20-25 outside of about three months, the material fatigue threshold turns out to be surpassed, and the joint flows.

The assembly of the propylene pipeline is carried out on the fittings under the soldering - direct (for connecting pipe segments), corner, tees, crosses. Washed before softening the pipe is inserted into the clip is also preheated fitting, and the junction is frozen. In this case, the water pressure, on the contrary, presses from the inside the pipe to the clip, ensuring the strength, and only sealing remains to the share of the fused zone. Pretty high rigidity propylene does not allow the covered pipe to expand elastically. It is such a design of the connection in combination with the properties of the material and makes a propylene pipeline suitable for immoving into the walls for decades.
Note: more or less decent soldering iron for propylene costs at least 2000 rubles. And for something is still unsuitable, but it does not wear out. Therefore, it is not necessary to buy it, it is better to rent.
- For hidden wiring in a typical apartment in the strokes or deployed - unambiguously propylene.
- For the branches of a large length with a large number of watershed points - metal-plastic Open or in channels with removable lids.
- For country houses, seasonal housing for rent, country houses with remote housekeepings, greenhouses, and the like. - Polyethylene.
- For budget repairs or locally with a shortage of water, weak pressure in the water supply, with water of poor quality - PVC.
Layout scheme

Collectors-rowing
There are two water watershed circuits: sequential and parallel. With a sequential papidation point circuit, connected to a common pipe through tees. This scheme is the most economical, but with a high layout length, a large number of dismissal points and / or at a weak water pressure, it is not suitable, since it strongly reduces the pressure.
In this case, the waterscence is made on a parallel scheme from the collector "Comb", see fig. The comb is an assembly from the bypass valves, from each of which is a one-piece branch to its paging point. The valves adjust the pressure separately by points. Point branches are performed by metal plastic or polyethylene: in this case, their low hydraulic resistance plays the role, and when laying a solid piece, they are quite reliable.
Development of water treatment scheme
The water supply scheme in the apartment is needed primarily for himself in order not to get confused, not to be miscalculated and then to know exactly where that - no particular permission for this work is required. But when registering the meter, the Vodokanal inspector may ask to look at the scheme, so you need to draw it right.

Full scheme for all rules - the work is serious and for a knowledgeable specialist; For example, in a large figure, the water supply scheme of a private house with a summer kitchen, necessary to ensure that the project is approved. But it is not necessary to replace the pipes in the apartment so much, it is enough so that the scheme is clearly visible and understandable:
- Hot and cold water pipes, their type and diameter of the lumen.
- Accounting devices.
- Emergency valves and plums.
- Shock fittings.
- Score points with consumer indication.
- Backup branches and devices.
- Direction of water current.
That all this was understandable not only to yourself, or a year later, certain rules when drawing should be observed. We will analyze on the examples, see fig. Left - more or less comes out, but with comments, on the right - wrong:

- The scheme on the right is made in isometric - for beauty, or what? It is confused by the intersection of pipes, and it does not give views of the real location of the discretion points: the washed with a boiler under the floor.
- There is also too many current-pointer arrows there, where it is clear where it flows, which also confuses the scheme.
- In the same place - fuzzy and not according to the rules, shut-off valves with accounting devices are depicted.
- There are also not specified the type and diameter of the pipes.
- There - who, where and when I saw the water to the boiler to be filled from above, and the toilet washed over the sump?
- But on the side of the left, not even a specialist is clear that the boiler (6) is a backup. The remark will be: "Where is the reverse valve for hot? Without it, when the boiler is stopped, the boiler will take his hot riser if the valve (10) is not overlapping. " But it is already essentially a matter of understanding.

Proper simplified water supply scheme in the apartment
An example is arbitrarily, not according to the rules for designing design documentation, but completely understandable and without the excesses of the accumulated water treatment scheme is shown in the following figure. This is also an example of parallel waters; Where the ridges are understandable.
Calculation of pipes
Before you finally choose pipes, you need to calculate at least about their diameter. It is necessary that not for the "cleverness" - the more pipe, the more cheaper, on the one hand. On the other hand, the pipe diameter for water supply will cause the turbulization of the flow in it. In this case, the bandwidth of the pipe drops sharply, and at normal pressure at the inlet of the crane, it will be barely soooed.
The accurate calculation of the pipeline is a matter of highly qualified specialists, but for the city apartment, so that it flows normally, you can estimate yourself. The source data are:
- The minimum allowable pressure is 0.3 at.
- Pressure loss on 1 m propylene pipe 16 mm - 0.05 at.
- The average pressure loss for the apartment layout per unit of fittings and reinforcement is 0.15 at.
- Loss of pressure in the selected assembly assembly - 0.25 at.
- In conventional pressure values \u200b\u200bat the inlet in the riser of 1.5-4.5 AT in a pipe 12 mm, periodic turbulization is inevitable, and in 16 mm pipes is not observed.
- The reserve for pressure for the longest point is no less than two-time.
It remains to learn the pressure (pressure) at the entrance, and can be defined, is it enough with a sequential layout of such a, the most chassis, pipe, pressure for the long crane or will have to take the sewn and more expensive. Pressure at the bottom of the riser can be found in the pressure gauge in the basement or the operator of the building; Then take 0.6 at the floor. You can also estimate along the neighbors based on the same 0.6 AD / floor: if, say, after three floors up from the cranes still flowing, then we have a good 2 at. But in high-rise buildings, this focus does not pass: in order not to express an excessively apartment layout, there are separate risers on the lower and top and even on the lower, middle and upper floors.
Example of calculation: second floor of nine-story buildings; The tenants of the upper floors on the water do not complain. We have at least 4 AT pressure. 11 units of fittings (5 tees, 6 squares, 1 valve) give 1.65 AT loss. The length of the pipe from the riser to the far wall of the kitchen is 6.5 m, that's another 0.325 AT loss. In total, with a selective score, we have 0.325 + 1.65 + 0.25 \u003d 2,225 AT loss. Multimito, it is necessary to check the pressure to the pressure gauge and, most likely, take the main pipe of 20-25 mm, or divorce on a parallel scheme from the comb, otherwise you can remain "dry" in the summer such.
Note: from here it is clear how important it is to hide the pipes and how to easily lengthen them and clutch the reinforcement.
The dependence of losses in pipes and reinforcement is nonlinear: they depend on the flow rate, which, in turn, depends on the cross section of the lumen of the pipe. A minor increase in the diameter of the pipe sharply reduces the loss, so the usual wiring of 20 mm pipe with removal to the points 16 mm in most cases works well. In difficult cases, the accurate calculation can be made on SNiP, internal water supply and sewage system. There are all the necessary formulas and nomograms; The calculation can make a person with the engineering formation of any profile.
You only need to keep in mind that there is already three years at this subject with the same index: 2.04.01-85, 2.04.01-85 (2000) and 2.04.01-85 * "(Domestic Water Supply and Drainage Systems in Buildings) " Correct - Last Snip.
Tool, materials, dismantling old
Special tools for assembling apartment pipelines are described above the campaign. For the purchase of materials, a clear case, you will need to calculate the method, nomenclature and quantities at the place. The dismantling of old pipes is made in conventional ways. It is better to do it after installing and registering the water meter so that it is for a long time not to turn off the water on the floors.
We will give only one advice: do not take valves with a lever. It is made of silumin or plastic and has a property to rolled at the most inopportune moment, just when it is urgent to overlap. Take ball valves with a "butterfly" handle. Round corrugated handles are also not broken, but wet or sweaty hands will slide.
Accounting and control
The selected-account assembly consists of a shut-off valve, a coarse filter, water meter and check valve. Collecting, as shown in the figure. Each of the devices indicate the direction of water current for it, it is necessary to comply with it when assembling.

The node is collected with waterproofing of the connections of the FUM tape and also connect to the riser, breaking the water pre-water; Before driving, you need to not forget to block the shut-off valve. This is the only operation, and short-term, requiring the shutdown of water supply to the neighbors for riser.
For cold and hot water, separate meters nodes are needed. It is extremely desirable that the counters and handle of the valves are highlighted in color. The meter readings must be clearly readable without any additional operations (Luke, etc.), therefore it is often necessary to collect part of the one-piece pipeline in advance, sometimes quite a bizarre configuration, to connect the metering devices to the riser. In addition to the pipes and the soldering iron, the transitional clutches with plastic on the metal MRV are needed - the coupling is threaded internal. The plastic is connected to the metering sites using MRN - couplings of threaded outdoor.
Counters are sold sevented, but this does not mean that you can immediately call to Vodokanal and pay for water by consumption. The factory seal for Togo (the craftsmen is rich in the Russian land) so that no one gets into the counter and not twisted or did not sign anything there. The factory seal must be preserved; Without it, the counter is considered unsuitable as without a certificate for him.
On the installation of water meters, we need to declare the waterochannel and call it an inspector. It is possible to use water before it is possible, the inspector does not need zero testimony, it will record the initial, seels with its seal meter and the filter drain. Payment for water consumption will go after registering accounting devices.
HMS, Aquastop, Filter
Although the design of the HMS is uncalapping and does not allow with it to steal water, and the sealing device is not subject to the device, the connection of the HMS to the counter is unacceptable: the coach of the meter can be clogged with sludge. The HMS with a flask filter is connected after the accounting devices; Filter - immediately after the HMS. Aquastop can be connected immediately after the filter, but if it is electrodynamic, the magnetic field of the HMS can cause its false response, but there is no meaning to attract an aquastope: it does not react to a breakthrough to him.
Video: Overview of the layout options for water supply elements
Installation of pipelines
So, now we make a water supply. The assembly of pipes is already described, but the installation of the entire system also has the characteristics of not a construction character, somehow, the device of the channels in the screed. The latter should take place no further than 150 mm from the wall and not closer to 200 mm to the furniture. Santechnibores, of course, before starting the pipe laying are removed.
First of all, it is necessary to install arcs - plastic strips with MRV Cornels under the mixers. They are attached to the capital wall by self-drawing in dowels. When attaching, you need to consider the thickness of the finish: plaster and tile or other decorative coating.
Without a large construction experience, it is very difficult to achieve the location of the weekend pipes with a wall. It is better to make them protruding on the decorative cap of the mixer in advance of half the width of the mixer's decorative caps: if the caps are unregulated, they can be made without much difficulty in the emery circle or manually on the emery bar.

The next moment is the assembly of pipelines. The most convenient way is the assembly on the table and laying in the entire shine. But then the question arises: how to spend pipes through the walls? There are no problems with metal-plastic, it is all on the detachable fittings, and for soldered pipes you can offer two ways:
- With the help of MRN / MRV adapters and metal-plastic inserts. In the apartment it is quite reliably, and in the corners above the strokes you can make removable rugs for revision and repair of threaded connections.
- Mount pipelines in place. For this you need a compact soldering iron. It is more expensive, and you need to work in x / b gloves to accidentally do not burn.
Fourth time - soldering. One soldering takes 15 mm pipes. That is, if between two fittings exactly 1 m, it is necessary to cut off 1030 mm; If 0.6 m - 630 mm etc.
The fifth moment is flexible metal-plastic pipes. The minimum allowable bending radius is 5 outer diameters of the pipe. You can meet the recommendations: they say, shove the spring there, fill the sand, and you can bend at all at an angle, and pull the spring and squeeze the sand with a wire crochet. In no case: the pipe coating is spoiled, the residual stresses in it are much higher than the allowed, and the metal-plastic pipe acquires the properties of a very bad steel rusted.
And finally. This is a separate production cycle, and it is done after entering the water supply system. Nozzles under the boiler are made in advance, but the valves for them (they are necessarily needed on both) overlap immediately after the installation of pipes, and the nozzles are additionally drunk.
Video: An example of the mounted water supply
Outcome
Now you know how to make water pipes with your own hands. We emphasize - this work is not their complex or heavy, but negligence and hackturi does not tolerate.
Water supply at home is an objective condition for the normal residence of its inhabitants. SNiP 2.04.01-85 "Water flow rate consumers" regulates water consumption ranging from 80 to 230 liters. per day per living. Consumption depends on the presence of centralized water supply, sewage, bathroom or shower, the presence of a speaker for heating water and other factors.
In multi-storey and municipal homes, this issue is solved by connecting to the system of central water supply. For a private country house or cottage, it is necessary to provide water supply on their own.
Of course, one can bring water from an external source in the amount of needs will not be difficult. But how to provide water to the family, for a long time?
This article will solve this task, in which the types of water supply, schemes, systems and methods of their device are structured in detail. And also the nuances of the implementation of the main types of work with their own hands are indicated.
Private Water Supply Types
From the position of the dependence of the source of water supply from external factors, two fundamentally different types of water delivery to the user can be distinguished:
Centralized water supply at home
In fact, the same autonomous, but within the region. In this case, the user does not need to take care of the arrangement of the source of water intake. It will be enough to connect to the central plumbing line.
Connecting a house to central water supply
All actions are reduced to the phased implementation of a number of requirements, including:
- appeal to the regional communal organization of MPUVKKH KP "Vodokanal" (Municipal Enterprise "Department of Watering and Sewage Economic Management"), which controls the Central Highway;
- obtaining the technical characteristics of the insertion. The document contains data on the place of attachment of the system of the user's pipes to the highway and the depth of its location. In addition, there is a diameter of pipe pipes and, accordingly, instructions for the choice of homemade pipe wiring. It also indicates the water pressure indicator (guaranteed water pressure);
- get an estimate for the connection, which is developed by the municipal or contract organization;
- control the performance of work. Which are also usually executed by the CPC;
- perform system testing.
Advantages of central water supply: convenience, simplicity.
Disadvantages: water pressure fluctuate, dubious quality of incoming water, dependence on central supplies, high cost of water.
Autonomous water supply at home
Independently to ensure the water supply of cottages, private or country houses can be used when using autonomous water supply. In fact, this is an integrated approach that includes activities, on the installation of the water supply system, starting from providing a source of water intake, ending with its tap into the sewer.
The autonomous water supply system can be represented as two components of the subsystems:
- water delivery: imported, primary, from an open source;
- feeding to consumption points: Samotek, with a pump, with the arrangement of the pumping station.
Therefore, in a generalized form, two water supply schemes can be distinguished: the self-consuming (accumulative water container) and the automatic water supply.
Using the container (water tank)
The essence of the autonomous water supply scheme is that water is supplied to the tank with a pump or poured manually.
Water to the user comes in gravity. After all the water from the tank is used, it is recourse again to the maximum level.

In favor of this method, it says its simplicity, it is suitable if water is required from time to time. For example, in the country, which is visited not often or in the utility room.
This scheme of the water supply device, despite the simplicity and low cost, is too primitive, inconvenient and also creates a significant weight on the inter-storey (attic) overlap. As a result, the system has not found widespread, is more suitable as a temporary option.
Using the automatic water supply system

This scheme demonstrates the procedure for the functioning of a fully autonomous system of water supply of a private house. Water to the system and the user is supplied using the component system.
It is about her and talk in more detail.
It is possible to implement the fully autonomous water supply of a private house on its own by implementing one of the schemes. Selects several device options:
1. Water from open sources
Such can be superficial sources: ponds, rivers, lakes. In some cases, water purification systems can act as sources. But, in our country, they are not yet common.
Important! Water from most open sources is not suitable for use. It can only be used for watering or other technical needs.
Obtaining water from an open source requires the creation of sanitary protection of water intake places and is regulated by the provisions of SanPiN 2.1.4.027-9 "Sanitary protection zones of water supply and drinking water supply sources".
2. Water from underground sources: pools and aquifers
This water, in most cases, is suitable for consumption.
How to spend water in a private house do it yourself
Step-by-step guide to the choice and water supply device in a rustic cottage or in the country from A to Z

The water supply scheme of the house consists of elements:
- water source;
- pipe system;
- pump, hydroacumuator, automation relays;
- filters;
- fittings, valves, check valves and plumbing devices;
- water heating equipment (for hot water supply);
- sewage.
Element 1. Water source
Starting to ensure autonomous water supply, the source of water supply should be determined and equip it.
Among the subspecies of autonomous water supply with an underground source of water intake are distinguished:
1.1 Well;
1.2 Abyssinian Well;
1.3 well "On the sand";
1.4 Artesian Well.
The final choice will depend on the species and features of the soil, the depth of water, from the performance of water vein.
1.1 Normal Well
The traditional well prefer in the case when the water vein is at a depth of 4-15 m. These are the so-called inter-plastic sources of water. In addition to the depth of the occurrence, it is important to determine the performance of the veins. The incoming water should be enough to ensure the needs of family and / or households. Through a well, water is carried out at 500 liters / day.
The unconditional advantages of the well are:
- independence from electricity supplies. So in case of turning off the electricity, water can be taken a bucket;
- long service life (up to 50 years), which is verified in practice;
- low cost of work;
- easy device.
It should be noted that in mind a minor depth of water fence, it may differ in low quality. This is due to the probability of entering the well of groundwater. Also, the well is characteristic of the water level drops.
Important! Highlighting the well need to position it correctly and from the point of view of remoteness from land buildings. It should not be located close to buildings, the optimal distance is 5 m. (Will prevent the erosion of the construction foundation). At the same time, to direct sources of pollution (waste ditch, toilet, other sources) the distance should be at least 50 m.
To dig a well to perform a number of actions:
- take a water sample;
Important! Before you arrange a well on your site, try the water from the neighbors, and even better hand it out for analysis. It may happen that water will be unsuitable for use and all efforts will disappear for nothing.
- get a conclusion about the quality of soil and depth of the flow of aquifer. In practice, the wells often dig "on the eye";
- determine the place of digging the well. For this you can attract specialists, use special devices - indicators framework. And you can observe the dew for several months. The greatest accumulation of wings in a certain place is talking about the proximity of water;
- select building material for finishing the walls of the well (mines). More often for these purposes such materials are used:
Reinforced concrete rings that are manufactured at factories or differ independently. Their diameter is 1-1.5 mp, and the estimated life of up to 50 years. The obvious advantage of using the rings is the possibility of recessing up to 20 m, high speed and greater safety of work. In addition, the rings are installed as the work is promoted;
Melnochnaya Materials: Brick, Brick Stone. This material is suitable only for wells in a depth of no more than 3-4 m. Its use significantly increases the laboriousness of the work;
Processed logs. For finishing, the wells are suitable for logs from wood, resistant to stay under conditions of high humidity. These include oak, larch, pine. The log diameter should be at least 120 mm.
- drop the home shaft. To reduce the cost of work, this is usually done manually. It is possible to determine the size of the mines: to measure the diameter of concrete circles, measure their thickness and add 10-15 cm. On the backbone. Then, with a circle diameter in 1 m and a thickness of 10 cm - the diameter of the mine will be 1.4 m. If you plan to use another material, for example, brick, it is sufficient to designate the desired well diameter and add two thicknesses of the material to it;
- run the well - inner and external.
1.2 Abyssinian well
Water supply of a country house from the Abyssinian Well or Well-needle is the easiest way to get water with minimal cost. To do this, it is enough to perform a number of actions:
- check water;
- choose a place under the well;
- score a well-needle;
- install the check valve and pump (manual or automatic).
The reason for the increased popularity of wells in the purity of incoming water, tightness, simplicity of drilling, the ability to connect the pump, and a long service life (up to 30 years), a significant amount of incoming water - more than 1000 l / day. Among the disadvantages are the shallow depth of scoring and dependence on the composition of the soil.
1.3 well "On the sand"
In this case, water also comes from inter-slash sources. The sandy well makes it possible to get cleaner water, because the aquifers are located after a sublinka filtering water.

Thus, the well is used if the depth of the bombing of aquifer reaches 40 mp.
The well has a shorter service life (up to 10 years) and allows you to get up to 50 M.Kub. Water per day. The well is distinguished by a well drilling, a smaller recess of the soil.
Detailed description How to make a well with graphic visualization is presented on video
1.4 Artesian Square
Allows you to use water with significant depths. The depth of the well reaches 150 m., Which allows you to get high quality water. The unlimited stock of water is also argued in favor of the artesian well. At the same time, the life of the well increases compared with the previous version of up to 50 years.
The method of drilling the artesian well is identical to the previous one. The only difference is that the mechanical way of drilling is used: auger, rotary, column or shock-rope. The well design is shown in the diagram.

Important! By law, Artesian water is a strategic reserve of the state. Therefore, there is a need to register an artesian well.
Element 2. Pipes for water supply
Water supply cannot be organized without installing a branched pipe system, both external and internal and water tanks.
Options are used galvanized, polyethylene, polypropylene or metal-plastic pipes.
Important! The use of plastic pipes will join the appearance of rust and flow. They are also more convenient to give the right shape. The estimated life of the polypropylene tube is 50 years.
 Exterior pipes fit into the ground.
Important! The depth of laying pipes depends on the level of engine freezing (indicated in the bottom, for the middle of Russia, the depth is about 1.5 m.). Pipes are located below this value. In this case, the system does not threaten the freezing and as a result of the deformation.
Council. To prevent stagnation of water in the pipe, it must be placed at an angle to the house.
Next, one end of the pipe is started into the house (for this, the foundation is left in the foundation in which the steel pipe is placed. It will prevent the water supply pipe deformation in the event of a shrinkage of the house). The second is descended into the well.
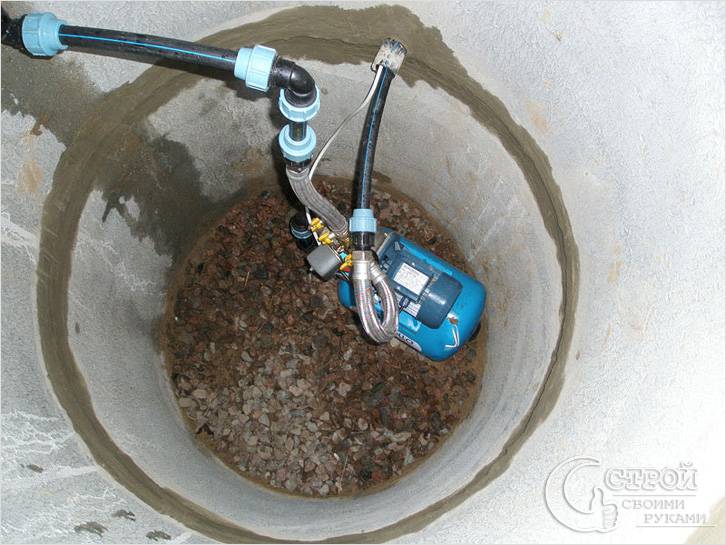
Element 3. Pump or Pumping Station for Water Supply
 Pump can be installed in the house (basement or countertop)
 And can be installed in the caisson or impressive (directly above the well). The diagram shows the installation in the caisson of the submersible pump and surface.
To get the caisson, you need to dig a hole with a depth of 2-3 m. To put a sand-chicted pillow on the bottom and pour concrete. The walls are conveniently laying out bricks. A pump is installed in the caisson, and the caisson contour is poured with concrete (a layer of about 0.4 m).
Two types of pumps are distinguished:
 Submersible pumps. Immerse yourself in water (well, well) and raise water. For convenience, such pumps are equipped with automation, which allows pumping water from the house.
 Surface pumps. Paste pumping stations equipped with a hydroaccumulator and relay.
 The hydroaccumulator performs the functions of the water tower.
 Relay - regulates the pressure of the pumping station.
Principle of operation of the surface pump
The principle of operation is as follows: the pump serves water into the hydroaccumulator, which accumulates it. After the house turns on the house, the pressure in the system decreases. After reaching a critical level in 2.2 bar, the relay is turned on, which in turn includes the pump. The pump serves water into the hydroaccumulator to the level when the pressure will restore at a time of 3 bar. After that, the relay disables the pump.
You can choose a pump can be guided by the following data:
- depth of water running (bottom of the well or well);
- water height in the source mine;
- the height of the point of water treatment;
- the volume of water consumed (M. KUB).
The water supply tube of pump falls into the source. To avoid clogging the pipe on its edge filters are installed.
Important! The pipe is installed at a distance of 20-40 cm. From the bottom (gravel pillow). The distance is determined by the water height in the source.
Council. So that the pipe in the traditional well is not shifted, it needs to be consolidated to a special pin, arranged at the bottom.
Element 4. Filters for Water Supply System
Cleaning the water enters into the system is an important aspect of water supply at home. Two types of filters are used for cleaning:
The first is installed on the edge of the pipe placed in the well. It cleans water from mechanical impurities;
The second is directly in the house and can be a complex multi-stage filter system. Water purification scheme in the figure.

Element 5. Fittings, valves and plumbing
These are the elements that are necessary for a sealing connection of pipes with each other and with other devices.
Important! To prevent the system break and water leaks, try to use only high-quality shut-off valves.
Plumbing devices include: cranes, drain tanks, water shutters (siphons). They also do not need to save.
Element 6. Water heating equipment
 In the event that there is a need for hot water supply, i.e. almost always.
Important! To equip a hot water supply, it is necessary to provide for a separate removal to the heating device.
At the same time, several options for selecting heating equipment are possible:
- two-circuit boiler. Will warm the water for heating and household needs at the same time;
- single-mounted boiler. Designed exclusively for water heating to user needs. A boiler relies to such a boiler. At the same time, the boiler can be accumulated or flowing. In the first case, it is possible to heat a large amount of water;
- electric cumulative water heater that allows you to satisfy the need for hot water a significant number of users;
- several flow water heaters. They will warm the water for each consumer separately. Such a system allows you to more rationally spend electricity for water heating.
Element 7. Sewerage
After the place of the drain of the water used is determined, the water recovery process can be considered complete.
Water removal is a mandatory component and the more water consumed, the more it needs to be removed. So you need to approach responsibly and to this stage. There are also two options here:
- crash into central sewers;
- equip your own autonomous sewer. Septic or sump is designed to collect water. Concrete and plastic septics are shown in the photo. And their volume and quantity (total volume) depends on the amount of water consumed.

On video, the rules of construction septica for a country house are substantiated.
The process of water supply from design to construction is shown in video
Conclusion
As you can see, there are different schemes of water supply of a private house, from simple, to complex, respectively, alone will cost cheaper, and others are more expensive. Also on the cost of water supply affects the structural foundation, i.e. It will require a water supply device working periodically (temporarily) or year-round - in winter and summer. In any case, the implementation of each system is possible, but requires knowledge and skills.
Large review of blood dilution
Water pipe on the cottage from the well: Mounting technology
Water pipe in the country with your own hands: water supply scheme and independent connection process
What do smelters on the lowerwrench mean women and men and how to develop them?
How to choose a gas heater from a cylinder