Domestic cats need an individual corner, where no one distorts their sleep. Solving your own hands to equip a comfortable place to stay quite practical. In this case, all the nuances of the situation and the characteristic features of the animal are taken into account. The proposed master classes with step-by-step instructions accompanied by photo will help to decide on the optimal model of a cat for a cat.
Conditions of proper license equipment for pet
The initial stage of any creative process is planning. When designing for a cat, a house should take into account the mass of the nuances, which we will talk in detail.
Form, dimensions and color
Among the variety of structures, there are most often larches and housekeeping houses, the optimal solution is to combine both options. When arranging a closed model, preference is given to rectangular forms, although round houses appear in the photo periodically. Two factors affect the choice of dimensions of the design: the size of the cat and the presence in the room of a free square. If you are the owner of two or more animals, you can not do without the game complex. Cats are hunters for their nature, so they will appreciate the house with two outlets, in which it is very convenient to follow the potential enemy.
A wide range of finishing materials allows you to choose a fabric that will be harmonized with a common interior and at the same time have sufficient durability in order not to break in the process of using a cat's cat.

Materials
The material for the house is selected depending on the planned model. We will get acquainted with the most common decisions:
- The frame of the game complex or single closed design is usually made from chipboard. Detailed master class of this option will be proposed further. Plywood, MDF or natural boards are also suitable for these purposes.
- The original models of cozy houses in the presence of certain skills can be applemented from the vine or newspaper tubes.
- Holding a needle with a thread will be enough to build a cozy bed or a soft lodge from the foam rubber.
- Extremely easy to perform closed and open houses for cats from boxes.
- For registration with your own hands, the brates are inhibited by a jute or sisala rope. Avoid fixing the material with the help of nails or brackets, cats can be injured on such a device.
- The base of catbathing for a cat is usually used PVC pipes, sometimes apply metal products or wooden bars.
- As fillers of pillows and sailors fits syntheps, foam rubber, artificial straw.
- Inner covering is performed from soft tissues: plush, fleece, artificial fur will be for the cat, as the way.
- The external decoration of the house is selected, taking into account the cat's habits to drag claws. Therefore, in the overhaul, the material must be strong enough. Carpet fully satisfies the requirements provided with the absence of electrostatic properties.
Tip! Studying any master class, note that the manufacturer's design for the cat is carried out using natural materials.
An important point is the choice of glue, it should not exude a caustic aroma that will scare the cat. Prefer the products with an organic solvent content.
The pictures presented below clearly demonstrate a wide range of houses that can be arranged with their own hands:


Accommodation
The key condition for the proper placement of the cat's house is the stability of the design. Therefore, for game complexes it is desirable to take care of the basis of the Fiberboard. The next nuance is the level of installation of the house. Cats prefer to observe what is happening, so when designing it is better to schedule its location at an altitude of 1.0-1.2 m from the shelf. Lena, hammocks and just stands are also preferable to equip at different levels.

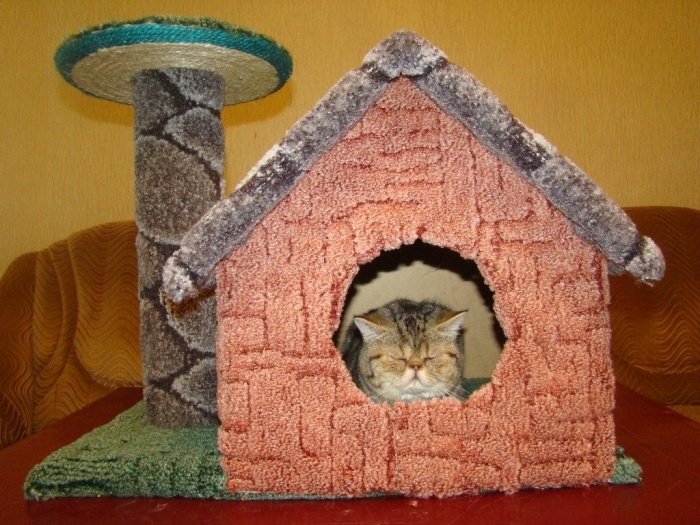
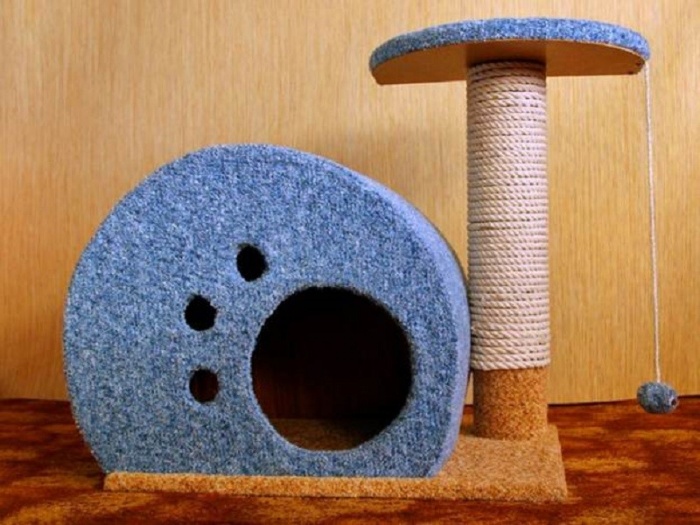
Compact design with Kogtechochka
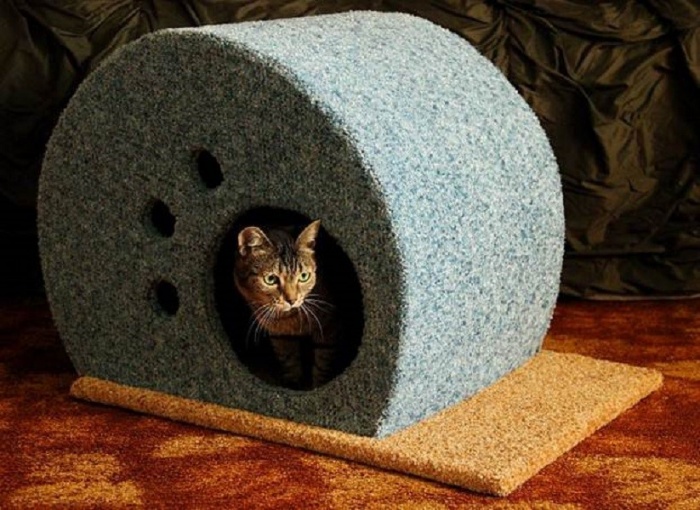
In the interior of a small room, a harmoniously fitted compact design of a house with a clawing, stand and a toy on a rope. Additional elements allow you to organize for a cat not only a passive rest, but also an active time. The photo of the finished design will help specifically understand what the master class will be discussed.

Preparatory stage
Before proceeding to create your own hands of a comfortable mini complex with a cat house, you should take care of the presence of the following materials:
- For the base of the house - the board of fiberboard is 40x120 cm.
- On the roof - chipboard 44x60 cm, walls - fiberboard 44x55 cm.
- The struts for the walls of the house are made of 7 speeches with a length of 38 cm section 3x4 cm.
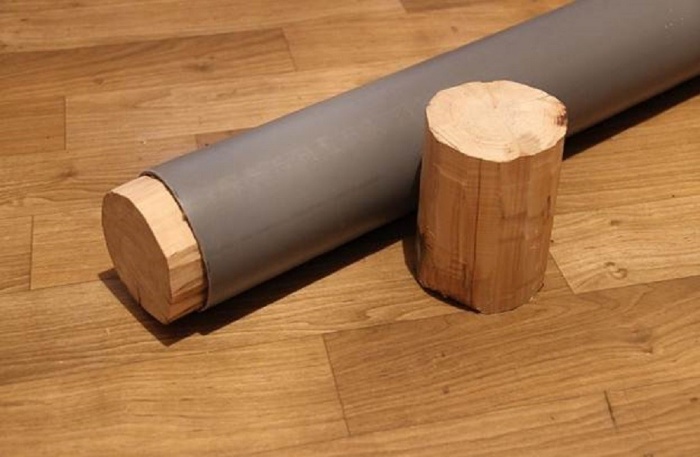
- Basis of Kogtechki - PVC pipe Ø 110 mm 60 cm long, winding - from jute rope.
- The inclined bracket is made of a 40x18 cm board.
- Provide stability of brazetting near the house 2 wooden bars will help.
- The basis of the Lena - DVP, chipboard and porolon with dimensions 44x30 cm.
- Upholstery fabric for housekeeping, burdocks and inclined brates.
Construction of a cat for a cat is impossible without the following tools:
- Lobzik (preferably electric) and saw.
- Screwdriver with a drill.
- Scissors and sandpaper for grinding details of a house.
- Adhesive thermal and furniture stapler.
- Pencil, marker, chalk and roulette.
Manufacturing process
A detailed master class will help competently organize the workflow of the creation of your hands a mini complex for a cat with a house, clawed and laying. So:
- From the chipboard and the fiberboard, rectangular elements are initially chopped according to the size specified in the previous section. It is not necessary to strictly adhere to the proposed dimensions, you can independently determine the optimal outlines of the cat's house.
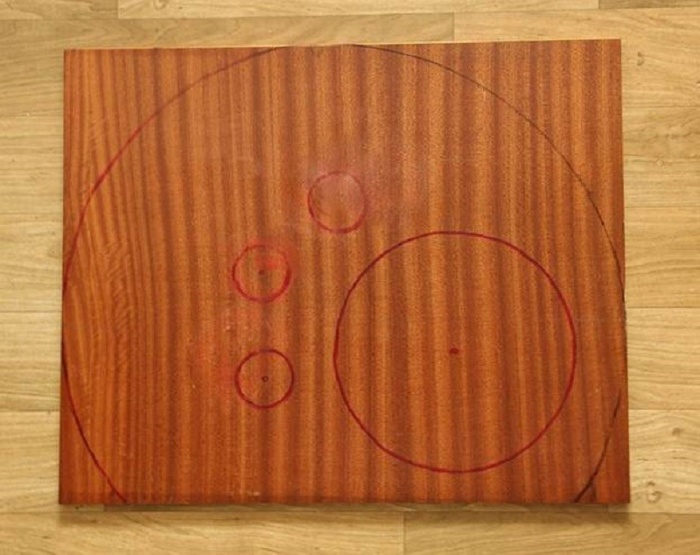
- On both parts it is planned circle with a radius of approximately 27 cm. Make it better than a circulation, when it is not enough, use the marker fixed on the rope.
Note! The center of the circle is shifted down to ensure the stability of the design of the cylindrical house.
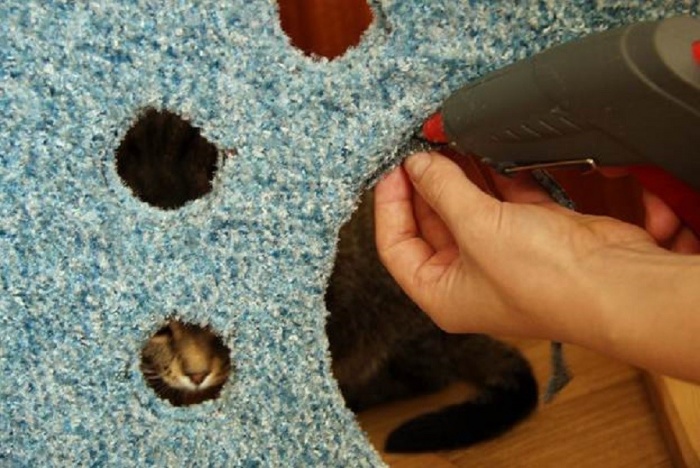
- The rear wall will remain solid, on the front draw a hole for the input with a diameter of 22 cm and small windows Ø 5.5 cm, as shown in the following photo:
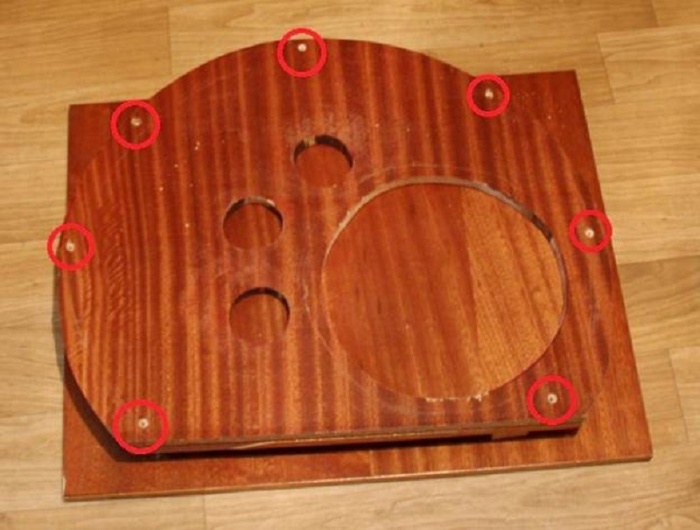
- The next step is to drink holes with your own hands. For this purpose, the electrolybiz and drill will be useful.
- Further, both details of the future house for a cat are combined to make markers where the rails will be fixed. It is recommended to establish the order of seven struts. The labels are practical to make through through drilling on two walls, as depicted in the photo:
- In the holes, the drill is prepared for the recesses for the self-tapping screws, which will be fixed by the rails.
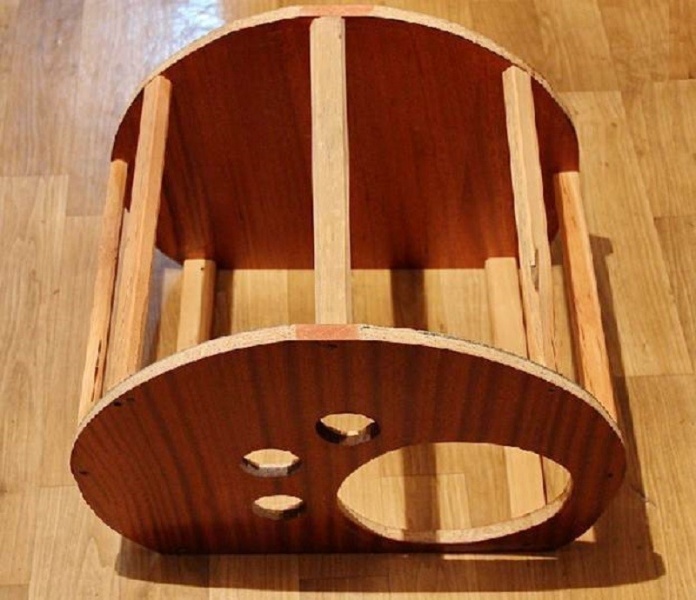
- Rakes for the cat's house need pre-processing: after grinding, the edges are flattered and removed roughness. Thickened lower rails will provide a house for a cat greater stability.
- The front and rear part of the design for the cat are connected by rails with self-tapping screws, look at the photo, which should turn out in the end:
- The next stage - cutting material for decorative decoration design.
Tip! The fabric for the house is better to choose with a cut pile, otherwise the cat will cling to her claws. Artificial fur, plush or pile will also be suitable for these purposes.
- The most practical way to fasten the decorative decoration to the blank of the house - with the use of a thermal system, fastened with glue without a sharp smell. On the front side you will need to carefully cut holes for the entrance and the windows and process the edges.
- The place on the basis of the chipboard, where the house will be enshrined, is drawn up by the foam rubber. Its dimensions correspond to the design dimensions for the rest of the cat. Near the circle is drawn, where the frame of the cats for the cat will be set.
- All the foundation is made up with decorative matter. It is convenient to do with a furniture stapler. Having wrapped the tissue, the bottom of the base is closed with a sheet of fiberboard.
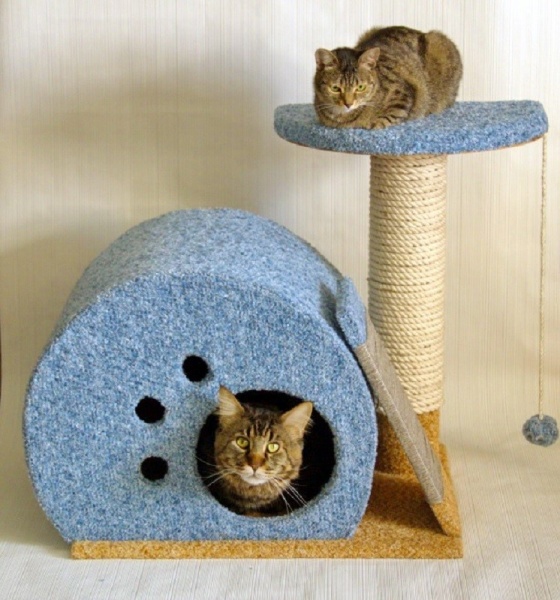
- Now you can go to the processing of the roof of the house. First, the upper part is glued, then the rails located below are closed. After that, the cat's house can be attached to the base, pre-picked up the correct size of the screws. The following photos clearly seen the inner design of the house and cat satisfaction with the process according to the proposed master class.

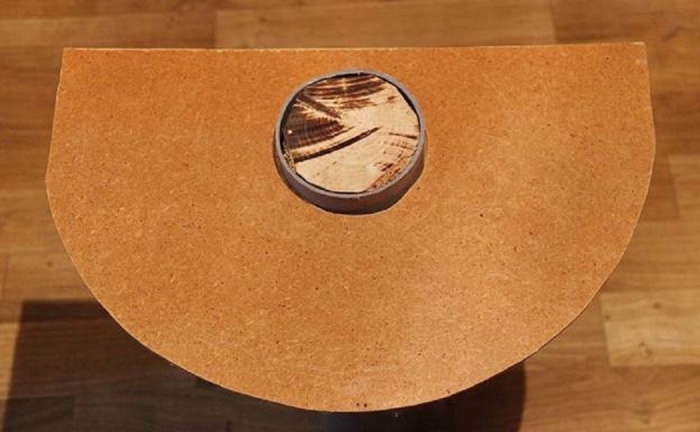
It remains very little. For the stability of the plastic pipe inside on both sides, wooden bars are placed. Depending on the materials used, they are fixed with self-draws or glue. Semicircular elements are cut from chipboard and fiberboard. First, a part of the DVP is riveted on the pipe (later it will close the edges of the decorative trim).
Then the detail of the chipboard is attached to the bruus. Approve the design of the house for a cat horizontal position, the location of the locking of the scathetties is determined, as shown in the following photo:

After that, the pipe is connected with the base of the house for the cat. Final strokes:
- fasten under the detail of a bed from the chipboard cord for hanging toys;
- to decoe the bed for a cat with a cloth, pre-put a foam;
- combine glue with the bottom item from the fiberboard;
- emboss the pipe with a jute or sisala rope with periodic fixation with glue;
- an interesting bubo made of soft tissue is attached to the edge of the suspended cord.
So now it looks like a house for a cat with a stand, it remains to arrange the inclined bracelet.
On the one hand, a diagonal sleeve is made on the board for sustainable fixation based on the construct for the cat. The edges of the board can be seen by matter, and the middle wrap over the rope. After that, the upper edge of the brackets is attached to the rail of a house for a cat, and the bottom - on the base. On this master class with a step-by-step instruction for the design of a mini complex with a house completed. You can supplement it with your elements or resize, the main thing is to ensure the strength and stability of all components.
Registration of the game complex
The manufacture of a multi-level game complex will require high time and strength, but positive emotions from the result obtained will experience everything - both the owner of the cat, and directly the animal for which it is intended. Step-by-step instructions offered in the master classroom, and numerous photos will help to navigate in the right direction and without any difficulty to issue a practical corner for the cat. Materials for such products are taken standard, innovation may seem door hinges.
Assembly
Go to the process:
At the first stage, a box of arbitrary sizes is collected from sheets (without one side wall), in our case, a spacious house for a cat has a length of 80 cm, in width - 55 cm, the height is 30 cm. The input shape can be any, if desired, fall Design with individual features, you can cut the semblance of cat's head. The assembled housekeeper is attached to the base, as shown in the photo:

Loops are attached to the free side and the door is fixed. Pipes are fixed on a house corner with screws.

Alternating pipes with chipboard panels, you can create a game complex of any design for a cat with your own hands with different levels of levels.
Note! For convenient movement of a cat in the panels formed holes.
The photo shows that a layman is equipped between two pipes, then there is a solid overlap.

The next level is a launcher, but another form. For the cat, it will be interesting to move between the stairs houses, which can be installed on the side or directly inside the complex. For its attachment, furniture corners also apply.

The upper house is better to make a bounce roof, set it symmetrically on four pipes.
Tip! Signing one part of the roof on the hinges, you will greatly facilitate the process of house cleaning.

The transitional shelf between the house and the cabinet will help to give greater stability of the design, which further fixes the multi-level complex for the cat.

Finish
After the assembly process proceeds to decorative trim. First, all pipes are wrapped with a rope from natural materials, upstairs they are fixed with glue. Lena, overlaps and houses are glued with carpet. On individual elements it will be necessary to make holes for pipes. Corners and hard-to-reach areas are recommended to fix with a furniture stapler.

Design with your own hands can be carried out in one color or combine the finish. A particularly careful approach requires the treatment of ends and joints. The holes zone is convenient to close the furniture planks, which are easily deformed and provide a smooth surface, unable to paint the cat. This master class can be considered completed. Despite the bulk work, step-by-step instructions will be reliable assistants in a noble break to create a game complex for the cat with their own hands.
Conclusion
The proposed master classes will not cost without male hands. In the event of the reluctance of their participation in the process, it is better to stop at the manufacture of models of houseworks of houses where the female skills are required. For the very elementary conversion of a cardboard box to a favorite place of rest, cats will need scissors and tape. Simple laying sew with their own hands from the foam rubber and soft fabric in a couple of hours. Therefore, when choosing a design for a cat, consider your capabilities and availability.
In this article we share ideas, ways and relevant advice on how to make a house for a cat with your own hands. Step-by-step instructions with photos, detailed explanations of the production process and master classes will help you quickly and easily create an original cat house. Choose an option that perfectly fit into your interior.
Complex for the cat with brakes, a bed and hanging toy
For games, sleep and recreation, as well as to sharpen claws, you can build a cozy house for a cat with your own hands, which will not only decorate the room, but will benefit. This ideal complex for the cat will not take a lot of space. A roomy house is suitable for a large fluffy or pregnant cat. Vertical Kogttechka, Soft Lenhing and Cleaning toy will become an excellent entertainment for adult animals. And a cozy house and inclined brazetchka will be a favorite place of curious little kittens.
Materials necessary for the basis of the design and house:
- Fiberboard (organite) 40x122 cm (for base);
- Chipboard 44x61 cm (for the roof of the house);
- Chipboard 55x44cm (for walls);
- 7 Rosek 3x4x37 cm (struts for walls);
- pipe with a diameter of 11 mm, a length of 60 cm;
- 2 bars (for pipe stability);
For Lena:
- Chipboard 44x30 cm;
- Fiberboard 44x30 cm;
- foam in size 44x30 cm;
For brates:
- rope from x / b materials or jute with a thickness of about 110 mm, 15 m (for vertical brates);
- rope or fabric (for inclined braid);
- toy;
- board 18x41 cm;
Additional materials and tools:
- cloth or fur for tight;
- saw, manual or electric jigsaw;
- drill, screwdriver;
- knife, scissors, sandpaper;
- stapler for furniture, adhesive thermal controller;
- roulette, pencil, chalk, marker.
The process of making a house for a cat with your own hands
First of all, it is necessary to cut out from the existing materials of the chipboard and dvp rectangles: For the base of the house, walls and layers. The required dimensions are indicated above, but you can independently define the suitable size convenient for you convenient for the pet. On both rectangles for the walls of the house you need to draw circle From radii about 27 cm. Make it most easily with a circulation, but not from the center of the rectangle, but just below. You can use the marker, if you attach the rope to it and hold it in the center of the future truncated circle.

One wall of the house will be solid, and on the second wall you need to draw circles holesfor the entrance and several windows. It is originally made by a feline trail look like an imprint. Large circle Make 22 cm in diameter, and small 5.5 cm.

house for the cat do it yourself a step-by-step instruction photo
Small lateral circles should be arranged on a symmetric distance from a large circle (equal to 17.5 cm). And the central small circle is to arrange a little further.

The next step in building a house for a cat with your own hands will be druple. Carefully, using a drill, a jigsaw or other suitable tools, you need to cut down alternately small and large circle.

Next, we combine both walls of the future house and celebrate the places in which we are planning to bore them with the rails. In our example, it is 7 points. It is most convenient to do with drilling through the tags to be visible on both panels.

In all marked points, we turn the deepening drill for self-tapping screws. Reiki will be mounted here.

We prepare the rails: Ogrivate, flatter, remove roughness. For stability, the lower rail can be made thicker.

Both details fasten in seven points with the help of prepared rails and screws.

house for cat do it yourself a step-by-step instruction. Photo
Preparing fabric for walls Domika. It should be slightly more than the walls themselves. For the safety and convenience of the cat, it is better to choose fabrics with a cut-on pile so that the animal does not engage with claws. You can use artificial fur or other materials.

Segments of fabric with a glue thermopystole glit To the blank of the house. It is best to use glue without a strong smell, he probably does not like the cat.

On the front side of the house cut the hole in the tissue of the hole in the right places, we begin it and carefully fasten along the edges.

On the basis for the complex (in the place where the house will stand) place and glue porolon. Its size must correspond to the distance between the two side lower racks of the house. It will be the first bed, next to it, we celebrate the circle to the vertical pipe.

Fully glue the entire base of the design cloth.

In order for the fabric to firmly keep it will be better consolidated with a bracket using a stapler for furniture. If on the sides there is a fabric that begins to crumble it needs to be wrapped. Next, fix the design from above with the help of a WHP sheet.
Prepare roof Domika. We celebrate the cabin on the tissue of the allowance and glue her sheet of fiberboard.

We take two not wide pieces of fabric and glue them to the inside of the two lower edges. If you use colored fabrics, you need to use the color of the base. 
Connect House with base. In this stage, it is important to choose the screws of the optimal length. They must keep the house tightly, but at the same time do not play for the base. 
Hide racks under the fabric. 
The rectangle from the fiberboard is placed on the roof of the house and fix the stapler for furniture. 
Staples with small scissors in the fabric. 
Refine interior Domika. We glue the fabric of the appropriate color. 
The house for the cat is almost ready for the cat. Details remained: Kogttechka and Lena. 
Preparing pipe From cardboard, plastic or wood and two bars slightly smaller diameter. This ensures the stability of the design. In our example, a plastic tube and wooden bars are used. 
Firmly insert and fix the bars in the pipe, it can be made with glue or self-drawing (depending on the materials used). 
From the rectangular sheets of chipboard and fiberboard cut the same semicircular parts for lena.
Part of the fiberboard we ride on the pipe, having previously done the hole. This part will close the glued tissue below. 
On the bottom side of the beds are preparing holes for self-tapping screws. We connect the bed and bar fixed in the pipe. 
I turn around the house horizontally. We place the pipe parallel to the floor, we substitute any items under it to determine the appropriate place for fastening the scheduling. 
We make the mark on the bottom of the base, we make holes for self-tapping screws, screw the pipe. In our version we made four holes for better mounting. 
The bottom of the pipe can put a cloth. Usually cats accreed claws, pulling up the paws up. 
Cut the porolon of the desired size and glue it to the laying. 
We take the rope, on one end attaching toy And the other side is fixed by the furniture stapler side to the base of the laying. 
Fully glue the top of the laying with a cloth, making the allowance for its bend. We glue the fiberboard part so as to beautifully hide the edges of the fabric.

Cheat the rope tube periodically pinning with glue. 
Preparing sloped Kogtetchochka. The bottom we enjoy it to touch the bottom. Plug by cloth both ends of the board. 
The house for the cat is almost ready for the cat. The central part of the inclined brackets, about which the cat will be able to sharpen claws, wind the rope or cloth. Board put on the basis of the complex and fix over one of the plates between the walls of the house. 
Using our master class, you can complement yourself and complicate the design, increasing its size and number of components. 
Scheme of a house for a cat in the form of a castle

Standard game complexes for cats usually occupy a lot of space in the apartment. It is not always possible to allocate territory to put this building at home. But if the desire to make you chanting your pet, does not give you peace, we suggest to do hinged house For the cat do it yourself. And not just a house, but a whole castle! It is convenient to place it anywhere on the wall. You can make any number of turrets and combine them with mesenters.
If there are small children in the house or besides the cat there is a dog, then such a mounted complex with a clawed will be the favorite place of the Uncet Murlyk. There the cat will be able to sleep peacefully to no one bothered him.

Materials necessary for the construction of towers:

In addition, they will need construction tools, such as drank, manual or electric jigsaw, drill, screwdriver or screwdriver, stapler for furniture, stationery knife or scissors, pencil (marker) and roulette.

Stage planning and training
In our example, the sizes of the turrets have a base of 34x34 cm, the height of the walls is 45.5 cm, the upper tier begins at a height of 30 cm from the lower base of the wall. Therefore, for the construction of the turrets, we will need: base, side wall (size 34x44 cm), two small side walls (30.5x44 size), shelf 30.5x30.5 cm, two rails 5.5x44 cm, two rails 5,5x23 cm. The DSP leaf has a thickness of about 1.5 cm.
To make a house for a cat beautiful comfortable and functional, you need to think over the magnitude of the turrets. They should harmoniously look in the room and be sufficient height so that the cat can sneeze and move in. If the game complex for the cat will include the bunk tower, then the size of the top base should allow the cat to curl up and feel safe at the expense fortikov.
House for Cat with your own hands Step-by-step instructions
From chipboard sheet cut down Accordingly, the previously specified sizes of 9 rectangular parts.

Drawthe outlines of the tower: teeth, three pieces, 6.5 cm high and removing.

We take a big side wall, divide her side to 5 equal segments and put mark. (Side 34 cm, divide it to 5, we get 6.8 cm). We take the side walls of a smaller size, apply on top to the first wall, from the edge put the side thin rails. Then we carry the marks from the bottom wall on the walls of the smaller size. It is necessary in order for all the teeth to be one size.
We carry the marks from the ends of the wall to its horizontal, carry 6.5 cm. Connecting points, we will get the finished drawing of the teeth.

Neatly around the lines drink the teethlobzik.

Next, make a tower entranceHis width will be 20 cm, the height is 25 cm. Measure the same distance up and down from the center, mark the points you need. Optionally, you can round up the top line. In this case, it is possible to postpone the segment of 12.5 cm. Draw an arc.

Make lobzik Log in the drawing.


We connect the sidelines with the side wall with the face.

In the same way, we attach the second side wall. For convenience between them can be put Shelf.

I turn over the tower, add the base, which is also fastened with self-draws.

At an altitude of 30 cm on the ground we make marks, deepening under the self-tapping screw and secure the shelf.

Two side horizontal and two vertical rails fix on the side, closing the sections of the walls.

Cut a piece fabrics Slightly more than the height and width of the tower, try and adjust the size.

We fix the cloth with glue or furniture stapler, neatly decorated and wrapping the edges. In the area of \u200b\u200bthe teeth, we leave about 1.5 cm. It is important that the glue does not have a sharp repulsive smell.


A narrow long piece of fabric (about 6.5 cm high) we glue the teeth from the inside. Gently we rush ends.


For side inputs We prepare a fabric with a margin, trying to cut, then glue.

Decorated Tales At the entrance, and at the end they fix another piece of fabric from the bottom of the tower.


We select poropolone Details for layers, turn around their cloth from the top, fastened glue.

The lower part of the foambed bed is fixed with the help of glue on the shelf, paying special attention to the edges.


To put the tower behind the fasteners and hang it on the wall. We complement at will staircase-Kogtechochka, Create which can be similar to the first way, wrapping the board or pipe with a rope.


To make a cat to be comfortable to climb into your house and crawl around the turrets, you need to come up with bridges between turrets. It can be a piece of wood, placed with a cloth. Using in the design and brake, and bridges, it is important that the wall can be left for the cat.

It is so easy to make an unusual house for a cat with your own hands. Optionally, you can build several towers of different sizes, hang them at the floor or high at the ceiling. If you place the design around the perimeter of the house, then the inputs in the turrets are better made from three sides.


Entertainment complex for cat do it yourself
Another option is to highlight the place for your pet - create an interesting cat and an unusual interior detail for you in your home. FROM an entertainment corneryour favorite will always be busy, even in your absence. We will show you how to make a three-tier complex for the cat.

Required tools:
- two different in the magnitude of the table on low legs;
- rope, fabric or fur;
- stapler, glue;
- toys and decorative elements;
- screw and screws;
- paint.
Step-by-step instruction of an entertainment corner for pet
The first stage will be preparation of tables. They should be disassembled, unscrew the legs, shelves (if any), countertops to decorate and improve. In our case, we use a fur item - a large piece of fur. They want to completely close the shelf from the table. To fix the fur should be hooked down.

In this way, we also decorate a small worktop, fixing from the bottom of the fur stepr.
From the legs of the table will turn out excellent khogtechki, It is worthwhile to wrap them with tight ropes. You can wrap all the legs, you can only part of them. To fix the rope in the process of winding, you can fix it with brackets.

The remaining legs and other details of the tables are offered to paint into another color of safe paint.

After drying, you can collect all the details.

On a large table, we will put our little table with a smaller table, considering where they look at the brackets so that the cat is convenient to use them. The upper table can be glued, fasten with screws or screws.
The last stroke in the design of a bed for a cat will be adding toys and entertainment accessories. It can be suspended toys on the ropes, a glued pot with a flower, a piece of carpet for claws. Fantasy is limitless.


Multi-storey house for cat do it yourself
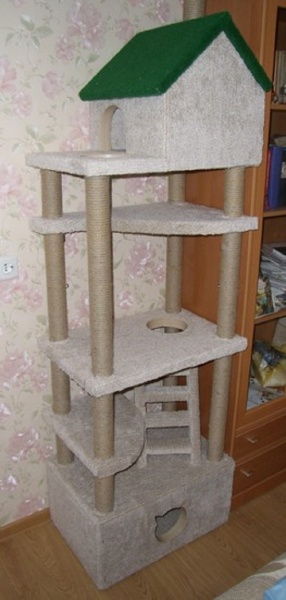
To build a multi-storey complex for a cat, you will need a little longer time and patience, but the beauty that will result in the end, please the small tenant house and its builder. In such a complex, you can sleep, and hurt, and sweep the claws.

For the manufacture of such a complex you will need:
- chipboard plates;
- electric jigsaw;
- fabric and rope;
- roulette, pencil, scissors;
- templates for entry / windows;
- glue;
- plastic or cardboard pipes;
- self-tapping screws, door loops, screws, corners.
Multifunctional six level house for cat do it yourself Step-by-step instructions
At the very first step you need to prepare base complex houseand nizhny compartmentwith an entrance that can be any form (circle, oval, rectangle).

We chose a figure in the form of a cat's head, circled it on a sheet of chipboard, and then cut out lobzik.


Of the five rectangles we collect arbitrary largest house-boxIn our version of its length 80 cm, the height is 30 cm, the width is 55 cm. The main thing is that the cat was comfortable.

On the rest of the side hang loop For the future door.


We join the door to the house on screws.

Between the floors, we will have pipes, so they will connect to their foundation, with which it is easy to attach the pipe to the base.

Thus, using pipes and chipboard panels, you can build several floors, different in shape and size. At the same time, they should leave holes for a cat. The diagram of the cat for the cat depends on your imagination.


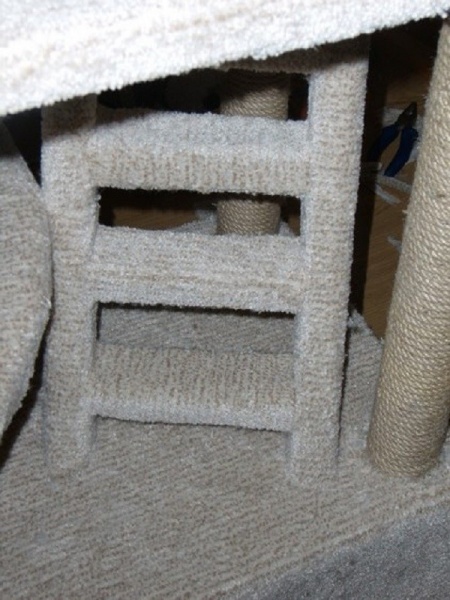
With a side or between levels to a multi-storey cat house can be attached staircase. Make it just from ordinary boards. The staircase can be put at an angle, covering the legs from the bottom at an angle of 45 degrees. To the house to attach this element with furniture corners.


On the top of the house will look good house with double roof. Its foundation will stand on several pipes, better if they are symmetrically located for equilibrium.

From the DSP boards, cut the suitable parts suitable in size, we form in the design, fix with screws and furniture corners.

One side of the house or roof can be placed on the loop, not only for the entertainment of the cat, but also for the convenience of opening and cleaning the home.

In our version, we made a house with a side entrance and a door on the roof.

The topmost floor (that is, the attic) can be placed under the most ceiling or make a peculiar step to the closet from it.

Using another pipe and mini DSP panel connect a feline complex with the top of the cabinet.

Decorative finish
At the end of the construction of a cat's house for a cat, it is important to decorate beautifully and make it a beautiful interior accessory.

All pipes are wrapped with a rope or rope, fix at the bases and at the vertices of glue.

Roofs, walls, side and inner sides gluculating carpet.

We measure each detail, we make the necessary holes in the carpet, try on and fixing.

At the corners and in difficult to accompany the places, it is convenient to use the furniture stapler.


Optionally, you can make a manifold of all parts in one color or use several different. The roof of the house we were performed in green.

Special attention should be paid to the corners, ends and joints. At the ends in the zone of holes, it is good to use a furniture bar. It is smooth, easily bends and takes the right shape.


The master class on the construction of such a complex is very simple. Perform it for everyone. Your cat will appreciate such a gift.
Soft bed for cat do it yourself

Cats lover sleep, they are always looking in the house the most soft, calm and cozy place. Give your attacker your own place for sleep and rest. You can make a bed for a cat with your own hands in just a couple of hours. This method does not require male skills, there are no complex details in the master class.

Lenhing Making Materials:

You can choose any size and shape for a laying. This method is also suitable for the manufacture of a bed for a dog.
Step-by-step instruction how to make a bed for a cat
Choose a placewhere Lena will be located, it affects her form. You can place the future design to the angle, on the window or under the table. We will do a classic oval form. For a regular cat is suitable size 40 or 50 cm long.

An important step is select fabric. It should be pleasant, easy to leaving and safe for cat claws. Color You can choose a suitable to the main shade in the interior.
Black Oval shape on a sheet of fiberboard. This can be done in two ways.
The first method without the use of a circulation. Blacks straight line, divide her in half the segments.

I fix the side points with stationery buttons or pins, we wear threads associated with two ends on them. Using a pencil, stretch the thread on the left side to get a triangle. We put the point.

With similar tension, we carry out a line around the buttons to get a beautiful oval.

Another way to get an oval shape is to draw it with circular.

We carry out a segment, divide on equal parts, at the end it put the points A and V. Draw a circle two circles with centers at the end of the segment, diameter to point A and in respectively.

Abroves over the crossing of the circles to the arcs from the upper points of the circles to each other. We get oval.


Transfer it to the DVP panel and drink For such form 2, the same figures.

We measure and construct flights. For this we take foam rubber. Its length is equal to the length of our oval (135 cm), and the width will be 10 cm.

From a piece poroorone We form a side. We fold the segment of the foam rubber along the entire length and fasten with the help of glue.


Preparing the clothwhich is tosing a foam. The fabric must be somewhat more widely in the width to make it convenient to glue the structure to the bottom of the base of the laying. We chose a width of 14 cm.

We glue a foam fish and a piece of fabric.


Fixthe resulting side of the Lena, leaving the free edge of the fabric from the outside.


Complete the semicircle with the connection of the two ends of the side.


At the bottom of the bed, fasten the fabric from the side.


To hide this part of the design, close it prepared by the earlier part of the Fiberboard.

We decorated in nutrane part of Lena. Cut in the form of foam rubber. Apply and try size, it should be slightly smaller than the diameter of the bed.


Wrap a fabor with a cloth, making the allowance. Fix them from the bottom.

For the remaining non-closed fabric part of the foam rubber we applied glue and put a soft detail in the construction center. You can do without glue, then the foam rubber should be wrapped with a cloth completely and sew threads.

Compact and soft place for the cat is ready!


Master Class: Cat House Found
One of the most favorite entertainment for cats and cats is the search for secluded corners or capacities where you can comfortably get a set. Even the simplest small shoe boxes instantly attract the attention of the cats. What is their joy to get a house from a big cardboard box!
You can make a house for a cat from one large cardboard box (from under the equipment) or from several small boxes. This will require:
- scissors or stationery knife;
- glue thermopystole;
- line or stencils (for windows);
- self-adhesive paper, paint or fabric (for decoration);
On the walls of the box, you must draw and then cut the windows and inputs, they can be of any shapes and sizes. For sustainability, it is important to strengthen the angles, the bottom and side walls with the help of tape.

So that the house looked like a real, his roof is better to do double. For this you need to work with a riding box, consisting of 4 rectangular parts (continued walls). Two wide parts will become skates, and two narrower - frontones (triangular parts of the walls). Clean the roast of the house most convenient thermoclaster.
Using this way of building a cotton house for a cat, you can make one house or whole tunnels if the territory allows. The design can be painted with paint or punctory with colored paper or wallpaper. Optionally, you can warm it from the inside and outside with various materials: foam rubber, carpet or cloth, and add a pillow to softness.
From old T-shirt
One of the most elementary ways to make a house for a cat at home is to build it out of wire and ordinary male T-shirt.
To do this, you will need:
- cardboard or piece of plastics;
- 2 Metal thin wire hangers;
- pliers;
- t-shirt or other clothes with sleeves and gates;
- pillow or pillow;
- pins or glue.
Prepare frame housing. The pliers will warm up ordinary clothes hangers and install them on the cardboard base of the cross on the cross in the form of an arc. At the top of both wires need to be combined with a scotch. Special attention will be paid to the consolidation of arcs in all four points at the base. You can pierce cardboard, a little bend the wire from the back and consolidate it with a scotch. To the base, you can glue the fabric, put a foam or pillow for soft.

We put the T-shirt on the frame, stretch the fabric from above, sweep it down and challenge the pins. T-shirt should be placed in such a way that the entrance is from the hole for the gate. Optionally, it is easy to leave the windows on the sides of the house of sleeveless or do additional holes.

Other ideas for creating houses for cats and cats do it yourself
Original houses for cats with their own hands can be made from wicker basket. Of the two baskets, a cozy bed will be cozy in the form of pearls, and on the bottom you can put a soft pillow.

On the window and the table will be great to look a house in the shape of a cat with sewn ears, eyes, tail and a hole resembling a yawning mouth. Such a house is better to sew from a dense, holding the form of the fabric.

For the children's room or the corridor will fit the house for a cat from colored wooden cubes. You can make several inputs in the form of geometric shapes and positively decorate cubes outside.

A cat'simate detail will be a feline house - Wigwam with shelves. You can assemble it from wooden or cardboard bonded horizontally and vertical boards, inside the satellite soft blanket, instead of walls hang fabric.

The easiest way to do wigwam for Kota - Connect several sticks in the form of a cone, high-qualityly bore them on the top and at the base. Then cover the house with the cloth, make the input and windows.

A cozy house for a cat do it with his own hands if you eat or create from fabric (carpet) mini House Round Form. Then make a cut and decorate it along the edge knitted scarf.

Like the cat I. suspension fabric house in the form of cone with one or several inputs. The main thing is to make a soft bottom. Such a composition can be hung in any place.

Decorate the apartment is a concise dwelling for a cat in the shape of an egg. Smooth and solid outside, but soft due to the litter inside, the house together with the owner will take a central place on the window or shelf.

Vertical house with brakes and cylindrome in the centervery compact and functional. The cat will be able to hide inside or frivolous to explore on the top lay, watching what is happening around.

When a cat appears in the house, you need to highlight your place for it. Many owners do not bypass a simple bed from the store. They wish to make an original lodge with their own hands. This task may seem complex. But if you figure it out in all parts of production, the structure is made without difficulty! You can also build a house suitable for the interior style. And in ordinary stores it is difficult to choose this. About everything in more detail further in the article.
There are a number of rules that will help prepare for work on the arrangement of a hut for a cat.
To begin with, learning the most basic:
- Before embarking on the building for an animal, think what materials you will use. It is better to use fabric from natural fibers and natural wood. These materials are the safest for cats. But in any store they cost expensive. And Chinese counterparts, as a rule, consist of synthetic and plastics.
- You need to clearly understand what kind of house you want to make. To do this, draw it in advance on a sheet of paper. Such a sketch will help not forget anything. Also, you will correctly plan the purchase of materials, prepare a screwdriver.
- This is an interesting lesson for parents with children. After all, participation in the creative process always brings joy.
Dominics for cats Step by step: Main recipes
Make a house for a cat with your own hands more fun together with children. Just give preference to safe materials. So, the simplest and cheap option for the agricultural chaolash is the following:
- You need to take a large box of corrugated cardboard. It is better that the box had parameters at least 35 by 50 cm in width and up to 50 cm in height.
- Now you need to prepare a scissors: scissors, glue, stationery knife, fine sandpaper, tape, pencil, colored paper, upholstery and more.
- For the internal frame (litter on the floor), you can use foam rubber. But if it is not available, an unnecessary blouse or a piece of old plaid is suitable. For the exterior trim, the house can be applied colored paper. But it is more important to use the booklined cloth or fur.
- Now proceed to the preparation of the box itself. To do this, we remove the stickers from it, we are lining the scotch of the place where there are cracks, cut the bursavire, grinding sandpaper roughness.
- On the end of the box draw a hole. To do this, we apply a saucer to it with a diameter of at least 20 cm and supply it around the edges. Then cut the hole by the stationery knife. Gently grind edges with sandpaper.
- Once again we cross all the joints with scotch or glue. The house should be solid, so that the cat in it was cozy and calm. Dry the product before starting the exterior finish.
- Now you have a house with colored paper or textiles. For the second variant, silicone quick-drying glue is suitable. In this case, it is impossible to use a furniture stapler, as the cat can be born about the clips from the inside.
- Under the size of the floor in the house Sew a small pillow of foam rubber and upholstery fabric.
Now the house is ready for operation. And in this cozy nest can be launched a pet. You can add it with glued toys hanging threads, sequins.
Popular options
The building for the cat may have a non-standard form. It is possible to make it from the remedies. It can also not be scratching. Consider several such options:
- Wigwam. The design of metal rods is made in the shape of a tent. Then it is tightened from all sides (except one) cloth. For the floor of such a house, the foam rubber and the litter are stacked.
- House-Puffy. Standard square baffy usually consists of wooden or MDF design. Therefore, we remove the fabric from the bottom of the pouf and the jigsaw cut the hole. Then the wooden part can be covered with latex paint, and inside put a soft lining.
- House-hammock. Any cat is interesting to new places. Make a hammock for her rest is very simple. To do this, you can take advantage of: a small coffee table, chair or chairs. But these furniture items must have 4 legs. So, at the level between the floor and the countertop / seat, the canvas is stretched. According to his sides, two tissue tapes for each should be sewn. Then the cloth is attached to the legs by means of ties. And vua-la!
- House-triangle. This is the easiest view of a hut for a pet. To make it you will need 3 small pieces of Ozbov Plates. They can be cut from a thin board, 6 ml thick. Slices should be equal size and rectangular shape. Then the 1st piece put on the floor, and on top of it we make a dome from the other two. Fix parts with each other with nails or screws. Additionally, metal triangles can be used. With the help of glue-gun or furniture stapler we make a house with an outer face. Inside the laying soft lining.
- House-shelf. From undergraduated materials (OSB plates, boards, laminate or chipboard) can be prepared by the shelves of various levels. But its main task will be - to become a place for the rest of the cat. So, it will be necessary to decide the resulting element of furniture with a cloth and put it on the floor.
Dominics with Kogtetchka
Each cat must sharpen claws. If the pet is home and attend the street regularly he does not have the opportunity, then you will have to do it at home. Without the procedure for the stratification of claws, they will have to cohere up the owner.
And if there are no brakes in the house, the pet will begin to sharpen claws about the furniture.
Therefore, it is better to make a cat's house with a cog-brake, which will fully perform the assigned function.
Materials
First decide on the place of construction. Then you need to measure the designated "angle" in height and width. Now prepare materials, the most convenient for the sharpening claws of the animal. It:
- carpet;
- tapestry;
- jute rope;
- wood.
Carpet - it is quite durable and soft material. On him the cat will be convenient to sit and also comfortably accurate about it claws.
In addition, you will need:
- plywood sheets;
- wooden bars;
- plastic pipes as reference pillars;
- self-tapping screw;
- corners;
- screwdriver;
- lobzik.
But the specified tools may not be found in the house. Therefore, their presence is worth taking care of in advance.
What and where to buy?
To build a hut with a kogtechka for an animal, buy a whole plywood sheet at once - 1.5 per 1.5 cm. Then cut it into pieces: 0.50 by 0.75 cm.
For support (post), you can apply the usual bar, which will need to be divided into several parts. Bar Choose long to 2, 5 m.
Plywood sheets are desirable to choose with a thickness of at least 10 mm. Since the cat will often jump on them in the future. And this material should be strong.
Council
Do not buy the most expensive carpet. Prefer the cheap option. You can also ask the seller to sell you trimming this material.
Jute rope will be found in every construction store or on the market. The difficulty lies in the fact that it is sold in bulk. You will have to buy a whole motility or search for a shop where they sell the rope in the midst. But the price of cutting is an order of magnitude higher. Rope take at least 1 cm in thickness.
Under the structure buy safety elements of fastening: corners and triangles for better fixation of structures.
Manufacturing process
When the design of the hut is over, and all the materials are at hand, you can start work. The basic frame may be single, two- and even three-core. The number of platforms also depends on the number of cats in the house. So, if two pets live in the apartment, then for each of them there should be their own seat.
So, proceed:
- To the base of the plywood is attached to a wooden bar.
- You can put on it a plastic tube suitable in size (so that the pipe fits tightly to the walls of the bar and did not twist).
- If we make several platforms, at some distance from each other on a single foundation fix another 1-2 bars.
- Each of them is attached to its platform (at different heights). Fix them on top of self-discharge and metal corners on the sides.
- The first shelf must be fixed not only on its bar, but also to be connected to the second. Therefore, a hole for the second timber is prepared in the plywood in advance. He will have to enter the board. The second shelf is attached to the third in the same way.
- Now you can proceed to the frame of the plywood surfaces of the carpet. Here you can use the stapler or apply ordinary nails and the hammer. If you place a house with ordinary cloth, then it will soon be replaced by a building. Most likely the animal wants to sharpen claws about the fabric too.
- All pillars from the beginning and fully interfere with the rope. Try to make their rings firmly fit to each other.
Now the structure of the brake for your favorite is ready! Additionally you can decorate it with a colored felt, threads with buttons, sparkles, foil.
Variants of Kogttechochki
In addition to the most common brackets for cats, it is possible to make simple but original analogues. So, it is permissible to make a brake in the form of a picture. To do this, you will need a simple piece of plywood (rectangular shape) and carpet.
On the board, with the help of nails and hammer, carpet is recorded. Fabric angles must be hidden on the back. That and the mini-hanger is fixed. Then the finished picture hang on the wall in the corridor or room. It should hang at the level of homemade pets. Here the cat's growth in the withers is meant, and not from the floor to the tips of his ears.

Cats are not similar to dogs not only externally, but also on behavior. So, the saturated fluffy loves to be tied to one place, where they spend most of the time. You can buy in a specialty store for animals, and you can independently make a house for a cat from a cardboard box. Thus, it will turn out not only to save money, but also add a part of your love in the process of creating a new furniture item for your pet.
In order to imagine how there should be a house for a cat, you can go to pet store or look at the Internet.
In the overwhelming majority, the owners stop their choice on the following models:
- lena - suitable for pets who love to watch and at the same time be in shelter;
- - choose for cats that prefer privacy;
- - Suitable for active animals that love to rest for a while, and again run in their affairs;
- game complexes are an excellent way out for those people who have several cats in the house. Consists of a whole complex of houses and platforms.
Despite the fact that the solution to the problem is quite simple, before learn the question of how to make a pet house for a pet, you must trace the cat, making an analysis of the nature and behavior.
It is important to take into account several nuances when designing a house:
- what loves to do a pet - watch the time surrounding in free from the games, play a day long or sleeping;
- like an animal to rip out interior items;
- what prefers the cat is to hunt or fade in search of enemies.
After analyzing the individual characteristics of the cat behavior, will allow the owner to make the right house that meets all the necessary needs. So, for lovers to watch, the best solution will create a two-tier house, with a stayed under bed. This makes it possible to be a pet and be aware of what is happening below.

Hunters and caring mom will fall to taste a house where there is a spare input or output. This makes it possible to make an animal to monitor all the ways and in case of danger to have a spare option for escape.
Note! An important condition for creating a house for active cats is convenient approaches and outputs from all sides.
It is important not only to decide on the view of the future house, but also to choose the necessary dimensions taking into account the animal himself. The medium-sized cat is perfectly suitable for a house made in the form of a cube with a width of an input from 20 to 25 cm. For larger or small pets, dimensions and sizes must be adjusted.
For greater comfort, you can put a pillow in the house, acquired in advance or stitched with your own hands. The filler is better to use Halofiber or Singry Training, which are hypoallergenic.
Creating a house from a cardboard box and T-shirts
For the manufacture of such a house, you need to take a suitable cardboard box, as well as the old T-shirt, tape and wire cuts long 50 cm each. Two wire cuts need to be crossed together, and the places of contact with scotch. Be sure to take the ends of the wire for the safety of the animal. As a result, two arcs should turn out to adjust the height of the future dwelling for the cat.
The base for the house is a cardboard box with small sideboards. The boxed arcs made from wire are inserted into the box and fixed with glue at the bottom of the cardboard box. It is necessary to make it so that the sharp edges of the metal design do not look out.
An old T-shirt is stretched on the harvesting. For a more aesthetic species, you can pre-repeal your hands and sew the places. The T-shirt is tensioned on the frame so that the neck serves the entrance to the house.
Note! The house from the cardboard box and T-shirts are the fastest in the manufacture, but also the most durable.
Making a multi-tiered house from a large cardboard box
Cats creatures careful and very curious. In order to entertain a pet and satisfy some of its needs, you can add multiple items when building a house. So, an excellent find for owners having several cats, there will be a multi-tiered house of cardboard. The manufacture of such a house is different from the one-tier in that it is necessary to strengthen the design. For these purposes, you can use a plastic tube passing through several floors. The basis for such a house should also be more durable to withstand the weight of several pets.
If your cat or cat is constantly disappearing in a closet, scratch a wallpaper or sofa, hide under the blanket and it bothers you, try making a feline corner. Correctly made house for a cat or cat will be a favorite place of time. All sorts of feline corners, with clawholders and without, fully in stores, but it's not at all ... made with your own hands and better, and more reliable ... It is possible to develop it personally under the queries of your favorite.
What option to choose?
Build a house for a cat is not so difficult, but it is necessary to correctly choose the design. After all, I want to have a personally made, actively exploited, and not just stood for collecting dust. To like your cat or cat, look at where the pet prefers to spend time that he likes to do where he prefers to relax - climbing higher or on the floor ... In general, it is necessary to pick up the design of a cat house based on the habits of your pets.
How to develop a design
Cats and cats may vary. For example, cats prefer houses with two entrances - in case of emergency evacuation of offspring. Therefore, many people like pipes or similar to them. At the same time, too big LAZ do not like it, as it is necessary to feel in the shelter. Therefore, the entrance / exit to the house must be done not too much so that the pet in it calmly passed, but not more. And yet: not all cats like the houses that stand on the floor - in them cats dwell with kittens. "Idle" prefer asylum at height, although this is also not a fact, and depends on the habits of the individual.

Cats prefer to spend time at a height, watching everything that happens around. They rarely sit in the house, but on the venues they can lie for hours. If you have a cat, make more sites, and solid sizes - so that the animal could lie down in full growth without risk fall. The railing if we need, then only for the highest shelves and clearly not around the perimeter, but only from the back and a little bit from the sides. In general, the individuals of the male floor feel very well on the sites without any fences: there is no fence on the trees. The railing is needed more to calm the owners than for cats.

And, by the way, there are cats that love to sit on the courts at least cats. So for them, too, you need a review point, as well as you need houses for cats. Little, maybe he will have a bad mood and he will decide to hide from you there. So yes, we have not been simplified with the choice with the choice, but this is the case - until you try, you will not understand what your pet is needed.
What to add
When the owners say "Cat House", usually refers to a whole feline complex, in which, in addition to the house itself there are sites and a number of additional devices. Typically, one or two plots are usually used, and the rest is only occasionally visited. But the fact is that you do not recognize in advance that your pet will have to do.
Useful additions for a cat house are scratching and lazal rubber. Kogtetochi are vertical surfaces that are usually wrapped with a rope from natural fibers. Lazallets are horizontal and oblique boys, for which cats can move from one level to another. Kogttechki, by the way, can also be used as lazal rubber - on them the beast is closed on the upper tiers.

What else can be in a feline complex? Hammocks. This is usually a piece of rectangular fabrics, fixed on two crossings. Another option is also possible - a hard frame with a cloth with a cloth or a piece of fabric, suspended in four corners to the site.

A combination of hammock and pipes - one of the "Light" options for a cat for a cat
Which cat likes the pipes. They are sewn from the fabric, for rigidity insert the circle or oval from the wire. One end is fixed higher, the second is thrown down. The main thing is that at the end of the tunnel there was a clearance, otherwise the cat is not lured. It turns out a good place for an ambush, in which some shaggy hunters love to spend time.

There is another chip that likes cats, but about which not many know - clothing brushes, nailed on vertical surfaces at about the backrest level of your favorite. Bristles on the brush - artificial, medium hardness. Try, your pet will be satisfied!
Choosing a height
In general, for cats, the rule is fair - the higher the better. Therefore, the height of the house you want to make with your own hands may be like what you are willing to do is at least under the ceiling. And no matter how much tiers in it, most often the uppermost one will be busy. And if there are several cats, there will be a "leader" at the top and it is this place that will always be disputed.

The minimum feline height is about a meter. Such low buildings are safe even for kittens, however, they quickly grow up and then want to get higher.
Wall-mounted options
Not even the largest house for the cat takes about a meter of free space on the floor. It is not always possible to identify such space. For such cases there are wall-mounted options for feline corners. The houses and platforms are attached to the wall in the selected place by any available method. Where directly - nails to the wall, somewhere with the help of brackets. Between the fixed parts make transitions. From the boards - direct and inclined, rope stairs, stacked a crossroads at a distance of 10-15 cm from each other, make steps in the form of a ladder ... In general, everything is limited to your fantasy.

Wall "simulators" for cats
Such wall corners for cats are called still shelves for cats, as the construction is very similar to traditional bookshelves. By the way, the shaggy them is very loved and are actively moving.
Choosing materials
Cat's house, with all additions, is usually collecting from construction residues. This is quite justified, because many (or all everything) the surface of the finished design will be covered with cloth, textiles, entangled with ropes, etc. So if there are remnants of building materials - you can use them. Requirements for materials (all) two:
- They should not have a sharp smell. In any case, such that perceives the human nose. Natural smells (wood, wool, etc.) do not count. If the material is bought recently, and the chemical smell is present, hold it on the street to weathered.
- Materials should not electrify. Static discharges are very unpleasant for cats, so open plastic surfaces they do not like. Also do not use silk.

All demands, but there are still wishes. Want your cat to quickly and actively master the house? Hold building materials for some time in the house. They are impregnated with familiar odors, will be investigated by a curious beast. Made of "from the resistant" in the house of materials complex will be adopted with greater favor.
Materials for the base
If you look at the photo, a feline house consists of different parts and you can make them from different materials. The list of basic materials is:

Explanations require only the trunk of a tree, as a material for a feline complex. Everything literally: take a tree, clean from the crust if it lifts. The branches are used as stands for placement of houses, sites, baskets.
Than sow
For the arrangement of brakes, a twisted rope of natural fibers is suitable: jute, linen, pene, sezal, etc. Take a thicker diameter and immediately several tens of meters - if the base is not wooden, all pipes will have to wipe the rope.
The shelves and houses are squeezed with a tight fabric with a short pile, usually carpet. The shorter and the tight pile, the better. Long and shaggy only look good, and so far the new - with time, dust, wool, different garbage and a cat house becomes causing allergies (your or cat) over time.

The color of the upholstery, for cats is generally unimportant - they do not react to colors. Therefore, you can choose "under the interior", the most "practical" color, for the color of the wool of the pet, contrasting the cat's fur ... anyone.
Fastening
To make your own hands, the cat's house was safe, you should think about the fastener. It is undesirable to use selflessness, as wool can be clinged for them, you should not use and brackets - can be dangerous for claws (both types of fasteners are suitable if the upholstery closes). It remains, in fact, only two types of fasteners: glue and nails, and glue - only PVA. Its normally transfer cats, since after drying it does not smell. Ropes and upholstery are glued on it, and shelves, houses and everything else - nails are nailed.

You can still make a safe use of screws. Under the hat to drill a hole with a diameter of a larger diameter of the Hats, set fasteners, smeared with putty. Yes, exactly as in the manufacture of furniture, but what you can't do for the sake of the pet.
And yet: if the feline complex turned out to be too high, it is better to fix it. To the floor or to the wall, or to the floor, and to the wall. Otherwise, there may be problems - there have been cases when the cats have wrapped the design.
Photo with dimensions
No matter how talked about the device for a cat for a cat, it is best to understand the dimensions allow drawings with sizes. If you look closely at them, notice a solid run. This is understandable - cats have large and small, respectively, and the size of a cat's house will be more / less. You yourself can correct them depending on the size of your pets or available at the disposal.


The height of the presented structures is rather big - 180 cm and above, but you can reduce it, removing the extra floors of your opinion. All of these sizes can be as the basis for developing your own layout, put up exemplary sizes. Having a drawing on hand, you can start purchasing materials and making.
Instructions for making a house for two cats
There are two cats in the family. Senior - cat aggressor and younger, more movable. Therefore, the design was designed so that the younger could hide on the highest platform, and the eldest, because of his weight, could not get there. The house decided to arrange high, since both cats prefer height. The size made it more so that both individuals there could be simultaneously.

For this design, a thick furniture plywood (12 mm) is 75 * 50 cm in size, a bar of 50 * 70 (4.2 m), a joot-based carpet - 1 * 2.5 meters, 20 meters of rope. Fasteners - corners. For a house - 15 * 20 mm, for mounting sites - 40 * 45 mm, 55 * 20 and 35 * 40 - for insurance, and a couple of large - for mounting to the wall.
Cooking platforms and fasteners to the columns
Pillars in the selected design three: one 220 cm, the second - 120 cm and the third - 80 cm. They will be attached to the basis of the plywood sheet. Based on the poles so that the longest was closer to the wall. In order not to confuse, when marking on a sheet, with the help of a line and pencil, first painted the stencil on the paper on which the location of the columns relative to each other was applied. From the finished layout moved the markup to install the columns. They were fucked by long nails through the basis (4 pieces), drilled in the plywood holes slightly smaller diameter. Then they focused outside the corners 55 * 20 for a large pillar and 35 * 40 for smaller.

Using the same pattern, on the platforms, there were a place of passings, then holes were cut down on them. To do this, the first drill was taken by 12 mm, drilled in the corners marked for the installation of the squares of the hole, which perfectly passes the blade of the electrolyzka. According to the experience: Better a slot to do with a millimeter-two more. The platforms still hold at the expense of the corners, and if it is too small to make a slot, it has to focus on a file or emery paper.

Before installing the platform, "try on", by the need to adjust the slot. After putting the platform horizontally (we use the construction level) at the desired level, you note the pencil where the platform is worth it. On this markup, then install the corners, so the marks are made clear, from all four sides. When all platforms are normally installed, they are engaged in their carpet.
Build house housing
Two pieces of plywood 75 * 50 cm were cut into 4 rectangles. Of them made a roof, gender and two side walls. In the manufacture of one of the shelves, a piece of plywood with a semicircular opening side remained. It was decided to make an "entrance", and the rear wall was cut out from one of the pieces. It remains to collect a house, which is completely simple. Small metal corners were used, which were attached short self-drawing.

Cooking "nest" for a cat
Before covering the roof house, he was lit from the inside, thus closed fasteners and raised comfort. Work inside the case is not as convenient, but you can cope. The roof was chopped from two sides, after which they fastened with the help of the same corners, but placing them outside. Not very beautiful, but not deadly. The finished house was secured at the place allotted him. Received corners again, but larger - 35 * 40 mm.
Watch up pillars
The last stage - wind the poles, making the brake. Secure the rope to the post is easiest all the brackets. Several brackets - and ready. Next, tightly pressing one turn to another, overlook the spirals of the poles. We reach the barrier, reinforce the rope with brackets and continue in the next site.

As it turned out, the rope must be fell by a hammer ...
According to the experience, I must say that no matter how hard, the turns of the rope lay down one to another is not very tight, over time they "worked" and began to "ride" up / down a little. Having done the work to errors, they found a way: setting several turns, they are bridged with a hammer. Everything is simple, but if I knew in advance ... That's all, we made a house for a cat with your own hands. It took about 6 hours.
Similar design is considered in the video below.
House of the box and T-shirts for two minutes
For the simplest and budget option, you need a minimum of "ingredients":
- Cardboard box of suitable size;
- Old T-shirt;
- Wide scotch.
From the tools only the mounting knife and scissors will be required.
Stock Foto Interesting cat houses / complexes
Living next to us, cats are becoming difficult for pets, and family members. I want to create them all the conditions for comfort, so the hosts and try, inventing all new and new devices / structures. We collected a few interesting ideas in this section.


Compact "Multi-Build"

Shelves for cats - the name is clearly non-random ...


Coto bedside ...

Cold is not aunt ... Hammak near the radiator

When the windowsill is too narrow ...


Guards ...


Combination of shelves for cats with hammocks ... Almost work of art
Additional video ideas
The house with a periscope and brake cleaning for a cat.
Option using PVC pipe with a diameter of 100 mm.
Water heater Country Evbo 15 1
Punctuation analysis of the sentence: easy and simple
What did Kulibin invented? (8 photos). Kulibin - the most famous Russian inventor from where the Kulibin
Resurrection of righteous lasquary
What was invented by Kulibin I. P.: The most famous creations of a talented master. Kulibin - the most famous Russian inventor and P Kulibin brief biography