 Your own pet house is a comfortable secluded space in which it can hide from intrusive attention, relax and gain strength for new adventures. Anyone can make a house for a cat with their own hands - the main thing is to stock up on inspiration, choose the right tools, buy materials and decide on the format.
 Before getting started, it is worth exploring the benefits of a homemade cat house, made in accordance with the individual needs of the pet. The main advantage is the ability to design a house that best suits the size and lifestyle of the pet. The store often presents standard models that may not fit a large pet in size, or create another problem - take away a lot of usable space in the room. Making a house for a cat with his own hands, the owner can choose the optimal size of the product and independently create suitable patterns and blanks.
Pet owners who know how to make a house for a cat with their own hands receive a number of other advantages: 
- cost savings;
- the opportunity to realize your creative potential;
- creation of a unique and original design of the house;
- the possibility of using improvised materials in the work.
House format
 It is advisable to decide on the format of the future house before starting work. It can be a soft house for a cat, made on the basis of foam rubber. Also popular are houses made of cardboard, wood, vines and other materials, made in the format of beds, tents, birdhouses, hammocks, playgrounds, etc. Not only the cost of the house depends on the choice of the format of the house, but also the selection of certain materials, labor intensity and duration of work ...
A soft house is a cozy place for a pet to rest
The owner may be interested in a soft house for a cat with his own hands, patterns for making it can be made based on templates downloaded from the network. In the process of creating a house, you will need sewing machine skills and cutting tools. Also, in the work you will need pre-prepared consumables - soft fabric (tapestry, fleece, velor, velvet), threads, foam rubber and polystyrene.
Schematically, the sequence of work can be represented by the following list:

According to this scheme, you can make a soft house of any shape, the main thing is to choose a durable, non-easily soiled fabric and soft high-quality foam rubber. Anyone who has experience in sewing and who has several hours of free time can make a soft house for a cat with their own hands.
T-shirt house
Fans of original ideas can make a house for a cat with their own hands from a T-shirt, which unnecessarily gathers dust in the closet. To make the house neat and tidy, you need to use a clean T-shirt made of dense fabric in your work. The presence of original prints and bright drawings on a T-shirt is encouraged, as it allows you to achieve a more effective appearance of the product. The process of creating a house is not difficult - the owner will need a couple of hours of time and a minimum set of tools.
 The following materials are required for the blanks:
- cardboard (to create the bottom);
- wire (used to create a frame);
- Scotch;
- pins;
- bright T-shirt made of quality fabric.
Further work is carried out according to the following scheme:
- The bottom is cut out of the cardboard (its dimensions are selected individually).
- The frame is assembled from the wire. A T-shirt is put on a blank made of a frame and cardboard, fastened with tape.
- The neck of the T-shirt serves as an entrance to the house, so it must be placed on one of the walls of the future house.
- Remnants of the fabric are collected at the bottom and cleaved with pins. On this, the manufacture of the house is considered complete.
As you can see, every owner who takes care of the personal space of the pet can make a homemade house for a cat from a T-shirt. Among the advantages of such a house, the following factors can be distinguished:

If the owner has access to the network, he can learn how to make a house for a cat from a T-shirt by watching master classes with photos and video instructions. With the help of master classes, making a house for a cat with your own hands from a T-shirt is even easier. It can be made in the form of a tent, rectangular box, booth, etc.
House for a cat made using the basket weaving technique
People who are familiar with the basics of basket weaving can please their pets with original wicker houses.
 Such products have a number of advantages - light weight, natural ventilation, environmental friendliness, simplicity of technology and low cost. Of course, it will take quite a lot of time to make a full-fledged house, but the end result of the work justifies the high labor intensity.
With the skills of weaving, you can make a house for a cat from newspaper tubes, vines and other pliable and bendable raw materials. Before starting weaving, it is worth deciding on the size and shape of the house in order to properly make the frame and prepare the required amount of consumables.
House made of cardboard
There are quite a few interesting master classes on the net. Among them, you can find lessons in which it is described in detail and in an accessible way about how to make a house out of cardboard for a cat. Such a house will differ in its original appearance and affordable cost. In the process of work, ordinary packaging cardboard or ready-made cardboard blanks, available in stock, can be used. You can also use old boxes from household appliances or interior items.
The advantages of cardboard houses:

Cons of the design:

House with play area
Making a play house for a cat with your own hands from foam rubber, plywood, pipes and materials is not easy. However, the complexity of the work is justified by the manufacture of a luxurious house in which the pet can not only rest, but also give out its physical energy - climb slides, sharpen claws and play with toys. The owner will be able to learn how to make a house with a play area for a cat after reading the information provided in this section.
In the course of work, you will need the following set of materials:

As tools, the master will need a jigsaw, nails, scissors, pins, nails, a hammer, etc.

According to such a simple scheme, you can build an interesting playhouse for a cat with a scratching post with your own hands, in which the pet will be happy to spend its leisure time. When making a play house, the pet owner can show creativity and realize the most interesting and unusual ideas.
Original cat houses
While searching on the Internet for information on how to make a house for a cat himself, the user may stumble upon interesting ideas. For example, to see a master class where the authors propose to make a fruit house for a cat, patterns of such a house can be made independently or downloaded from the site. It is enough to have the skills of handling a sewing machine and tools for cutting fabric, and then it is not at all difficult to make such an extraordinary house for a cat, while cats never remain indifferent, and they are happy to master their new corner.
After making the house, the owner will be able to proudly place the product in the living room - after all, its appearance will emphasize the original taste and creativity of the pet owner.
Among other original ideas that should be adopted by needlewomen, the following options for cat houses can be distinguished:

A cat is a rather capricious animal, and it is not so easy to please her. She hates drafts, hates harsh extraneous sounds, smells and is wary of any rearrangements in the house. Therefore, if you decide to make a house for a cat with your own hands, be sure to take into account all her whims. Otherwise, she will simply ignore the new home.
Types of houses for animals

There are a lot of ideas for making cat houses. It all depends on the amount of free space in the room and your taste.
You can build:
- cardboard house
- soft foam construction covered with fabric
- dwelling for a cat made of plywood, fiberboard, chipboard or hardboard
- product from old furniture boards, boards and wooden blocks

You will also need to choose the shape of the dwelling.
When making a home for your pet, do not forget about the general interior of the room. If you choose the right fabric for decoration and the shape of the house, it will become a true decoration of the room and fit perfectly into the interior.
Required materials

The original house can even be obtained from improvised means or materials left over after the renovation of the apartment.
If you allocate a certain amount for the "construction" of a house and purchase several wooden slats or plywood, as well as a soft and durable fabric for covering, you will be able to make an original design structure that you will not be ashamed to show your guests.
So, you may need:
- cardboard: if you think that the design from it will turn out to be too flimsy, then you are deeply mistaken; to obtain a durable structure, it is enough to glue it in several layers
- plywood, fiberboard, chipboard or hardboard: with these durable materials, you can even build a multi-storey house or a palace house
- wooden slats: they can be used as spacers when creating structures covered with fabric or upholstered with plywood
- PVC pipes and fittings for their connection: they can easily replace wooden slats, and the structure of them will turn out to be no less durable
- carpet, felt or foam rubber: they can be useful not only for arranging a bed, but also for covering the side walls
- durable fabric or fur for the manufacture of a couch
- any kind of cat toys for hanging
- wooden block for scratching posts
- hemp or jute twine for her tight fit
Do not use highly electrified fabrics for upholstery. They will scare the animal.
House made of cardboard
Of course, you don't have to rack your brains too much and you can make a house out of a cardboard box by cutting out holes for doors and windows in it and throwing bedding on its bottom. By gluing several boxes together, you can get a dwelling from several rooms and even a multi-storey house.
But such a structure will quickly fall into disrepair - after all, it can be quickly torn and even "eaten" during the game.

It is still better to make a more durable structure with walls from sheets of cardboard glued in several layers. Moreover, with a high-quality finish, it will look no worse than a store product.
Craftsmen from Japan were the first to come up with the idea of making houses for cats in the form of corrugated cardboard beehives. Today such structures are also on sale. But we will make them ourselves, listening to the wishes of our pet.
First, let's decide what shape and size the cat's dwelling will be. If the domestic cat or cat is still young and full of energy, it would be more logical to create for them a multi-storey structure with shelves for climbing or attach a real tree with many strong branches next to the house.
For a bumpy cat who loves to doze almost around the clock, a soft and comfortable one-story structure with a scratching post attached to it is more suitable. The principle of assembling the house will be the same in any case.

Let's describe how to make a simple house for our pet's cat in the form of a round yurt or rectangle made of corrugated cardboard glued together with layers.
1 Cut the cardboard into rings or strips and join them together with a pile of PVA glue.
2 To ensure the stability of the structure, cut the bottom out of plywood, fiberboard or chipboard and glue it to the finished house.
3 With the help of corrugated cardboard, you can make not only a house, but also a couch, sofa or bed for your cat to relax. Some cat owners manage to build even scratching posts from corrugated cardboard. But their lifespan is short. Plus, debris will always form around it - even thick paper will tear too quickly under the pressure of cat claws.
4 An animal will definitely like a dwelling made of multilayer cardboard. After all, a solid base will turn out to be warm enough, and the walls are ideally protected from drafts.
If you decide to paint your pet's home, use persistent dyes for this purpose. After all, gouache or watercolors are unsafe - the animal, after licking the poisonous composition from the fur, can become seriously ill.
Multi-storey plywood construction
If you can keep your pet busy by arranging for him a play complex with ladder shelves, labyrinths, several hanging toys and a scratching post, perhaps he will leave your things alone and will not take them to the corners even in your absence.

For its manufacture, in addition to plywood, you will need furniture corners, sandpaper for cleaning cut points, glue, screws and furniture corners. It is better to pre-upholster the house with foam rubber, and then with a dense, not too-brand cloth.
A piece of carpet will also come in handy - this material is strong enough and will last longer.
Manufacturing of the game complex in stages

A solid house will turn out from plywood, fiberboard, chipboard. You can also donate several boards for it - the construction will only benefit from this.
So, step by step instructions for making it:
1 First, draw a detailed diagram showing the size of each part. Even if it is simple enough, you shouldn't ignore this step. It will be a shame if, when joining separate parts, they do not fit in size.
2 Plywood, if desired, can be bent and made into products of complex shapes. For this, frequent blind cuts are made in it. A similar method is used when bending chipboard and MDF. In the future, to strengthen the structure, the formed grooves can be filled with glue. Curved parts from this material are cut out with a jigsaw.
3 You can replace wooden blocks with PVC water pipes. To connect them, fittings (corners, tees, etc.) are used, which are attached to glue. Pipes must first be degreased with a solvent or alcohol, docked with fittings and mark with a pencil the places where the glue is applied. It is required to fix the elements motionlessly for 5-6 minutes.
4 To "build" a plywood house with 4 walls, a floor and a roof, in which the cat will rest, you will need 6 square or rectangular pieces. Such a dwelling is located at the very top of the structure so that the cat can have a larger viewing angle. And the temperature closer to the ceiling is always higher, and there are much less drafts.
5 Cats do not really like closed booths, so provide not one, but a couple of holes in the house. Be sure to sand the cuts so that the animal does not get hurt.
6 The rest of the details of the play complex are selected at your discretion, depending on the inclinations of the animal. To fasten pipes or bars in rectangular or round wooden blanks, you will need to drill holes of a suitable diameter.
7 Cover with carpet or foam rubber not only the sides of the structure, but also the inner surface of the house, so that the animal is comfortable in it.
8 To make the structure strong, use metal corners to connect the parts.
9 Apply a layer of glue to the wooden blocks or PVC pipes and wrap them tightly with hemp or jute twine, hitting it well with a hammer to the surface of the timber. It will be more convenient for the cat to climb them to any floor.
10 A miniature springboard can be attached to the house, along which the cat will climb up. Do not forget to build an observation deck - animals love to climb up to have a good view of the room.
11 Make sure the house is securely attached to the wall or floor. If it once collapses, the animal will treat it with apprehension and is unlikely to agree to live in it.
The smell of freshly sawn planks or plywood soaked in glue can scare your cat away. Before reassembly, they should be well weathered.
We attach a tree to the house
The cat loves to climb tree branches. Do not deny her this pleasure, build for her a device from any available means - PVC pipes or wooden bars sheathed with jute rope or pasted over with carpet.
You can even bring from the forest a part of a real tree with large knots.

1 To prevent the animal from pulling the bark around the house, it must be cleaned first.
2 Thoroughly sand each of the branches to prevent injury to the animal.
3 For easier climbing, attach several viewing platforms to large branches, where the cat can comfortably spread out and observe others. They can be attached using bolts.
4 A hammock can be hung on one of the branches. Stretch the ends well so that the animal is comfortable to climb into it.
House with a scratching post
Let's describe how to make a house with a scratching post:
1 The most convenient design is a column or rectangle with a height of 9-10 cm. Its width should also be sufficient - from 8-10 cm. A comfortable lounger can be arranged on top of such a structure.
2 The scratching post is attached with furniture corners to a cross-shaped, rectangular stand, which in turn is screwed to the floor.
3 For sheathing, you can take a thick jute twine with a thickness of 0.5-1 cm, carpet or thick burlap. Synthetic rope should not be used - catching on its fibers, the animal can damage the claw. The twine is firmly glued to the surface while tapping with a hammer.
4 A rug attached to the wall, a carefully polished log, or even a piece of wood brought from the forest can be used as a scratching point. Before installation, it is necessary to remove all small knots from it and grind it well.
5 Hang a couple of your favorite toys next to her to help grab the animal's attention.
Dwelling built into furniture
You can equip a cat's bedroom in one of the compartments of the bedside table, wardrobe or chest of drawers. After all, even the most sociable animal needs a place for periodic solitude, in which it will feel safe.
After all, even if a pet loves to lie on the couch, at the sight of a stranger, most likely he will look for a secluded place.

It is definitely not worth allocating space for a house in the hallway. It is better to equip it in one of the distant rooms, preferably in the one in which the cat is most often. If you are a breeder and your pet has not been spayed, you can set up a maternity ward for a cat in ordinary furniture.
To do this, you just need to make a hole in the side wall of the bedside table or cabinet and build a soft bed from a small children's mattress or an old blanket. If your cat likes to take a nap on an elevated position, set up a spot for her on one of the bookshelves.
To make it convenient for her to climb there, put a small ladder next to it, covered with hemp or jute twine.
Even an old chest of drawers can be turned into a play cat complex. To do this, you just need to remove the drawers, cover the vacant space with a soft cloth and hang curtains so that the cat can calmly rest in solitude.
A dwelling for two cats should consist of a couple of rooms or have two floors so that each of the pets has its own place.
For each of us, a home is a cozy room, a warm home, delicious food, a sincere atmosphere, and for many also a beloved domestic cat, which, like us, needs its own secluded corner. Of course, a beautiful house can also be purchased at a pet store, but it is better to do it yourself, especially since we have 13 wonderful options with detailed instructions in the photo.
Solar tent
Anyone can make such a tent for a cat. All you need is a bright T-shirt, a couple of wire hangers and cardboard.
Materials (edit)
So, get ready: a T-shirt, heavy square cardboard, two wire hangers, duct tape, safety pins, pliers.

Cut off the ends (hooks) of the hangers.

We make racks of hangers. For density and smoothness, we glue the cardboard with tape around the edges.

We make small holes (to hold the wire tightly) in each corner.

We cross the wires and fix the top with tape. Make sure the legs of the stand are touching the corners of the cardboard. Insert them into the holes.


Bend the ends of the wire from the back. 
For ease of movement of the tent, seal the protruding bends with tape.

The frame is ready. Make sure the wire posts are symmetrical. Trim them up with pliers if necessary.

We cover the frame with a T-shirt, folding it as shown in the photo below. The shirt should be tight enough.


Place a soft pillow or blanket inside and present it to your cat!


Cardboard tower
A structure made of layers of corrugated cardboard for a cat looks very aesthetically pleasing and unusual. Repeat after us and you will get the same!
Materials (edit)
Prepare corrugated cardboard, cutter, pencil, compasses, glue, brush.


Draw circles
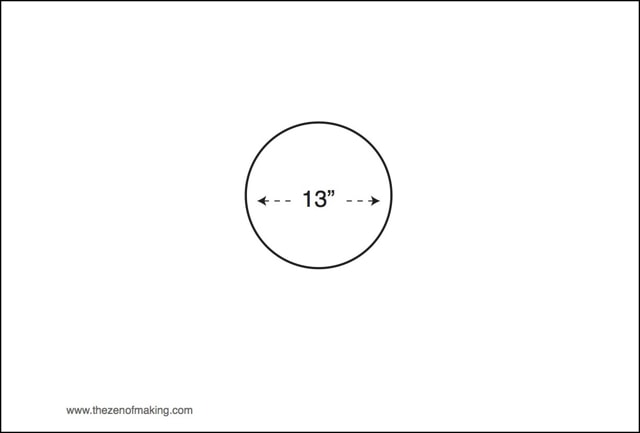
First of all, we will draw the layouts of our cardboard discs, located one above the other. As a result, you get 8 groups of 4 or 5 disks of a certain size. The dimensions will depend on the size of your pet, but in our example the radii are as follows:
- 21.5 cm
- 21 cm
- 20.5 cm
- 20 cm
- 19.5 cm
- 19 cm
- 18.5 cm
- 18 cm


Cut out along the drawn circles.


Base circles for the bottom
Now we form the base of our house. Cut out a solid disc with a radius of 21.5 cm (without a hole inside), then draw exactly the same 6 discs, but with a hole (measure 4 cm from the edge in the same way).

We put the disks on the solid base.

We collect the pyramid.


Draw the entrance
We measure the height of the opening and remove the extra top. Draw the borders of the door. You can draw any shape.


On each disk we mark the border of the opening.

Cut out the door
Using the marked signs, draw straight cut lines on the discs. It is important to determine their correct angle of inclination.


Putting the circles back together 


We glue the disks into a pyramid


We call the cat!
After the structure is completely dry, we equip a soft place inside and delight our beloved pet.


Luxurious sofa for an important cat
How long can you take the cat's favorite place on the couch? Finally, sew your own personal one for him. And don't forget about the bows!


For work, prepare:warm fabric (in our example, corduroy), material for the bottom of the sofa, material for interior decoration, synthetic winterizer, scissors, threads, needles and a sewing machine.
Drawing the layout. The sizes are determined by the size of the animal. The optimal sidewall width is 20 cm.

The bottom consists of a dense fabric on the bottom, padding polyester and velveteen on top.

Sew the layers together.


We cut the side. Sew along the edges, leaving one side unstitched.


We fasten the side panel to the bottom with pins first.

We fill it with synthetic fluff.

Sew up the hole.

Now comes the cushions for the sofa. We also fill it with padding polyester. Sew a patterned stitch around the edges, if desired.

We decorate the bed with bows or other accessories, for example, fish. Admiring!

The cat in the pipe

Materials (edit)
To make such an original cat house, prepare: a wood tube of the required size (available at a hardware store), acrylic paint, sandpaper, wood glue, a ruler (or measuring tape), a piece of foam rubber or soft cloth for interior decoration.


We measure and cut the tube to the required size.


Cut out the stand
Draw two straight lines along the tube at a short distance from each other.

We cut along the outlined lines.

Thus, we will get a rounded piece that will serve as a rack for our house. Sand the roughness with sandpaper.

We glue and paint
Painting the main structure and the outside of the stand. After the paint is completely dry, thoroughly glue the rack to the house. Turn the structure upside down and clamp our stand firmly to the base. Wait for the glue to dry (this will take about 30 minutes).

Glue a piece of foam for softness.


Cozy details
Cover the bed with a blanket and a small decorative pillow. You can also decorate it with curtains on the sides or hang a funny toy for a kitten.


Hanging cat house and shelves - original composition
Such an unusual project will become a real highlight in your home. Now the cat's house imitates a hanging shelf, and real little bookshelves serve as steps for it.

We build a house from ordinary wood plywood, having cut out a doorway and a small window in the shape of a cat's face.
 But the most creative element of the composition is the cable bridge! It is made of cut-out strips of birch plywood and spacers attached to a cable. We buy it in a store with appliances. Cable ties and clamps are also useful. We use a laser cutter for cutting.
The final touch is the rugs on the roof of the house and on the steps and shelves. We fix them with construction glue.

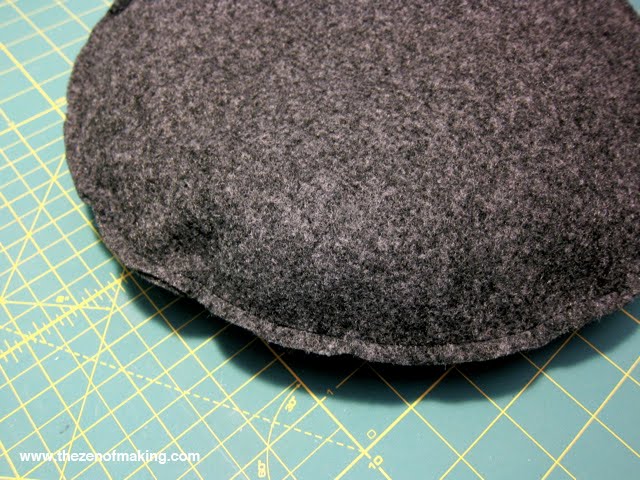
Puss in a poke!
And this project will show an interesting version of a cozy couch that can be used in different ways.

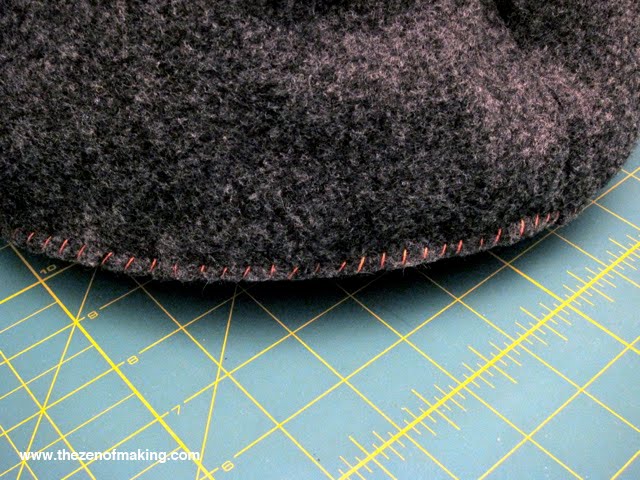
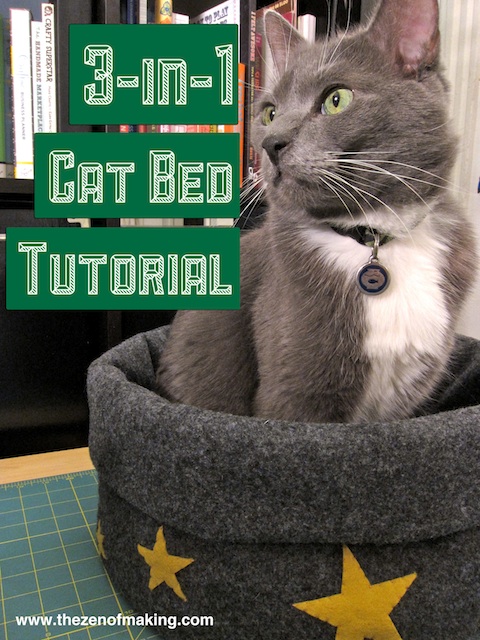
Materials: thick felt fabric, bright fabric for decorative stars, 2 colors of threads - to match the stars and the bag itself, filler, sewing machine, scissors, needle, measuring tape, fabric clips, compasses or a round shape, pencil, paper, chalk for fabrics.
Cut out two circles for the bottom of the bag.
Sew the circles, leaving a small filling hole.
Fill the bottom evenly with filler and sew the hole.
We form the side walls. We make measurements.
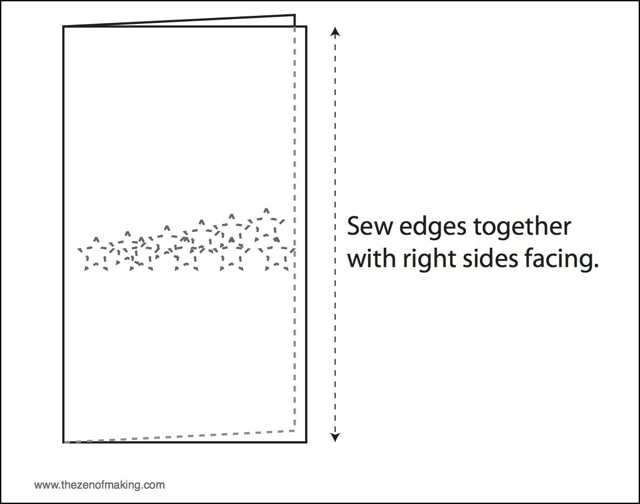
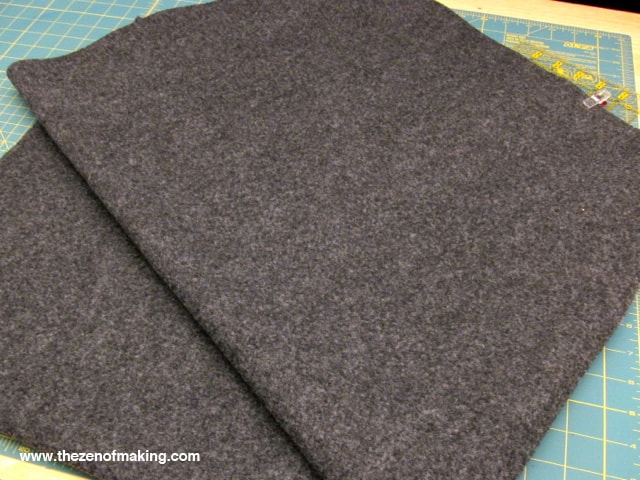
Cut out a large rectangular piece.
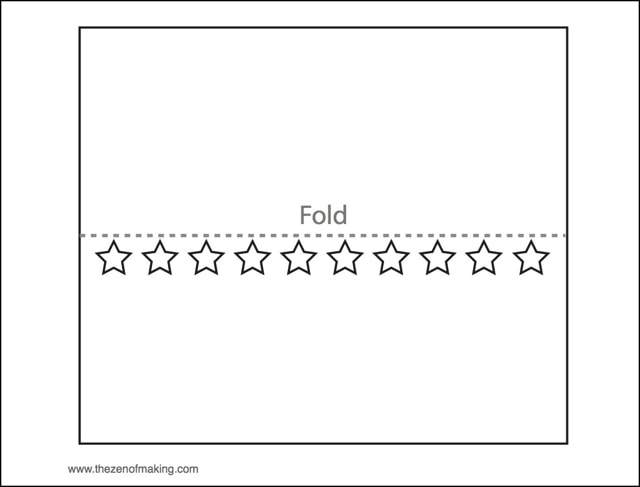
Fold the rectangle in half, and glue decorative stars on the outside just below the bend.

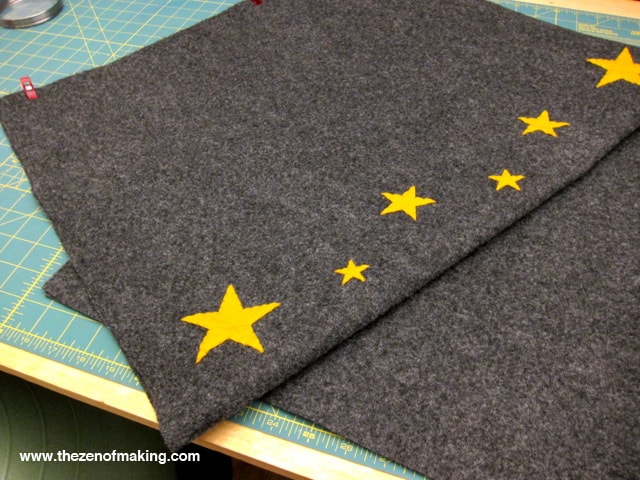
With three-layer thread, we sew the stars to only one side (try not to sew both!)
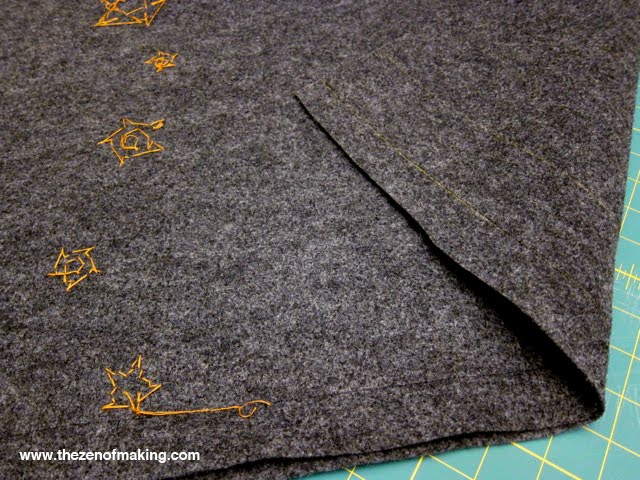
Fold the rectangle in half and sew the edges along the length. We turn the bag over to the back, hiding the seam.
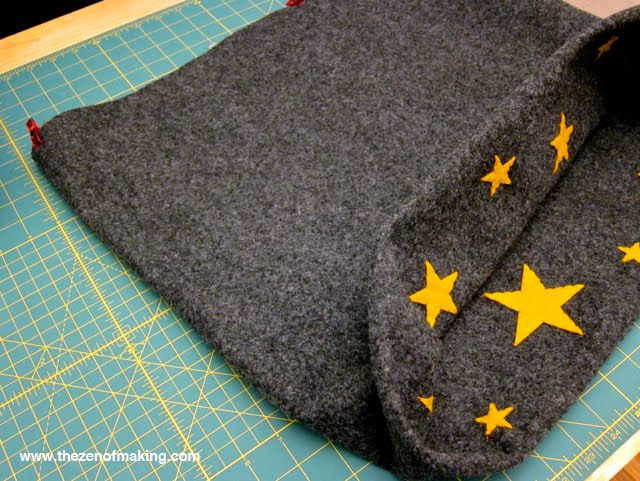
We fasten the pillow to the bottom with clamps.
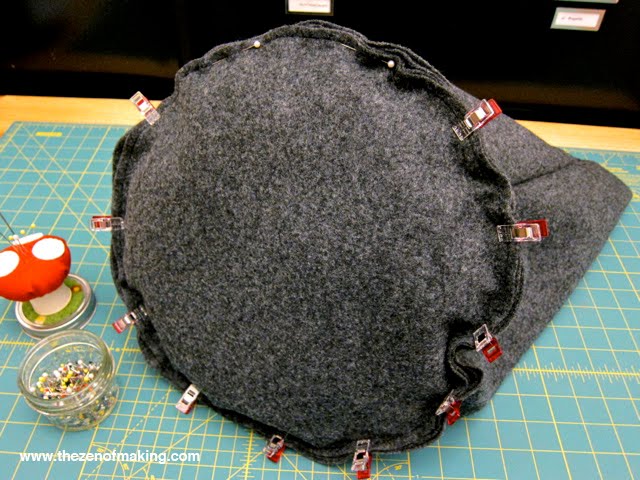
We sew it to the sidewalls.
The sleeping bag for the cat is ready. But the fun is ahead - the use cases!
Option 1 - cave
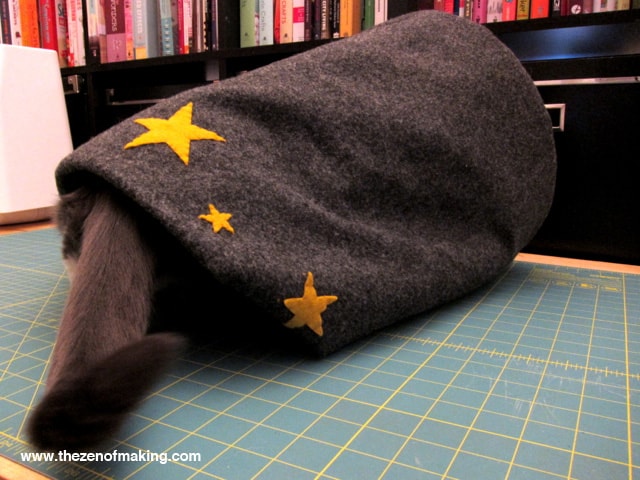
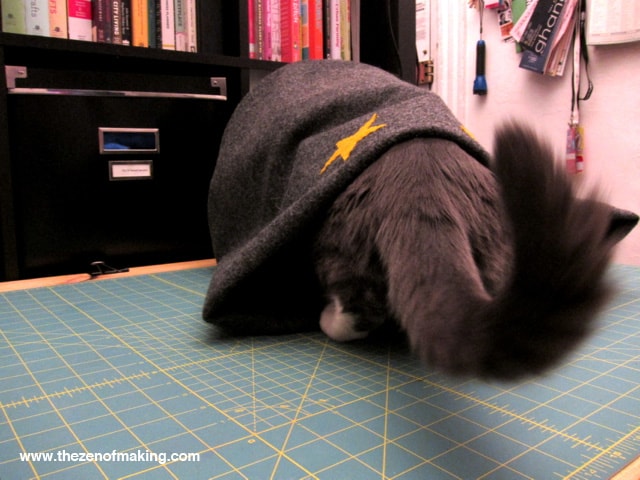
Option 2 - a cozy high sleeping bag
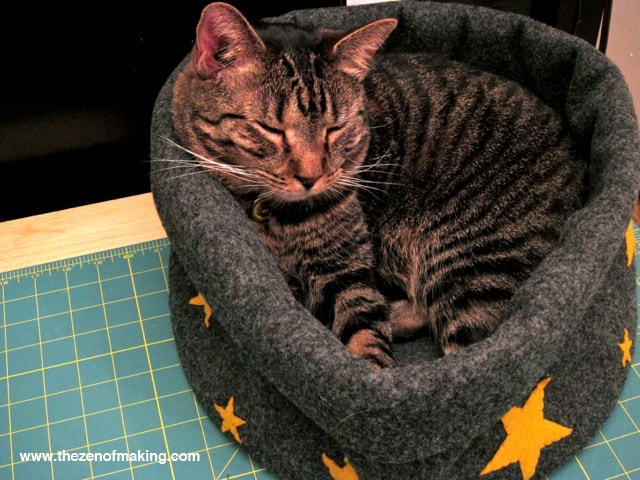
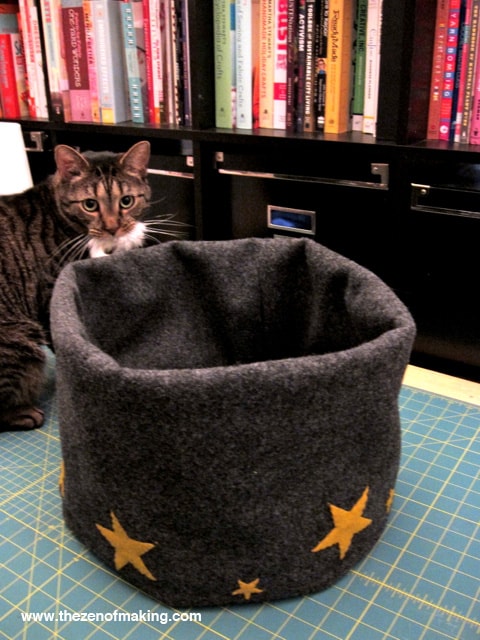
Option 3 - compact armchair
Luxury bed with columns

And we will start with such an ordinary table ...

... which we can transform into a luxurious cat bed.

Preparatory work
The headboard for the crib will be a finishing plinth, which we will cut to the required size.

We will make the ends of the columns from antique curly handles.

We will make the legs of the crib from pine wood blocks.

We fix them with screws and wood glue.

The frame for finishing is ready!


Add more beauty using a pink marker paint.

We put a beautiful mattress and call the chief expert!

Cat tent
It's no secret that cats love boxes! Why not try to make a real tent for your pet out of it? The principle is the same as for the “sun tent”.

Materials (edit)

We collect the box.

We disassemble wire hangers.

We attach the wires obtained from the hangers to the box.

Hot glue the edges to the box for strength.

We fix the top by wrapping it with wiring.

All that's left is to pull on the T-shirt.

Turning an old sweater
A cozy and warm bed for a cat can be sewn from an old sweater. Prepare pins, filler (such as polyester), pillow, needle, thread, and scissors.
Main source material

Sew up the neckline, sew the transverse line between the sleeves (thus separating the back of the future bed).

We fill the back and sides with polyester.


We sew the cuffs. 
We put the pillow inside.

Sew up the hole and fasten the sleeves to the base with pins.

Sew and take out the pins.

You can brag about the end result!

Two-storey building
A full two-story home can also be a great feline home project. A minimum of drawing skills, good imagination and cardboard boxes will definitely come in handy in this matter. And a few more details - a knife (or scissors), a ruler, a pencil.
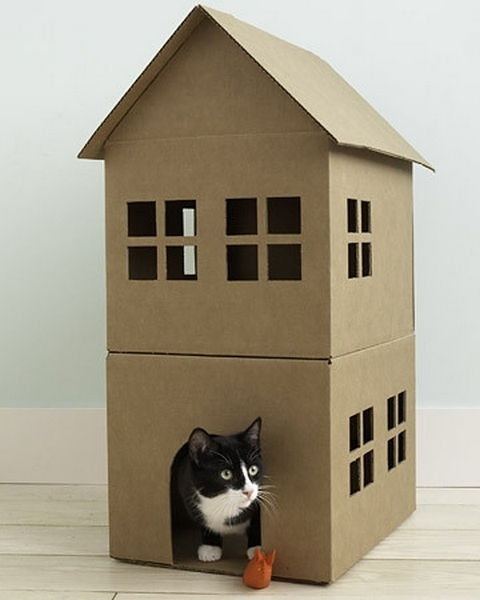
First of all, we cut out the door and windows, then we design the roof. We glue it to the frame and you can decorate it!

Another idea for a funny cardboard cat house
Striped tent
If you have a cat "Matroskin" at home, make such a tent for him. And then, for sure, she and your minke whale will be like two pair of boots.
Comfortable cube
And this cube house is made of foam rubber sheathed with beautiful fabric. The work is not fun, but the result is amazing!
More Creative Cat House Ideas:


Feel free to experiment and embody unusual ideas in such an important project as a house for a cat. Believe me, not only the main owner will be delighted, but also all the guests and family members around!
We will not go into thought, but we will say only one thing: your beloved cat or cat definitely needs its own small house. If you do not provide the four-legged with his own home, then he will do it for you by arranging a place to sleep and rest in a closet, under a sofa, in a washing machine, and even in any convenient corner. And how to make a house for a cat with your own hands, we will tell you in this article.
No artificial materials!
Cats, like humans, are very sensitive to various materials. And it is especially unpleasant for them if a sharp, unpleasant smell is heard from the material, because they have a heightened sense of smell. That is why give preference only to natural materials: change the plastic to wood, read the composition of the pillows, and buy all fabrics only with a natural composition like cotton. Synthetics not only can smell unpleasant, but also poorly let in air, and also often electrify, which will be very, very unpleasant for a cat with thick hair. So arm yourself with the most natural ingredients to create a home.
Glue? Only classic PVA or any other water-based one!
The glue used should not emit a terrible unpleasant odor after drying, and you should also give preference to the glue that is as safe as possible for the animal, i.e. PVA and its analogues. The fact is that the cat may try to chew on the glued element, because of which the glue can get inside with saliva. Pay attention to this.
When making a house, use PVA glue
Do not skimp on the sizes!
Of course, you do not need to overdo it either, but houses for cats should be made in such a way that the pet can sleep both curled up and stretched out along its entire length. And, of course, consider the size of your individual when designing a house.
We fix the dwelling on the floor
Don't want to spoil an expensive laminate or parquet floor? Think of some other mounting option, for example, to a wall. The cat will run into his house with a running start, jump on it, so the structure should be more or less rigidly fixed. And when designing, be sure to take into account the weight of the animal: the larger it is, the stronger the base should be.
Fix a new pet house
Option number 1 - from a regular T-shirt
For this simple masterpiece, we need a square piece of thick cardboard or plywood, two pieces of wire about 5-7 mm thick, as well as a pillow, a T-shirt and something to fix it.
House from a cardboard box
You can also take a low stepladder (about a meter high), wrap the vertical beams with twine, and lay sheets of plywood between the steps, having previously upholstered them with some soft material. And on the sheets that lie on the lower steps, you can make a full-fledged house. So you get three in one at once: a cat's house with your own hands, and a scratching post, and shelves on which the pet can lie down and enjoy peace.
Many needlewomen and needlewomen are familiar with this technique. Its essence is simple: you take sheets of paper (newspapers), a certain object whose shape you want to repeat (for example, mold a large fish from plasticine), and then gradually glue the object with paper using PVA glue. As a result, you will get a solid multi-layer construction in the desired shape.
How is a cat's house made using this technique? Very simple! We take a large enough package that needs to be filled with towels, rags (do not take large ones, let there be many, but small ones. Next, we give the package the desired shape (for example, a large stone) and begin to cover it with newspapers. We advise you to do this: soak the first layer with a little newspaper And just cover the bag without glueing. And immediately glue the second layer on wet newspapers. And each subsequent layer just glue the newspapers with PVA glue and glue, glue. We advise you to make enough layers so that the structure is very strong.
When all this is dry, cut a hole for the cat with a knife on one side. Under the newspaper, of course, you will find the same bag, cut it open and take out all the rags from the inside, one by one. In the final, pull out the package itself, it will get it without any problems, because the first layer was not pasted over with water, not glue. Next, let the future house for the cat dry a little, and then glue the space inside with several more layers.
House made of papier-mâché. It remains to decorate
Our frame is completely ready, now you can paint it, if you want to make a stand, put a pillow inside. We advise you to make an imitation of a stone, in combination with the papier-mâché technique it will look very beautiful, it will create the feeling that you have carved a house for your pet in the stone.
We take ordinary corrugated cardboard and cut rings out of it. Then the rings are glued one to one, after which we get a shell-house, like a snail. You can find pictures of similar designs to better see how it all looks. For work, you only need glue and the cardboard itself, and the result is very original and interesting.
Corrugated cardboard house
Option number 5 - a triangle of plywood and carpet
It is extremely easy to make such a house for a cat with your own hands, you only need an angle profile, self-tapping screws, carpet and plywood. Take three plywood rectangles, make them in the shape of a triangle, fasten with a profile and self-tapping screws, and then make a back wall of plywood in the shape of a triangle.
After that, sheathe the resulting structure with a carpet - and you're done, you can hand over the work to your pet, let him evaluate it.
Cat house toilet
Well, then modify to your taste. You can fix the scoop inside on the wall, you can screw the wheels from below, sheathe this whole structure with colored fabric, make a soft seat, so that you end up with something like a pouf or a bench. In general, there are a lot of ideas here. By the way, the same closed tray can be assembled from an old cabinet with an opening door. Just cut a hole in the door with a jigsaw, put the tray inside - and you're done!
Do-it-yourself cat houses with a scratching post are also a necessary thing, because many representatives of felines, over time, begin to tear everything that came under their claws. Do-it-yourself scratching is very easy: a wooden or plastic post is taken, which is simply wrapped tightly with twine or other thick rope. Just do not fasten the turns with nails!
How to combine a scratching post with a home? Yes, in absolutely any combination! We take a sheet of plywood, install the house itself on it, next to it a post with a scratching post, and nail a soft couch on the post. That's it, the simplest design is ready! You can simply attach the sharpener to the dwelling itself, build a complex multi-level structure, place the scratching post under the dwelling, above it - as you wish!
House for a cat with a scratching post
If you have a lot of time and energy, you adore your pet, then you can build a huge complex! Here you can envisage stairs, and suspended structures under the ceiling, and soft pipes that go around the sofa, and houses in the walls. Set up multi-tiered cottages, decorate all this with artificial or live plants and much, much more. On the Internet, there are a lot of ideas, how to make a cat house with your own hands, and how to build huge complexes in which you can even get lost! And the most interesting thing is that there are no restrictions: you can aim at work of the most impressive scale.
DIY cat complex
The choice is only yours!
As you can see, it is not difficult to build a dwelling for a cat, and it can be made from a variety of materials.
We showed you the cat houses, and also gave ten options at once on how to equip a cat's home on your own. We tried to tell you how to make a beautiful house with your own hands, starting from the simplest options, and ending with complex cottages for a real cat elite!
We hope you enjoyed it and found for yourself the solution that will make all your ideas come true. Modify our solutions as you please, creating non-standard and creative cottages for your pets.
In specialized stores, a huge assortment of everything necessary for cats is presented. These are bowls, trays with fillers, and toys. But at the same time, it is important to provide the pet with its own home, where it can feel safe and comfortable. The price of such products can "bite", but you can always make it yourself.
Requirements for the cat house
- safe;
- fenced;
- strong, reliable, the house should not fall when the cat jumps;
- able to withstand the mass of an animal (if you have a kitten, then you need to study what is the maximum weight of an adult representative of this breed) or several pets at once;
- as closed as possible;
- suitable in size (if there are several cats, then the house should be such that several loungers fit in it);
- easily accessible to the animal, while taking into account individual characteristics, some of them love height, while others feel more comfortable closer to the floor;
- cleanable, the material should not easily absorb odors, because they can scare the cat away.
A cat should feel comfortable in its house.
Scratching posts, hanging toys, hammocks will be useful on the cat's house. This will save space in the room. It is advisable to make as many different openings and lying surfaces as possible to give your pet a choice.
Step-by-step instructions for making a house with your own hands
A homemade house is ideal for your cat, because when creating it, all individual characteristics, character and preferences will be taken into account. It should be done in such a way that, if necessary, it can always be modernized (for example, if the kitten loves to eat deliciously, but is indifferent to physical exertion, which means that its mass may be excessive).
House from a cardboard box
This design is the simplest and most win-win, because everyone knows the love of cats for boxes of all sizes. Such a house has other advantages, for example, good thermal insulation, material availability.
The first stage in the manufacture of a product is the development of the design. It is recommended to allocate a place for sleeping and playing, while the shape should be free of small details and sharp corners.
The size of the box for the house must be sufficient for a small and adult animal. For a medium-sized representative, you can take a cube-shaped box about 40 cm wide.
The love of cats for boxes can be used when choosing material for a house.
To make a house from a cardboard box, you need to follow the instructions:
- On the box, mark the places where there will be holes about 15–20 cm in size in the future. Both a kitten and an adult cat can enter such a house. You can make them with scissors or a stationery knife. If you want to make a tunnel out of the boxes, do this work with each of them.
The box must be large enough for a kitten and an adult cat
- Sheathe the blank with felt. Do it both outside and inside. This material will increase the strength of the structure, and hence the service life.
- Put a piece of carpet on the floor of the house. This must be done in such a way that, if necessary, the carpet can be removed from the house and cleaned. Therefore, glue is not suitable for this purpose. Better to use metal staples.
- Make a roof from pieces of thick cardboard.
Doors and windows can be made in the house
- The house can be decorated, for example, painted.
The roof of the house can be flat or pitched
Siamese and Bengal cats love to sit on their hind legs. Therefore, they are advised to make a high house, at least 60–70 cm, for example, in the form of a wigwam.
Video: a real cardboard house for a cat
House made of plywood
Plywood requires certain skills, it is a little more difficult to work with this material than with cardboard, but a house made of it will also be more durable and reliable. For the manufacture of the structure you will need:
- plywood;
- furniture corners;
- carpet, felt or any other similar upholstery material;
- foam rubber;
- glue;
- fine-grained sandpaper.
The manufacturing process itself is as follows:
- Cut 6 identical squares out of plywood. Their dimensions are about 40 * 40 cm or 50 * 50 cm.
Most often, a cat house is in the shape of a cube.
- Make holes in two parts so that the cat can enter its house. Sand them with sandpaper.
The entry hole is usually round.
- Connect 5 squares together in the form of a cube without an upper bar. For fastening, you can use furniture corners and screws of suitable length.
Furniture corners can be used to fix the walls of the house.
- Sheathe the inside of the house. To do this, first lay the foam rubber on the bottom, which is secured with a stapler, and then lay out the carpet or felt. Also secure it with a stapler. Perform the same work with the side walls.
- Cover the house with the remaining square piece, which is also attached with a furniture corner.
Exterior decor can be made in accordance with the design of the room. For decoration, the same carpet, self-adhesive wallpaper or paint is suitable.
Additionally, you can install a scratching post with an observation deck. To make this part you need:
- Take a pipe for a scratching post. It can be a plastic or wooden part. It needs to be covered with glue and tied with a rope. Make sure that each loop fits snugly against the previous one.
- Make an observation deck out of a square of plywood. It must first be sheathed with foam rubber, and then sewn up with fabric on both sides.
- Attach the observation deck to the scratching post with furniture corners, and then the pipe to the house in the same way.
A hanging toy can be attached to the bottom of the viewing platform.
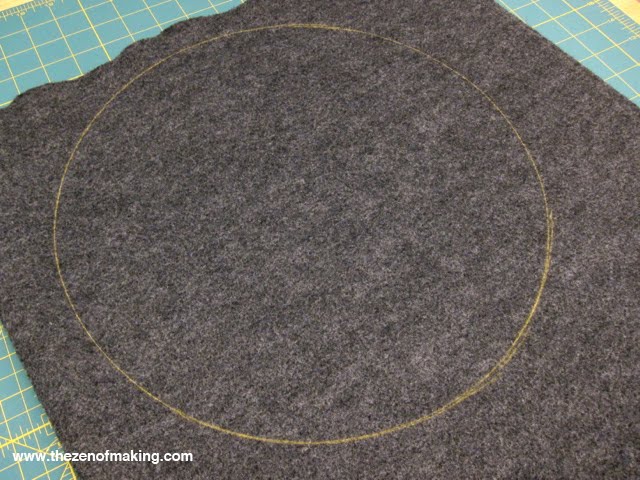
House made of foam rubber and fabric
Sewing a house out of fabric is not difficult, for this you do not need to be a professional in handling a sewing machine. The following materials must be prepared in advance:
- foam rubber (for walls, a material with a thickness of 1.5 cm is suitable, for the bottom - 2.5 cm);
- dense fabric for external and internal (you can use not a single piece, but pieces) decoration.
The very process of creating a classic cat house is as follows:
- Pattern of fabric parts. First you need to make a template, for which newspapers or old wallpapers are suitable. It must be transferred to the fabric, taking into account an allowance of 2 cm. Such blanks will need 8 pieces for the walls (base - 40 cm, height - 30 cm, distance from the edge of the wall to the edge of the roof - 25 cm). It is recommended that the edges of these parts be sewn with a zigzag stitch.
Each part needs two copies
- Pattern of foam parts. Their dimensions correspond to the fabric details, but there should be no allowances here. Their number is less: 4 parts for the walls (40 * 30 * 25 cm) and 1 part for the floor (40 * 40 cm).
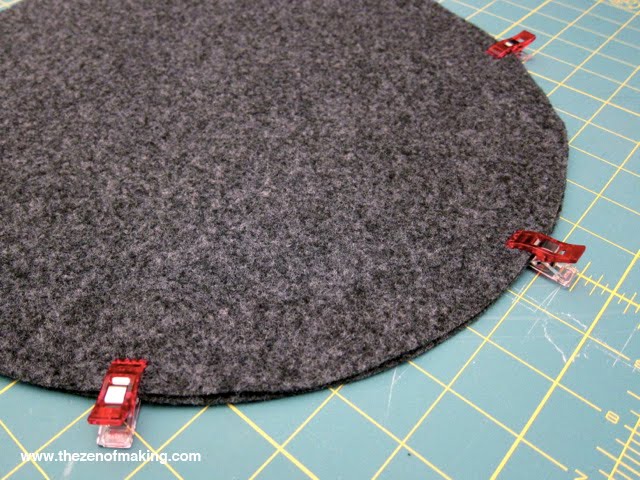
- Assembly of parts. To do this, place a foam rubber between two fabric blanks. Make a basting around the perimeter, and then sew along the marks. After that, turn the workpieces out.
- Arrangement of the entrance. Mark a round hole on one of the wall parts, then cut it out, and machine the edges with a machine stitch.
The hole must be large enough for the cat
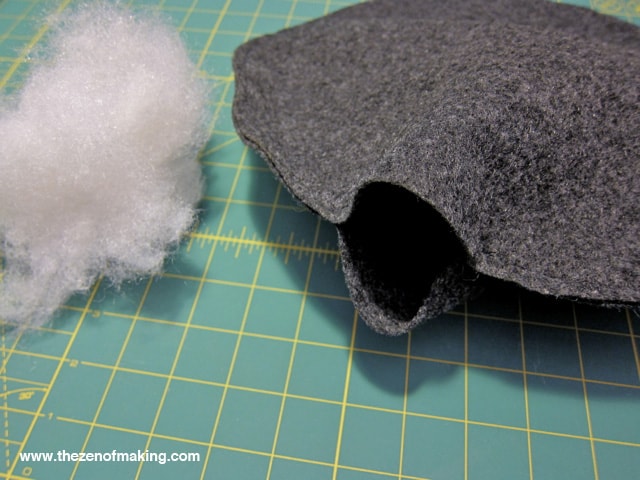
- House assembly. Sew all the parts together from the seamy side, and you need to start from the entrance, and finish with the back wall. At the end, the bottom is sewn to the house.
Sew all the details from the wrong side
- Now the house needs to be turned out through the inlet.
A house made of foam rubber and fabric retains heat perfectly
Video: how to sew a home for a pet
House-scratching post
Sharpening the claws is a necessity that needs to be provided for the cat. If this is not done, then damage to furniture or walls cannot be avoided. There are different options for making such a design. The simplest is the house, made according to the following instructions:
- Cut truncated circles with a radius of 27 cm from two pieces of chipboard.
The back and front walls must not be completely round
- Leave one circle solid, and make holes on the second: one for the entrance (diameter 22 cm) and several decorative (diameter 5.5 cm). You can cut parts with a jigsaw, and for small holes, a drill with special crowns is suitable.
On the front wall, you can make not only an opening for the entrance, but also several decorative
- Mark the attachment points. They must match on two parts. Drill holes for fasteners according to the marks.
To hide the caps of the screws, you first need to make a depression in the blanks
- Prepare wooden blocks 37 * 3 * 4 cm in size. Sand them with sandpaper. Screw them to the walls using self-tapping screws.
The frame for the house may not be solid
- Cut pieces of fabric in accordance with the dimensions of the walls, not forgetting the allowances. Paste the walls with them. In this case, it is better to choose a glue gun, as it does not have a strong smell. Particular attention should be paid to the edges of the walls and holes.
It is better to use a heat gun to glue the house with a cloth.
- On a piece of chipboard, mark the location of the house and the scratching post. On the site where the house will be, place the foam rubber that needs to be glued. Glue the fabric with allowances on top. Additionally, you can fix it with a stapler. Paste over the sides of the lower rails with it. Close the bottom of the base with a sheet of fiberboard.
- Cut a piece of fiberboard measuring 40 * 122 cm. This material will serve as a roof. Before fastening, it must be pasted over with a cloth.
- Attach the house to the prepared base. Self-tapping screws are ideal for this. The exposed parts of the slats and the remaining side walls can then be covered with a suitable cloth.
The house for the cat must be pasted over with a cloth from the outside and from the inside.
- Now attach the scratching post pipe to the base. First, insert the bars into it from both sides. On one side it is attached to the base (with self-tapping screws), on the other side they make a stove bench.
To fasten the pipe, you can use bars that need to be placed in the cavity of the part
- For this, parts are cut out from a sheet of fiberboard (in the middle of the part, you need to make a hole with a diameter the same as that of the pipe) and chipboard (this part must be solid). The first part is put on the pipe, and the second is screwed to the bar in the pipe. Now you need to put a piece of foam rubber on the couch, and then paste it over with a cloth.
It is better to make the bed semicircular
- Glue the lower part of the scratching post with a cloth that was used to decorate the house from the inside, and the rest with a rope.
- Additionally, you can make an inclined scratching post from a board measuring 18 * 41 cm. Cut the bottom edge at an angle of 45 °, then glue it on both sides with a cloth, and fill the middle with a rope.
The scratching post can be in the form of a pipe or inclined
Video: how to make a do-it-yourself cat complex with a scratching post
House of newspaper tubes
If it is not possible to purchase material specifically for making a cat's house, then a newspaper is quite suitable for this purpose. You can make tubes from it, which can later be used to weave a house. You need to prepare in advance:
- pencil (any object of a similar shape, for example, a brush, knitting needle);
- ruler;
- scissors;
- glue;
- cardboard.
After preparing the necessary materials and tools, you can proceed directly to weaving:
- Cut the newspaper into strips 10 cm wide. Now attach a knitting needle to the strip at an angle of 45 ° relative to the narrow part of the part. Pressing the knitting needle against the newspaper, wind the latter around the tool. After that, remove the knitting needle, and glue the tip of the tube. The number of tubes cannot be specified in advance, it all depends on the size of the house.
It is not difficult to get materials for a house from newspaper tubes
- Cut out the bottom of the house from cardboard (two parts). Make holes in it at a distance of 1.5–3 cm from the edge, into which to insert the tubes, having previously greased them with glue. Now glue the second part of the bottom so that the ends of the tubes are between them.
- Now you can weave the walls, for which the tubes need to be passed between the wall tubes, alternately changing their direction (either from the outside, then from the inside).
Weaving a house from tubes is a monotonous process.
- At a height of 4–6 cm from the bottom, you need to start making a hole for the cat to enter the house. Its size depends on the size of the cat (if you have a kitten, then the hole still needs to be made for an adult animal). The hole must be strengthened by braiding around the edges.
- To weave a roof at a height of 30 cm, you need to start tapering.
- It is better to decorate the house with food coloring, so you can be sure of the environmental friendliness of the product.
House of newspaper tubes is environmentally friendly
Video: original house with a cover for a kitten
House-toilet for a cat
Although a cat litter box is a special device that helps to avoid unpleasant situations with a cat going to the toilet, its contents do not always look aesthetically pleasing. But you can always hide it in a specially prepared house. It is not difficult to make it. You need to prepare in advance:
- plywood (for walls, material with a thickness of 12-15 mm is suitable);
- boards 4 cm wide;
- a hammer;
- self-tapping screws;
- nails;
- screwdriver or screwdriver;
- glue;
- jigsaw;
- hacksaw;
- drill;
- roulette;
- furniture hinges;
- sandpaper;
- tracing paper;
- masking tape;
- paint.
The instructions for making such a house are as follows:
- Sizing. You need to take into account only the dimensions of the tray, because the cat will not rest there, and the height of the cat while sitting.
The edges of the hole should be smooth so as not to injure the cat
- House assembly. All parts must be combined, after having greased the ends with glue. Leave the house until the glue dries. To prevent the structure from disintegrating, it can be fixed with tape. After the glue is dry, you can remove it.
The roof may not be solid
- House painting. Only then can the roof parts be connected with furniture hinges. Moreover, one of them must be attached to the house, and the second must remain free so that the tray can be removed through the roof.
Tray house has an opening cover
Where is it better to place the finished house
After the house is made, you need to figure out where to put it. Not the best place would be the area near the battery. There are several reasons for this:
- the battery is under the window, which means there is a risk of draft, which can be the cause of the cat's illness;
- due to the effect of heat, the house will become unusable faster;
- The warm air can cause a cat to shed more.
The ideal place for a house is considered to be a corner. There, the structure will not interfere with anyone, there is no draft in this part of the room, and the heat is retained there, which means that the cat will definitely not freeze.
The best place for a cat house is in the corner of the room.
A cat can be a full-fledged member of the family, which means it also needs a separate room. You can do it yourself, with a little effort and showing imagination.
Endangered and extinct animal species
Military analysts spoke about the background to the liberation of Aleppo Where could this group be directed?
Stalin tattoo Meaning of a tattoo with a portrait of Stalin
Reckless life of Empress Elizabeth Petrovna After Elizabeth Petrovna became ruler
Symptoms of vitamin deficiency, lack of vitamins in the body How to determine which vitamin is missing in the body