Eggs painted in one color are called painted eggs, and eggs painted with ornaments or plot patterns are called pysanky. Classic pysanka is a complex way of painting Easter eggs, which uses wax, steel feathers or hooks, and special paints. But along with traditional methods of coloring, there are a large number of simpler and more original methods for painting an egg. Even kids can paint Easter eggs with watercolors, gouache or markers. You can also use watercolor pencils, corrector, felt-tip pens, gel pens and other standard writing instruments. Painting and painting eggs for the main Christian holiday, Easter, is a long-standing tradition. One of the legend versions says that when Saint Mary Magdalene came to Emperor Tiberius and told about the Resurrection of Jesus Christ, the emperor did not believe it and said that it was as impossible as the fact that a chicken egg would turn red. At the same moment, the chicken egg he was holding in his hands turned red, confirming the news of Mary Magdalene. Other versions date the origin of the tradition back to pre-Christian times.
Painting Easter eggs with watercolors
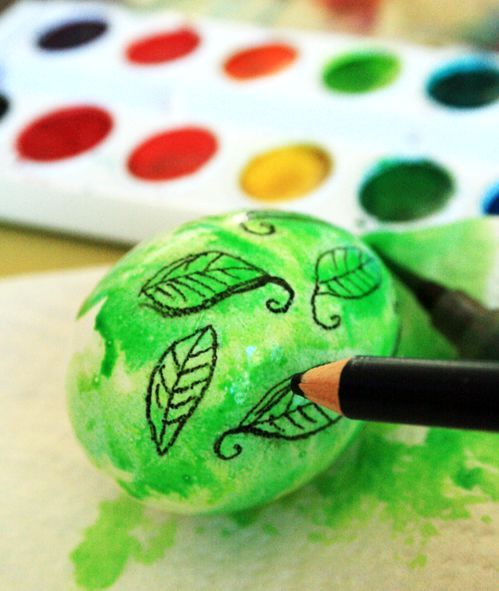
An easy way to make unique and colorful Easter eggs with your own hands is to paint Easter eggs with watercolors, combined with watercolor pencils. Keep in mind that this is not a permanent dye, but it is an easy, affordable and fun decorating method, and you can create a real watercolor painting effect right on the shell.

The saturation of the pattern depends on the degree of dilution of the paint with water. You can first cover the entire surface of the egg with a light layer of watercolor, and then, while the paint is still wet, add more concentrated and saturated spots.

The core of watercolor pencils consists of pressed watercolors, which allows them to be dissolved with water. In other words, we draw as if with colored pencils, and then we go over the image with a damp brush or cotton wool and get a watercolor drawing. In this case, you can use a watercolor pencil to paint on the still wet surface of the egg. The effect is as if the pencil is melting. As a result, soft and slightly blurred lines perfectly depict details.


Painting Easter eggs with gouache
But this wonderful painting of Easter eggs can be done with gouache, acrylic paint and permanent markers!


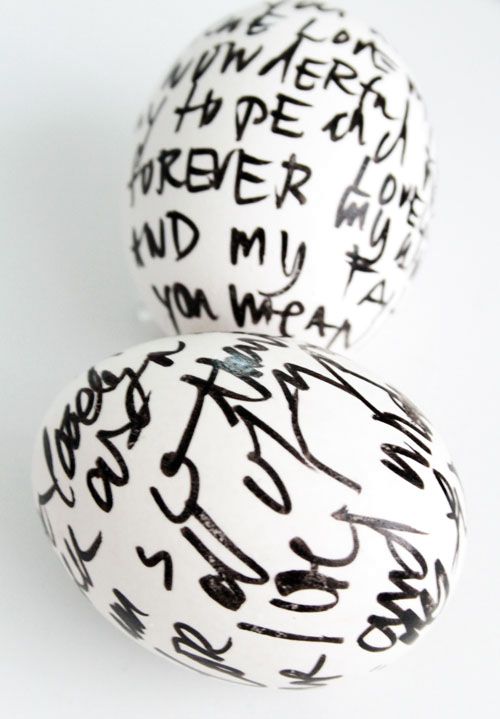
Painting Easter eggs with a marker
Stylish black and white Easter eggs - forget about paints and different materials! Just a black permanent marker and your imagination!


Painting Easter eggs with a gel pen
Fine drawing with gel pen:

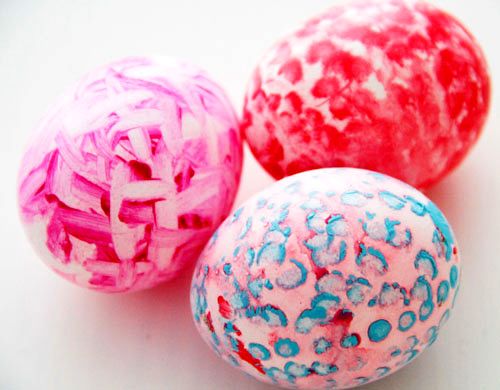
Painting Easter eggs with fingers and sticks
Doodles, dots, spots, stains made by the fingers of children's hands!

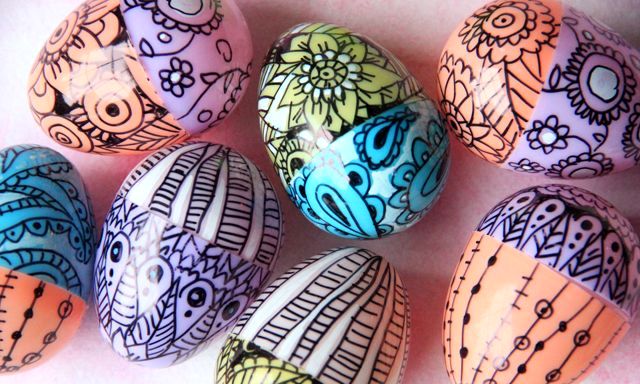
Easter eggs from Kinder Surprise
You can use markers and felt-tip pens to paint plastic eggs from Kinder Surprise. Interestingly, the child can then combine the halves of the egg himself, creating a new Easter egg each time.

I offer you several ways to color Easter eggs.
Easter eggs are a significant attribute of Easter, along with and. We have already prepared all this and even one.
Today we will look at and prepare painted Easter eggs for the celebration.
There are probably a hundred or even more ways to dye eggs.
We will look at some of the most interesting and simple ones.
How to paint eggs for Easter. Coloring Easter eggs step by step with photos
First you need to prepare the eggs. This is very important for the eggs to be beautiful.
Menu:
How to prepare eggs for Easter painting
Preparation:

1. It is best to buy white eggs because they take paint better. Eggs must be washed thoroughly.
Usually the eggs are marked with a mark, date of release, and other things. This mark must be washed off, because it will show through any paint.
If it does not wash off with a sponge and warm water, try it with baking soda powder and, as a last resort, table vinegar. This will not cause any harm to the egg, because we act on it in this way for a short time.
Do not press too hard on the egg. Since it is raw, it may crack. The egg must be washed thoroughly. Because only on a clean egg will the paint lie in an even layer.


3. And one more trick. A cotton pad should be moistened with alcohol (if you don’t have alcohol at home, use 9% table vinegar) and wipe the eggs with it. This is to remove grease stains from the eggs from your fingers. We process all the eggs in this way.
Do not forget! When processing eggs, they should be at room temperature.

4. Place the eggs in a saucepan and add a couple of tablespoons of salt to prevent the eggs from cracking during cooking. And fill with cold water so that the eggs are completely covered.
By the way, can you tell old eggs from fresh ones? When we fill them with water, the old egg floats to the top, while the fresh egg remains at the bottom.

5. Let the eggs cook. We will cook on low heat. Of course we will boil it hard-boiled. After they boil, you need to cook for another 7-10 minutes if the eggs are store-bought. If the eggs are fresh village eggs, you need to cook them longer, after boiling for 13-15 minutes.
Don’t forget, when you take the boiled eggs out of the boiling water, be sure to dip them in ice water for a while, this is so that they can be cleaned better later. Just don't refrigerate it at all. The eggs should be warm when painting.
Well, we've cooked the eggs. Now let's move on to their coloring.

How to paint beautiful eggs for Easter

1. Take a hard-boiled egg, wipe it again with alcohol or vinegar and wrap it in a paper napkin or paper towel, do not try to wrap the egg evenly, just wrap it randomly, as if you were crumpling a napkin (do not press too hard, crush the egg).
Pour a little vinegar, as if getting wet, from all sides. Press the napkin (crimp) more tightly onto the egg.

2. Take blue dye and randomly drip it onto the egg. Let the dye spread a little.

3. Take another dye, yellow. Also, in a chaotic manner, apply it to the egg.

4. Take the third dye, ours is red, and just like the first two, apply it to the egg.

5. Squeeze the egg with your palms so that the napkin sticks well to the shell. In this case, the napkin turns out to be one-color, evenly colored.

6. Before painting the egg, we need to make a stand for it. We take an ordinary sponge, stick English needles into it the size of an egg and that’s it, our stand is ready.

7. Place our egg in a napkin with dyes on a stand and let it dry a little.

8. After a couple of minutes, the egg has dried, carefully remove the napkin from it, trying not to smudge the paint.

We got such a rainbow colored egg. Place the egg on our homemade stand again and let it dry completely.

How to dye Easter eggs to make them multicolored

1. We will need small but deep plastic dishes. Pour a tablespoon of vinegar into each of them.

2. Pour the dye into each of the dishes, a little at first, and then you can adjust it after diluting the dyes with water.

3. Dilute the dyes with water. You don’t need a lot of water, about less than half. You will understand when you see what we will do.

4. Take an egg and dip it 1/3 into the dye. We hold it for about 2 minutes.

5. Take out the egg and blot a drop from below. We leave the egg to dry a little on our homemade stand. Since our egg is warm, it dries out quite quickly.

6. When the egg is dry, dip it into the next dye, again about 1/3, for 2 minutes. We take it out, also blot the droplet at the bottom and set it to dry.

7. Dip the remaining uncolored part of the egg into the third dye. We take it out, not forgetting to wipe the droplet from below, and set it to dry.

This is the colorful egg we got.

How to paint Easter eggs with polka dots

1. Prepare two paints in plastic cups, yellow and blue, a candle, cotton wool on sticks and an egg cup. If you have some paint left over from a previous painting, you can use it. We light a candle. we need melted wax.

2. Dip the egg completely into yellow dye. Let's let it lie there for a couple of minutes, take it out and put it on a stand to dry.

3. The egg has dried out. Take a cotton swab, dip it in the melted wax and randomly apply dots of wax onto the egg with the stick. You can come up with something of your own. Inscription, figures, stripes, etc.
4. Literally let the wax dry for 10-15 seconds and add the egg to the second paint. Ours is blue. You can take any one you like. Let the egg sit in the paint for 2 minutes.

5. Remove from the dye, place on a stand, and let dry. Basically the egg is ready. We can leave it like this.

6. If you want to remove wax from an egg, warm it up a little next to a candle, in no case above the egg, just next to it. The wax melts and can be easily removed with a napkin.

How to paint eggs for Easter with color transition
We will need an egg and dye of the same color.

1. Pour just a little dye into a plastic cup so that it only covers the tip of the egg a little more than a centimeter and lower the egg there vertically with the blunt end down. Leave it like this for 2 minutes.

2. Then use a spoon to add a little more coloring. Depending on how large the egg is and how many rings you want to make of different intensities of color on the egg, calculate how much paint you need to add. We added about 1 cm at a time. We also left it for a couple of minutes.

3. Add more dye and also leave for 2 minutes. And so on until we cover the entire egg, leaving the egg in the dye for 2 minutes after each layer.
After covering the egg completely with dye, let it stand for 2 minutes, remove it from the dye and place it on our stand to dry.
As we can see, all the stripes on the egg are visible. The egg turned out beautiful, with a gradually weakening tone of paint towards the top.

How to paint striped eggs for Easter

1. Pre-color the egg blue. Next we need electrical tape. Cut off 20-25 centimeters of electrical tape and cut the electrical tape lengthwise into narrow strips.

2. Place the tape on the egg in a spiral. You can stick it however you like. You can also make the strip of electrical tape any width you want. In this way we cover the entire egg. Press the tape firmly against the egg so that there are no smudges.

3. This is what we got, covered with electrical tape. We dip it in the pre-prepared red dye, as always, for a couple of minutes. We take out the egg, put it on a stand and let it dry.

4. Our egg has dried, remove the electrical tape. As you can see, there is a blue color left under the electrical tape.

We got this striped egg in a simple way.

Mosaic coloring Easter egg

1. We cut a lot of corners from electrical tape and now stick them on the egg, which was previously painted yellow. We try to glue the corners in the shape of a mosaic. Between the corners we make a gap of approximately 2 millimeters. We lay the corners in random order.

2. This is the glued egg we got. Dip it in red dye to get a roughly orange color.

3. Remove from the dye and place on a stand to dry.

This is the egg we got. Now all that remains is to remove the electrical tape.

How to dye Easter eggs in onion skins
1. We will need onion peels, preferably from red and yellow onions. Eggs with already defatted shells. If you have not degreased them yet, wipe them with alcohol or vinegar. Squares of gauze measuring approximately 20 x 20 cm. Threads for tying gauze, a saucepan. There is a problem with the saucepan. After cooking onion skins, the pan is very difficult to wash, so choose a pan that is not needed or that you paint in every year. Or you will paint it.

2. For decoration, we will add various leaves and figures cut out of parchment so that the eggs are not so boring.
3. The husks need to be placed in a pan and mashed to crush. The size of the pan and the amount of peeling depends on how many eggs you want to dye. Fill the husk with water and put it on the stove to cook for 1-1.5 hours.
4. We begin to prepare the eggs. Take gauze, place a leaf on it, face up, carefully straighten all the ends of the leaf. Place an egg on a piece of paper. Carefully gather all the ends of the gauze into a pile and tighten it, pressing the leaf firmly against the egg. We twist the collected ends of the gauze into a tourniquet, then pull the leaf to the egg and tie it with threads.
5. We also make the following eggs. You can even lay out some composition of leaves on gauze. Place the egg in the center and tighten the gauze again. But for figures made of parchment paper, it is best to dip them in water so that they stick to the egg, and then put the egg in cheesecloth and also carefully tighten it.

6. Add salt to the boiling onion skins and place the eggs there.

7. Cover them all completely with husks and let them cook for 10-12 minutes over low heat. Remember that the eggs must be at room temperature, otherwise they will burst.

8. We take the eggs out of the husks and transfer them immediately into cold water to make them easier to clean later.

We cut off the gauze, rinse it with water and see how beautiful it is.
To make the eggs shiny, brush them with vegetable oil. The most convenient way to do this is by pouring a little oil onto cotton pads.
Well, the eggs are ready. They are perhaps not inferior in beauty to painted eggs.

Original DIY Easter eggs
We took:
- Eggs - 12 pcs.
- Water - 2 liters
- Vinegar - 2 or 3 tbsp.
- Silk fabric (with different patterns)
- Any white fabric
- Rubber bands

1. To color the eggs, we took unnecessary men's silk ties, of which we had a lot. If you don't have unnecessary ties, just take pieces of multi-colored silk.

2. We cut the fabric into squares. Take the egg and place it on the front side of the silk fabric.

3. Wrap tightly so that the fabric does not move around the egg. We twist the resulting tail of the fabric at the top, thus tightening the egg even tighter.

4. Place the same piece of white fabric on top of the colored fabric. We also curl the tail. We secure everything by putting an elastic band on the tail, twisting it several times. We do the same with all eggs.

5. When all the eggs are prepared, put them in a saucepan.

6. Fill with water, add vinegar and put on fire. After the water boils, cook for another 15 minutes. Turn down the heat so they don't jump around in the pan. If only they would slowly boil.

7. After 15 minutes, take out the eggs and place them on a dish. Leave on a plate until completely cooled.

8. When the eggs have cooled completely, remove the elastic bands and unfold the fabric. Look at the beauty that appears from under the fabric. In this way we unwrap all the eggs.

These are the most beautiful eggs we got. Surprise your friends. Enjoy yourself.

Very beautiful Easter eggs

1. Take hard-boiled eggs, ordinary colored napkins and egg white. We tear the napkin into 4 parts. Separate the top colored layer from the napkins.

2. Dip the egg into the white and swirl to moisten the entire area of the egg. Place the egg on the wrong side of the napkin and wrap it. We tear off the excess napkin.

3. Dip the brush into the white and grease the egg on top, thus distributing the napkin evenly over the entire egg, while simultaneously pressing the napkin more tightly to the shell.

4. Everything is carefully distributed, the egg is ready. We make all the eggs in the same way. You can take different napkins. Accordingly, the eggs will be different.
Enjoy!
11. Video - 5 ways to decorate eggs for Easter in an original way
Enjoy!
Happy upcoming Easter to everyone!
To decorate an Easter egg with a design, use "mask effect".
The mask can be:
1. Plant leaves.

Tear off a leaf from a houseplant or wild plant and apply it to the egg.

Place a nylon sock on top of the egg and tie it with an elastic band.

Color the egg with food coloring according to the instructions on the package.

Take off the sock and the leaf. This is how beautiful it should be!

2. Pieces of adhesive tape, electrical tape, self-adhesive paper.
Well, everything is simple here. Cut out squares, circles, strips from adhesive tape or tape, and different Easter silhouettes from self-adhesive paper and stick them on the egg.

Color the egg using synthetic or natural dye. When the egg is dry, remove the stickers.
Another interesting method is to paint eggs covered with electrical tape in two colors.

Cover the egg with a strip of electrical tape, first in one direction and paint it yellow.


When the egg is completely dry, remove the tape and apply another piece of tape in the opposite direction.

Paint the egg blue. Mixing blue and yellow will produce green.

Now remove the ribbon from the egg.

So, playing with colors, you can have fun and usefully spend time.


3. Bank rubber band for money.

You can get these cute striped eggs by wrapping them with a rubber band before painting.

4. Fig.
Dip the wet egg in dry long grain rice and wrap tightly in a bandage. Tie the ends of the bandage with an elastic band or thread. Boil the egg in the onion peel for 15-20 minutes (pre-soak the peel overnight in water).

Marble eggs
The effect of marble eggs gives vegetable oil, which is added to food coloring during coloring.

You can paint an egg first in one color, and then immerse it in a dye of a different color, after adding a tablespoon of vegetable oil and stirring the solution with a fork. Try to catch as many oil stains as possible, then dry the egg with a napkin.

The marble effect can be achieved by finely chopped onion peel, wrapping it around the egg and pulling a nylon sock over it. You need to cook the eggs for 20 minutes.

You can color Easter eggs marker...


Or felt-tip pens. Quite simple, but so beautiful!

Colored eggs look impressive wax crayons. True, they need to be painted while still hot. So, you will need an egg stand. After finishing the job, leave the egg to dry for an hour.

You can amaze your friends with an intricate pattern by painting eggs with natural cotton threads. Mix different colored threads, tie them tightly around the eggs and boil them. Voila - the creative pattern is ready!

To obtain golden yellow eggs, boil them in a decoction turmeric.

And in order for the eggs to acquire a soft pink color, dye them in juice beets.

A strong broth will give the eggs a dark brown color. tea.

And to clearly see the process of creating colorful masterpieces from Easter eggs, watch the video. A master class from Elena Bazhenova will help you color eggs for the holiday in an original and, not least important, correct way.
10 unusual ways to decorate Easter eggs April 27th, 2013
Treat yourself and your loved ones with unusual and bright Easter eggs. Thanks to your imagination and skill, ordinary eggs can turn into real works of art.
In addition to the previous stories and 9 natural dyes for Easter eggs, today we will tell you about alternative ways to decorate Easter eggs.
Eggs decorated with beads look very elegant. You need to take hard-boiled eggs and thoroughly bathe them in melted paraffin. Paraffin (fragments or remains of candles) is melted in a wide metal container (you can use any tin can) on the stove. The egg begins to decorate when it is completely covered in paraffin and has cooled enough so that the paraffin does not stick to your hands.
First, the desired pattern is applied to the paraffin layer with a thin needle. Using tweezers, take one bead of the desired color, heat each one on a candle flame for no more than 1-2 seconds and glue it onto a paraffin egg. When it comes into contact with heated beads, the paraffin melts and firmly glues the beads. In this way you can create a real work of art.
2. Eggs decorated with cereal
To decorate Easter eggs, you can use various cereals (rice, lentils, millet, corn grits, black peppercorns, etc.), and small pasta. Coat hard-boiled eggs with paste and place cereal on them. Cereals can be laid in various patterns. How to prepare paste? For 1 glass of water, add 1 heaped teaspoon of starch. Pour starch diluted in cold water into boiling water in a thin stream (dilute the starch in a small amount of cold water so that there are no lumps), boil the mixture for 1-2 minutes, cool. The paste is ready.
3. Eggs decorated with lace, bows, beads, paper decorations, etc.
Painted eggs can be decorated with braid, bows, lace, beads, buttons and other sewing accessories, gluing the decorations using PVA glue or paste.
4. Easter eggs painted with felt-tip pen, marker, wax crayons, paints
Already colored plain eggs can be painted
This will melt the crayons and create beautiful patterns. When painting an egg, place it on a stand, and after finishing the work, let it dry for an hour.
An openwork pattern is applied to boiled, dark-colored eggs with a sharp object: a knife, an awl, scissors, or a thick needle. But before you scratch out the pattern, you need to apply it to the egg with a pencil. A lighter scratched pattern on dark eggs looks very elegant.
To decorate Easter eggs using the decoupage technique, you can take elegant napkins with a bright spring pattern. The pictures you like are cut out and carefully glued with PVA glue (for safety, you can use egg white as glue) onto the surface of the boiled egg, and coated with glue on top again. The decorated egg is dried.
7. Glitter
Boiled eggs are coated with glue or paste or egg white, sprinkled with small multi-colored glitter, and allowed to dry. The top is once again coated with an adhesive substance (glue, paste, protein). If you apply glue not to the entire surface of the white egg, but in separate dots, circles, contours and sprinkle it with glitter, then the glitter will stick only to the smeared areas and you will get a white egg with a shiny pattern.
Another way. Cut out circles, flowers, and any other shapes from double-sided tape. Glue them to the egg. Remove the protective layer of paper. Sprinkle eggs with glitter. They will stick to the sticky areas and create a shiny pattern on the smooth egg.
8. Simply wrap in colorful foil
A very simple way to make a gold or silver Easter egg. Wrap the boiled eggs tightly in thin, multi-colored foil, which can be purchased at any craft store.
Needlewomen can crochet Easter eggs using multi-colored threads. You can tie it only with simple columns, or you can use unusual patterns.
10. Cover with fabric
1.Easter eggs can be decorated by covering them with colorful scraps of fabric. To do this, use rectangular variegated shreds, which are cut into thin strips on opposite sides so that the fabric fits tightly around the uneven surface of the egg. To glue the fabric, the surface of the egg is completely coated with glue.
2.Another way to decorate Easter eggs using scraps.
Cut the shreds into thin strips. Lubricate the egg with glue. Gradually pressing the strip of fabric to the surface of the egg (you need to start from the blunt end of the egg), we wrap it completely. A strip of fabric can be folded to create a more textured surface. Using stripes of different colors, you can create very unusual outfits for Easter eggs.
An easy and effective way to decorate Easter eggs. The kids will definitely love it!
For all methods, food coloring is used as a basis.
1. Decorate Easter eggs with double-sided thin tape or adhesive tape
Cut the duct tape into strips or squares and wrap the hard-boiled eggs. And take turns lowering them into different colors of paint, removing some stripes. And you will get these striped whales. There are a ton of options for how to apply stripes—spotted squares, vertical stripes, like on a watermelon, checkered patterns, or abstract transverse stripes.
Here, for decoration, we will need corrugated paper, which we apply with glue to the already prepared and painted eggs. Add a couple of stickers with a ladybug or butterflies and you get a very spring version of Easter eggs.

3. Paint Easter eggs with a marker
A monochrome version with white unpainted eggs would look great here. Children's flights of imagination cannot be stopped, so we give them markers and colored eggs and get little works of art.


You can buy such stamps at a decor store or anything for needlework, and if you are fans of Kinder, you often come across funny stamps there. Tip: Use a pen to carefully fill in any lines you may have missed.
 5. Decoupage fabric for Easter eggs
We cut any loose fabric into small squares, soak it in decoupage glue (or dilute regular PVA 50/50 water-glue) and make beautiful multi-colored eggs. In fact, these are the papier-mâchés that we all made as children, only in this case from fabric.

6. Decorate Easter eggs with pompoms
Just glue the pom poms onto the egg. Hot glue and a glue gun will work best, but PVA will work too.

We place a tiny feather on the already painted egg and carefully glue it using decoupage glue and a small brush. These are the eggs with the feather of the firebird.

In this case, it is better to decorate an empty, blown egg.
Tip: How to blow out an egg. Take a raw egg, previously washed in warm water. And a knife or any other sharp object to “drill” a small hole in the shell. Do not press too hard on the egg - the shell may crack. We insert a syringe with a needle into the hole, turn the egg with the hole down and begin to slowly blow air into the syringe. To make the contents come out faster, you can lubricate the surface of the egg with fat or wax. Let's check if the egg is really empty by shaking it in your hand. If there is something left inside the egg, you will feel it. Then, using a syringe, rinse the egg with water, injecting and blowing water.
After blowing the egg, lower the pin into the hole with the thread attached to it. Apply white glue around the edge of the hole, then carefully wrap the thread around it. Continue adding glue and wrapping the thread until the egg is closed.

9. Marble Easter eggs
Paint the egg the desired shade. Then, in a shallow bowl of water, add 1 teaspoon white vinegar and enough food coloring to create a darker shade than your first coloring (15 to 20 drops). Add 1 tbsp. olive oil and stir with a fork to create swirls and drips. Roll the egg over the paint until you see marbling. Dry with a paper towel.

10. Glittery Easter eggs
Using a brush, apply an even layer of glue to the egg. Roll the egg in the dry glitter until it is completely covered. Tip: For a crisp finish, first paint the egg the same color as the glitter. You can also use glitter glue (at any office supply store) and make beautiful patterns and inscriptions on painted eggs. 
11. Textured Easter eggs or “dinosaur eggs”
Wrap the egg in a fishnet stocking or lace fabric. Using a sponge with acrylic paint, blot the bottom of the egg. But it's easy to paint with a large dry brush. Let dry and remove the fabric. Now your egg looks almost like a dinosaur egg! Quail eggs are perfect for this theme - they already look like dinosaur eggs.

12. Paint Easter eggs with acrylics
This will probably be children's favorite decor option. Here you can draw anything you want - your favorite cartoon characters, Easter bunnies, etc. Advice: it is better to do the entire procedure with acrylic in clothes that you don’t mind; it actually doesn’t wash off after it dries.


13. Decorate Easter eggs using paper
Carefully cut out different geometric shapes from the paper, apply them to the eggs coated with glue and once again apply decoupage glue on top.

14. Easter egg chicken
Draw a chicken on the yellow egg with a marker, and use decorative feathers to make a tail. We fix it with silicone glue. 
Wrap the egg with several ordinary thin hair bands or food rubber bands, or alternatively, you have rubber bands for bracelets at home, they stretch well. Then paint the egg and let it dry completely before removing the elastic. Tip: If you blow the egg, do it after removing the rubber bands.

16. Paint Easter eggs using foil
Drop 10 to 15 tiny balls of foil into a paper cup. Spray with paint (you can use one or more colors). Place the egg in a cup and cover the top with foil. And Shake! SHAKE SHAKE! Take out the egg, look how beautiful it turned out.

Place the coffee filter on a sheet of foil. Add drops of dye or paint splatters to your coffee filter. Place the egg on top and wrap it in foil. Leave for 10-30 minutes, unwrap and let dry. Ta-dam, you have an amazing Easter egg.

17. Decorate Easter eggs with nail polish
This option will delight any girl. Well, of course - my mother allowed me to take my own polishes. Use orange nail polish to apply the stains. Let dry. Using black polish, paint a border around the edges of the stains. There are an incredible number of varnish design options.

18. Easter bunnies made from Easter eggs
We cut out the ears for these Easter bunnies from thick paper or cardboard, paint them to match the color of the egg and glue them to the egg with silicone glue. Draw eyes, nose and mouth with a marker. Tip: Mustaches can be made from threads. This will make your bunnies even cuter.

19. Draw a galaxy on Easter eggs
For this option we use acrylic paints. Paint the egg black. Then apply blue, purple and pink paint with a sponge. Let the layers dry and splatter white paint onto the surface - a stiff brush or toothbrush will do the job. Tip: Make sure to cover all surfaces around you with plastic wrap or cellophane so that splashes don't make a mess.

20. Multi-colored Easter eggs
the simplest, but at the same time the brightest option. Take turns dipping the edges of the egg in different food colors and get original and festive Easter eggs

King Bhumibol Adulyadej of Thailand: divine king with camera
Piggy Bank - Bible Questions
Recipe: Zucchini pancakes - With cheese - very tender and tasty
Flower mastic recipe
Hot smoked lard at home