If you need to visualize data that is difficult to understand, then a chart can help you with this. Using a chart, you can easily show relationships between different indicators, as well as identify patterns and sequences in your data.
You may think that you need to use difficult-to-learn programs to create a diagram, but this is not so. To do this, you will need a regular text editor Word. And in this article we will demonstrate it. Here you can learn about how to make a chart in Word 2003, 2007, 2010, 2013 and 2016.
How to make a chart in Word 2007, 2010, 2013 or 2016
If you are using Word 2007, 2010, 2013 or 2016, then in order to make a diagram you you need to go to the "Insert" tab and click on the "Chart" button there.
After that, the "Insert Chart" window will appear in front of you. In this window you need to select the appearance of the chart that you want to insert into your Word document and click on the "Ok" button. Let's take a pie chart as an example.

Once you choose a chart appearance, an example of what your chosen chart might look like will appear in your Word document. This will immediately open the Excel window. In Excel, you will see a small table with data that is used to build a chart in Word.

In order to modify the inserted diagram to suit your needs, you need to make changes to the table in Excel. To do this, simply enter your own column names and the necessary data. If you need to increase or decrease the number of rows in the table, then this can be done by changing the area highlighted in blue.

After all the necessary data is entered into the table, Excel can be closed. After closing the Excel program, you will receive the chart you need in Word.

If in the future it becomes necessary to change the data used to build the chart, then for this you need to select the diagram, go to the "Design" tab and click on the "Edit data" button.

Use the Design, Layout, and Format tabs to customize the appearance of the chart. Using the tools on these tabs, you can change chart color, labels, text wrapping, and more.
How to make a pie chart in Word 2003
If you are using the Word 2003 text editor, then in order to make a diagram you you need to open the "Insert" menu and select the item "Picture - Chart" there.

As a result, a chart and a table will appear in your Word document.

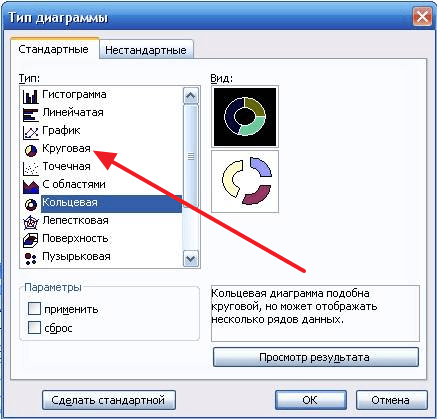
To make a pie chart right-click on the chart and select the "Chart Type" menu item.

After that, a window will appear in which you can select the appropriate type of chart. Among other things, here you can select a pie chart.
After saving the settings for the appearance of the chart, you can begin to change the data in the table. Double click the left mouse button on the diagram and a table will appear in front of you.

Using this table, you can change the data that is used to build the chart.
The human mind is designed in such a way that it is easier for it to perceive visual objects, otherwise they have to be represented. It is this fact that has led to the widespread use of diagrams. To create them, you do not need to install separate programs, just remember excel.
The process of creating a diagram
First of all, you will need to enter the initial data, most users try to create it on an empty sheet, which is a mistake. The table should consist of two columns, in the first it is necessary to place the names, and in the second the data.
Next, you need to select the table along with the names of the columns and columns, and then go to the "Insert" tab, selecting the "Charts" item there. Several options will be offered, 4 types are available in the “Pie” menu: the last two are used for complex data sets in which some indicators depend on others, for simple tables the first and second charts are used, they differ only in the presence of cuts. After clicking on the icon, a diagram will appear.
Change data and appearance
For a successful presentation of the material, it is not enough to know only how to build a pie chart inexcel, often it is necessary to edit it at your discretion. There is a special menu for this, which will become active after clicking on the diagram. There you can give it a different shape or save the current settings as a template if you need to create many similar ones.
Also, the color is configured here, for this you should select the desired style in the corresponding menu. To insert labels, you need to go to the “Layout” tab, the “Signatures” menu is located there, you need to select the “Data Labels” item, an additional window will appear.

To edit the inscriptions, you need to click on one of them and select the “Format of signatures” item. In a special window, you can customize their color, background, location, and content, for example, activate relative data instead of absolute data.

Of course, these are not all possible settings, but for most users they are enough to build a pie chartexcel.
The sequence of actions when building a chart
1. Select in the table the range of data on which the chart will be built, including, if possible, the ranges of labels for this data in rows and columns.
2. To select multiple non-contiguous data ranges, select by holding down the
3. Call Chart Wizards (menu item Insert / Diagram or a button on the standard toolbar).
4. Carefully reading all the tabs of the dialog box of the diagramming wizard at each step, go to the end (select “Next” if this button is active) and finally click “Finish”.
After plotting the chart, you can change:
· dimensions of the diagram by dragging the dimensional designations that appear when the diagram is selected;
position of the chart on the sheet by dragging the chart object with the mouse;
· font, color, position of any element of the diagram by double-clicking on this element with the left mouse button;
· chart type, source data, chart parameters by selecting the appropriate items from the context menu (right mouse button).
The diagram can be deleted: select and click
A diagram, like text and any other objects in MS Office, can be copied to the clipboard and pasted into any other document.
Pie charts- represent a circle divided into sectors (cake), and are used to show the relative value that makes up a single whole. The largest sector of the circle should be first clockwise from the top. Each sector of the circle must be marked (required name, value and percentage). If it is necessary to focus on a particular sector, it is separated from the rest.
Let's build a three-dimensional pie chart that displays the production load during the year.

With a pie chart, only one data series can be displayed, each element of which corresponds to a certain sector of the circle. The area of the sector as a percentage of the area of the entire circle is equal to the share of the row element in the sum of all elements. Thus, the sum of all shares by season is 100%. The pie chart created from this data is shown in the figure:

There are 6 types of pie charts in Excel:
¾ circular - displays the contribution of each value to the total;
¾ volume circular;
¾ secondary circular - part of the values of the main diagram is placed on the second diagram;
¾ cut circular - sectors of values are separated from each other;
¾ volume cut circular;
¾ secondary histogram - part of the values of the main diagram is placed in the histogram.
If you want to separate slices in a pie chart, you don't have to change the chart type. It is enough to select the circle and drag any sector in the direction from the center. To return the original view of the chart, drag the sector in the opposite direction.

It should be remembered that if you want to separate only one sector, you should make two single clicks on it. The first will highlight the data series, the second - the specified sector.

In a pie chart, sectors can be rotated 360° around the circle. To do this, select a series of data in the context menu, select the tab Data Series Format , go to the tab Parameters and enter the desired value of the angle of rotation:

A secondary pie chart, like a secondary bar chart, allows some of the data to be displayed separately, in more detail, on an auxiliary chart or histogram. Moreover, the secondary diagram is taken into account on the primary diagram as a separate share. As an example, consider a chart showing weekly sales, with the weekend portion plotted as a secondary pie chart. When choosing a chart type, specify Secondary circular .


To set data selection methods for the secondary chart, in the context menu, select Data Series Format and go to the tab Parameters. Here we specify the number of last values in the second part, the size of the second part, the width of the gap between the diagrams and other parameters, for example.

The Excel pie chart is based on the numerical data of the table. Parts of the chart show proportions in percentages (shares). Unlike a graph, a chart better displays the overall picture of the results of an analysis or a report as a whole, and a graph graphically details the presentation of information.
The visual representation of information in the form of a circle is relevant for depicting the structure of an object. Moreover, only positive or zero values can be displayed, only one set (series) of data. This feature of charts is both their advantage and disadvantage. Let's take a closer look at the benefits.
How to build a pie chart in Excel
Let's make a simple table for educational purposes:
We need to visually compare the sales of any product for 5 months. It is more convenient to show the difference in "parts", "shares of the whole". Therefore, we choose the type of chart - "pie".


At the same time, the tab "Working with diagrams" - "Designer" becomes available. Her toolkit looks like this:
What can we do with the existing chart:
Change type. When you click on the button of the same name, a list with images of chart types opens.
Let's try, for example, a volume cut circular.

In practice, try different types and see how they look in the presentation. If you have 2 sets of data, and the second set is dependent on any value in the first set, then the types: "Secondary pie" and "Secondary histogram" are suitable.

Use different layouts and design templates.

Let's make the names of the months and figures of sales indicators displayed directly on the shares.

The constructed graph can be moved to a separate sheet. We press the corresponding button on the "Designer" tab and fill in the menu that opens.

You can create a pie chart in Excel from the reverse order of operations:


If the choice of the program does not match the option conceived by us, then select the legend element and click "Change". The "Edit row" window will open, where "Row name" and "Values" are links to cells (set the ones you need) and click OK.
How to change a chart in Excel
All highlights are shown above. Let's summarize:
- Select a diagram - go to the "Designer", "Layout" or "Format" tab (depending on the goals).
- Select a diagram or its part (axes, series) – right-click.
- Tab "Select data" - to change the names of elements, ranges.
All changes and adjustments should be made on the Design, Layout, or Format tabs of the Chart Tools tool group. The tool group appears in the title bar as an additional menu when the graphics area is activated.
Pie chart in percentage in Excel
The simplest version of the percentage data display:
- We create a pie chart according to a table with data (see above).
- Left click on the finished image. The Design tab becomes active.
- Choose from the layouts offered by the program options with percentages.

As soon as we click on the picture we like, the diagram will change.

The second way to display data as a percentage:


The result of the work done:

How to build a Pareto chart in Excel
Vilfredo Pareto discovered the 80/20 principle. The discovery took root and became a rule applicable to many areas of human activity.
According to the 80/20 principle, 20% of efforts give 80% of the result (only 20% of the causes will explain 80% of the problems, etc.). The Pareto chart reflects this dependence in the form of a histogram.
Let's build a Pareto curve in Excel. There is some event. There are 6 reasons for it. Let's evaluate which of the reasons has a greater influence on the event.


The result was a Pareto chart, which shows: causes 3, 5 and 1 had the greatest influence on the result.
In this tutorial on pie charts, you will learn how to create a pie chart in Excel, how to add or remove a legend, how to label a pie chart, show percentages, how to split or rotate it, and much more.
Pie charts, also known as pie charts, are used to show how much of a whole individual amounts or percentages make up. In such graphs, the whole circle is 100%, while individual sectors are parts of the whole.
The public likes pie charts, while data visualization experts hate them, and the main reason for this is that the human eye is not able to accurately compare angles (sectors).
If you can’t completely abandon pie charts, then why not learn how to build them correctly? Freehand drawing a pie chart is difficult, given the confusing percentages that present a particular problem. However, in Microsoft Excel, you can build a pie chart in just a couple of minutes. Then all you have to do is spend a few more minutes on the diagram and use the special settings to give it a more professional look.
How to build a pie chart in Excel
Creating a pie chart in Excel is very easy, it only takes a few clicks. The main thing is to correctly format the source data and choose the most appropriate type of pie chart.
1. Prepare the initial data for the pie chart
Unlike other Excel charts, pie charts require the source data to be organized in one column or one row. After all, only one data series can be built in the form of a pie chart.
In addition, you can use a column or row with category names. The category names will appear in the pie chart legend and/or data labels. In general, a pie chart in Excel looks best if:
- The chart has only one data series.
- All values are greater than zero.
- There are no empty rows and columns.
- The number of categories does not exceed 7-9, since too many sectors of the diagram will blur it and it will be very difficult to perceive the diagram.
As an example for this tutorial, let's try to build a pie chart in Excel based on the following data:

2. Insert a pie chart on the current worksheet
Select the prepared data, open the tab Insert(Insert) and select the appropriate type of chart (we will talk about different types a little later). In this example, we will create the most common 2-D pie chart:

Advice: When highlighting source data, be sure to select column or row headings so they will automatically appear in your pie chart titles.
3. Choose the style of the pie chart (if necessary)
When the new pie chart has appeared on the worksheet, you can open the tab Constructor(Design) and in the section Chart styles(Charts Styles) Try different styles of pie charts, choosing the one that best suits your data.

The default pie chart (Style 1) in Excel 2013 looks like this on the worksheet:

Agree, this pie chart looks a little rustic and, of course, needs some improvements, for example, the title of the chart, and perhaps more should be added. We will talk about all this a little later, but now we will get acquainted with the types of pie charts available in Excel.
How to Create Different Types of Pie Charts in Excel
When creating a pie chart in Excel, you can choose from the following subtypes:
This is the standard and most popular pie chart subtype in Excel. To create it, click on the icon Circular(2-D Pie) tab Insert(Insert) in section Diagrams(Charts).

Volumetric pie chart in Excel
Volumetric circular(3-D Pie) charts are very similar to 2-D charts but display data on 3-D axes.

When building a three-dimensional pie chart in Excel, additional functions appear, such as.
Secondary Pie or Secondary Bar Chart
If the pie chart in Excel consists of a large number of small sectors, then you can create Secondary circular(Pie of Pie) chart and show these minor sectors on another pie chart, which will represent one of the sectors of the main pie chart.

secondary ruled(Bar of Pie) is very similar to Secondary circular(Pie of Pie) chart, except that the sectors are displayed on the secondary histogram.

While creating secondary circular(Pie of Pie) or secondary ruled(Bar of Pie) charts in Excel, the last three categories will be moved to the second chart by default, even if these categories are larger than the others. Since the default settings are not always the best, you can do one of two things:
- Sort the original data on the worksheet in descending order so that the smallest values end up in the secondary chart.
- Choose yourself which categories should appear on the secondary chart.
Selecting Data Categories for the Secondary Chart
To manually select data categories for a secondary chart, do the following:
- Right-click on any sector of the pie chart and select from the context menu Data series format(Format Data Series).
- Row parameters(Series Options) in the dropdown list Split row(Split Series By) select one of the following options:
- Position(Position) - allows you to select the number of categories that will appear in the secondary chart.
- Meaning(Value) - allows you to define the threshold (minimum value). All categories below the threshold will be moved to the secondary chart.
- Percent(Percentage value) - same as Meaning(Value), but the percentage threshold is specified here.
- Other(Custom) - allows you to select any sector from the pie chart on the worksheet and specify whether to move it to the secondary chart or leave it in the main one.
In most cases, a threshold expressed as a percentage is the most reasonable choice, although it all depends on the initial data and personal preferences. This screenshot shows how to split a series of data using a percentage:

Additionally, you can configure the following settings:
- Change Side clearance(Gap between two charts). The gap width is set as a percentage of the secondary chart width. To change this width, drag the slider, or manually enter the desired percentage.
- Resize the secondary chart. This indicator can be changed using the parameter Size of the second construction area(Second Plot Size), which represents the size of the secondary plot as a percentage of the size of the main plot. Drag the slider to make the chart bigger or smaller, or manually enter the percentage you want.
Donut charts
Ring(Doughnut) chart is used instead of a pie chart when more than one data series is involved. However, in a donut chart it is quite difficult to estimate the proportions between the elements of different series, so it is recommended to use other types of charts (for example, a bar chart).

Resize a hole in a donut chart
When creating a donut chart in Excel, the first thing to do is resize the hole. This is easy to do in the following ways:

Customize and improve pie charts in Excel
If an Excel pie chart is just for getting a quick look at the big picture of your data, then the default pie chart is fine. But if you need a beautiful diagram for a presentation or for some similar purpose, then you can improve it a bit by adding a couple of strokes.
How to add data labels to a pie chart in Excel
A pie chart in Excel is much easier to understand if it has data labels. Without signatures, it is difficult to determine what share each sector occupies. You can add labels to a pie chart for the entire series or just for a single element.
Add data labels to pie charts in Excel
Using this pie chart as an example, we'll show you how to add data labels for individual sectors. To do this, click on the icon Chart elements(Chart Elements) in the upper right corner of the pie chart and select the option Data Signatures(Data Labels). Here you can also change the location of the labels by clicking on the arrow to the right of the parameter. Compared to other types of charts, pie charts in Excel provide the most choice of label placement:

If you want the labels to be shown inside callouts outside the circle, select Callout Data(data callout):

Advice: If you decide to place the labels inside the chart sectors, please note that the default black text is difficult to read against the background of the dark sector, as, for example, in the case of the dark blue sector in the picture above. To make it easier to read, you can change the label color to white. To do this, click on the signature, then on the tab Format(Format) click Fill text(Text Fill). Also, you can change .
Categories in data labels
If an Excel pie chart has more than three pie slices, then labels can be added directly to each pie slice so that users don't have to jump back and forth between the legend and the chart looking for information about each pie.
The fastest way to do this is to select one of the pre-made layouts in the tab Constructor > Chart layouts > Express layouts(Design > Chart Styles > Quick Layout). Layout 1 And Layout 4 contain category names in data labels:

Click the icon to access other options. Chart elements(Chart Elements) in the upper right corner of the pie chart, click on the arrow next to Data Signatures(Data Labels) and select Extra options(More options). A panel will appear Data Label Format(Format Data Labels) on the right side of the worksheet. Go to section Signature Options(Label Options) and tick the option Category name(Category Name).
In addition, you can take advantage of the following options:
- under the heading Include in Signature(Label Contains) select the data to be contained in the labels. In our example, this Category name(Category Name) and Meaning(Value).
- In drop down list Separator(Separator) choose how to separate the data in the labels. In our example, the separator is selected New line(New Line).
- under the heading Label position(Label Position) choose where to place the label. In our example, we have chosen At the edge outside(outside end)

Advice: Now the data labels have been added to the pie chart, the legend is no longer needed and can be removed by clicking on the icon Chart elements(Chart Elements) and unchecking the box next to Legend(Legend).

How to show percentages on a pie chart in Excel
When the source data in a pie chart is expressed as a percentage, the signs % will appear on the chart automatically as soon as the option is enabled Data Signatures(Data Labels) in the menu Chart elements(Chart elements) or parameter Meaning(Value) on the panel Data Label Format(Format Data Labels) as shown in the example above.
If the initial data is expressed in numbers, then you can show in the signatures either the original values, or percentages, or both.
- Right-click on any sector of the pie chart and select from the context menu Data Label Format(Format Data Labels).
- In the panel that appears, check the boxes Meaning(Value) and/or Shares(Percentage) as shown in the example. Excel will calculate the percentages automatically based on the fact that the entire pie chart represents 100%.

Splitting a pie chart or highlighting individual sectors
To emphasize individual values of a pie chart, you can break it, i.e. separate all sectors from the center of the diagram. You can also highlight specific sectors by moving only them away from the main chart.
Fragmented pie charts in Excel can be in 2-D or 3-D format, donut charts can also be split.

How to split a pie chart in Excel
The quickest way to break a pie chart in Excel is to click on it to select all the slices and then drag them away from the center of the chart with your mouse.

In order to fine-tune the breakdown of a pie chart, you must perform the following steps:

How to highlight individual sectors of a pie chart
To draw the user's attention to a particular sector of the pie chart, you can push this sector out of the general circle of the chart.
I repeat: The fastest way to push individual chart sectors is to select them and move them away from the center with the mouse. To select a separate sector, you need to double-click on it.
There is another way: select the sector you want to push, right-click on it and in the context menu click Data series format(Format Data Series). Then, in the panel that appears, open the section Row parameters(Series Options) and adjust the parameter Point cutting(Point Explosion):

Comment: If you need to select multiple sectors, then you will need to repeat this process with each of them, as shown above. It is not possible to select multiple sectors of a pie chart at once in Excel, but you can split the entire pie chart, or select only one sector at a time.
How to expand a pie chart in Excel
When creating a pie chart in Excel, the order in which the categories are built depends on the order in which the data is placed on the worksheet. You can rotate the pie chart 360 degrees to show data from different perspectives. As a general rule, a pie chart looks best if its smallest slices are in front.

To rotate a pie chart in Excel, you need to follow these steps:
- Right click on the chart and select Data series format(Format Data Series).
- On the panel that appears, under Row parameters(Series Options) move the parameter slider Rotation angle of the first sector(Angle of first slice) to expand the chart, or enter the desired value manually.

Rotating 3D Pie Charts
An option is available for 3D pie charts 3D Rotation(3D Rotation). To access this option, you need to right-click on any sector of the diagram and select from the context menu 3D Rotation(3D Rotation).

A panel will appear Chart Area Format(Format Chart Area), where you can set the following parameters for the rotation of a three-dimensional figure:
- Horizontal Rotation around the X axis(X rotation)
- vertical Rotation around the Y axis(Y rotation)
- Viewing angle - parameter perspective(Perspective)
Comment: Pie charts in Excel can rotate around the horizontal axis and vertical axis, but not around the depth (Z-axis). Therefore, the parameter Rotation around the Z axis(Z Rotation) is not available.

If you click on the up or down arrows in the fields for entering the angles of rotation, the diagram will immediately rotate. Thus, it is possible to make small changes in the angle of rotation of the chart until it is in the desired position.
How to arrange pie slices by size
As a rule, pie charts are more understandable if their sectors are sorted from largest to smallest. The fastest way to achieve this result is to sort the original data on the worksheet. If it is not possible to sort the source data, then you can change the arrangement of sectors in the Excel pie chart as follows:

How to change colors in a pie chart
If the standard colors of a pie chart in Excel do not suit you, there are several ways out:
Change the color scheme of a pie chart in Excel
To select a different color scheme for the pie chart in Excel, you must click on the icon Chart styles(Chart Styles), open tab Color(Color) and choose the appropriate color scheme. The icon appears when a chart is selected to the right of it.
You can also click anywhere on the pie chart to bring up a group of tabs on the Menu Ribbon Working with charts(Chart Tools) and on the tab Constructor(Design) in the section Chart styles(Chart Styles) click the button Change colors(Change Colors):

Choose colors for each sector separately
As you can see in the picture above, the choice of chart color schemes in Excel is not rich, and if you need to create a stylish and bright pie chart, you can choose your own color for each sector. For example, if they are located inside the chart sectors, then you need to take into account that black text is difficult to read against a background of dark colors.
To change the color of an individual sector, select it by double-clicking on it with the mouse. Then open the tab Format(Format), press Shape fill(Shape Fill) and select the desired color.

Advice: If there are a large number of small, not very important sectors on the Excel pie chart, then you can color them in gray.
How to customize the appearance of a pie chart in Excel
If you are creating a pie chart in Excel for a presentation or for exporting to other applications, you can give it a more attractive look.
To open the formatting options, right-click on any sector of the pie chart and in the context menu, click Data series format(Format Data Series). A panel will appear on the right side of the worksheet. On the tab effects(Effects) experiment with the options Shadow(Shadow) Backlight(Glow) and Smoothing(Soft Edges).

On the tab Format(Format) other useful formatting tools are available:
- Resizing the pie chart (height and width);
- Shape fill and outline changes;
- Using various effects for the figure;
- Using WordArt styles for text elements;
- And much more.
To use these formatting tools, select the pie chart element you want to format (legend, data label, pie slice, or chart title) and click the Format(Format). Appropriate formatting options will be active, and unnecessary formatting options will not be active.

Now that you know how to build a pie chart in Excel, let's try to make a list of the most important guidelines that will help make it both attractive and meaningful:
- Sort sectors by size. To make the pie chart more understandable, you need to sort the sectors from large to small, or vice versa.
- Group the sectors. If the pie chart consists of a large number of sectors, it is best to group them, and then use separate colors and shades for each group.
- Color minor small sectors in gray. If the pie chart contains small sectors (less than 2%), color them gray or group them into a separate category called Other.
- Rotate Pie Chart so that the smallest sectors are in front.
- Avoid too many data categories. Too many sectors on the chart looks like a pile. If there are too many categories of data (more than 7), then separate small categories into a secondary pie or secondary bar chart.
- Don't use a legend. Add labels directly to the pie slices so that readers don't have to look between the slices and the legend.
- Don't get carried away with 3-D effects. Avoid a lot of 3-D effects in a diagram, as they can greatly distort the perception of information.
The origin of Alexander Nevsky Brief biography of Alexander Nevsky
File and folder sizes or what are KB, MB, GB
Special assessment of working conditions: rules and consequences
6 megabytes per second how many megabits
Collection of ideal social studies essays