The indifference of cats to a variety of boxes, boxes and shelves is hard not to notice: at the first convenient opportunity, they will rush to study and fill the alluring space behind the door of kitchen and wardrobes, like every piece of cardboard in the house that comes under their hands, that is, paws.
Caring owners, of course, want to please their pet and at the same time protect the cabinets from curiosity and the invasion of the mustachioed-striped-tailed beasts. To solve this issue, a self-made cat house from a cardboard box is perfect.
Every living organism needs a personal space, a place that belongs only to him, where you can feel comfortable and safe. Domestic purrs are no exception, as they are known to like to “walk on their own,” and thanks to their freedom-loving nature, they are constantly looking for a secluded personal corner.
Cardboard boxes are especially good for this purpose:
A house for a cat, made with his own hand from a cardboard box, will definitely delight the tailed friend, satisfying his urgent cat needs. In addition, it can become another wonderful place not only for a four-legged one to relax, but also for exciting games with domestic inhabitants.
Materials and tools for the manufacture of structures
The elements of the future construction depend on the model of the chosen house and the design idea, but there are common components that will in any case come in handy in the construction of a cat's apartment.
These include:
- Carton or carton (boxes)
- Scissors and stationery knife
- Tape measure / centimeter and pencil / pen
- Brushes and glue. Particular attention should be paid to the choice of glue. With its strong, pungent smell, the cat will not want to be inside or even near the cardboard house. To prevent this, the adhesive must be environmentally friendly and have quality certificates. If there is no way to find or purchase such glue, PVA glue is perfect.
Armed with the necessary materials, you can proceed to the next stage of manufacturing.
How to choose the size of a cat house
In order for a cat to feel comfortable in its house, it is necessary to do it based on the dimensions of the tailed pet, taking into account its behavioral preferences and habits. For example, the owners of Bengal and Siamese cats may be faced with the addiction of these breeds to stand on their hind legs, which means that the height of the structure must be calculated so that the cat can climb on its hind legs inside the house.
A good option for such a cat would be a cardboard wigwam, which will immediately generate interest and at the same time provide convenience.
 A do-it-yourself cat house from a cardboard box must be performed only with accurate measurements to be sure that the cat will fit in it.
 It should be remembered that the cat should have enough space not only for sleeping, but also for stretching on awakening, and since catofans instinctively tend to mark their territory, then for the claw point.
The best option for the size of the cat's house: base 50x60 cm and 30 cm height. British cats will feel comfortable in a house with dimensions of 50x50x20 cm, representatives of the Bengal breed will fit a design starting from a size of 42x40x50 cm, and the Maine Coon, as a large cat, will like a house with a play complex measuring 120x60x180 cm.
Features of building a future pet house
To make your cat's house as comfortable as possible, you need to take into account the animal's behavioral habits and preferences. For example, some owners of purr could notice a passion for their pets to climb to the very tops of sideboards and cabinets. 
This is due to several factors:
- The higher the cat climbs, the more confident she feels. On an instinctive level, this is a sign of superiority over other animals and their relatives.
- Warm air with the onset of cold snaps rises up to the ceiling, and in order to keep warm, the cat climbs as high as possible.
In this case, the cat will like the design with a column. a meter and a half in height and a minimum diameter of 10-15 cm, on which the house will be mounted.
Also, based on the habits of the animal, you need to choose the size of the entrance: for cats who like to rest especially in their society, a compact entrance is suitable, while those who like to watch all the household and everything that happens need an entrance that will provide a good view. The optimal entrance width is 15-20 cm.
Options for houses made of cardboard
A do-it-yourself cat house from a cardboard box can be made for every taste, choosing for this an attractive degree of intricacy, complexity and design idea. The only question is in the personal preferences of the owner and the cat, and in the amount of free time: some houses can be made in 5 minutes, making and decorating others can take a couple of hours.
There are the following options for cardboard houses:
- Wigwam- a domed hut, often consisting of a frame in the form of four to six sticks and "walls" made of fabric or cardboard.
- Lounger- a bed for a cat, made from a box or basket, covered with a mattress or thick soft cloth.
- One-story and two-story cardboard houses- the simplest cardboard structures of a square shape, suggesting space for sleeping and playing.
- Cardboard lock- a complex structure, which includes cardboard blocks, interconnected in several floors with a variety of decorative elements, carved windows.
- Cardboard tower- a structure consisting of many layers of cardboard cut out in rings, of different diameters, from the largest at the bottom to the smallest at the top.
A simple cardboard box house. Step-by-step instruction
Performance:

A complex house out of the box. Detailed master class
Performance:

Cardboard tower or castle
To build a tower house for a cat from a cardboard box with your own hands, you must follow these steps:

Two-story cardboard house
You will need: templates for doors and windows (prepare and cut out in advance), two identical strong cardboard boxes (the larger the cat, the larger the box is needed), a pencil, a ruler, a stationery knife, hot glue. 
Performance:
- First, decide on a scale, draw and cut out patterns for doors and windows. Attach them to the boxes that will make up the first and second floors, and outline the outlines of the templates. Take a clerical knife and along the drawn lines make an opening for doors with windows.
- Take the first box and cut off the two upper flaps from it, located not opposite each other, but next to each other. Take the second box and cut the flaps in the same places, but from the bottom. After that, glue the shutters to each other in each box. When the roof is done, you will need to connect them together and glue them.
- We make the roof. To do this, draw triangles on the two smaller sashes at the top, located opposite each other, so that the two remaining parts of the sash can be bent forward. Along the drawn line, lightly draws a knife and bend it forward. After that we glue them from below to two adjacent flaps, thus getting a roof. Now you can connect both boxes together.
- The house is ready! Get your cat to evaluate the work. For more comfort, you can lay a rug or pillow inside the house.
How to decorate a cardboard cat house. Decorating ideas
To make the cat's house more cozy and cute, you need to put in a little more effort and decorate the cardboard box with your own hands. To do this, you do not have to run to the store, because most of the details for the decor can be found at home. 
By the way, finding and making decorations for a house can be another little adventure and an interesting activity, both for the owners and for the curious purr.
Here are some design ideas:
- Using a thick needle, you can sheathe the house with fabric: completely or only inside, or in certain areas.
- Glue some white paper to the cardboard and paint it with cute designs.
- By the same principle, the box can be pasted over with wallpaper, beautiful napkins or newspapers.
- A variety of stickers can be used, if available. By and large, anything that can be glued or sewn to the box can become a decorative element, turn on your imagination and trust your creative impulse.
- Soft toys will help you to make a cardboard cat's house with your own hands as a concentration of affection and comfort: select several pieces and place them inside the house, near it, or glue boxes to the walls.
- Glue a rope that your pet loves to play to the ceiling of the house, inside or outside. You can also tie a rustling candy wrapper, paper, or a toy that the cat plays with to the rope.
- A scratching post near or inside the house will make the area more attractive to the cat and protect the furniture from damage.
There are many options for a house for cats: from the simplest, the production of which will take no more than five to ten minutes, to very intricate ones, with various decorative elements, second floors and towers. However, regardless of the complexity of the house, for each owner the happy muzzle of his beloved purr is the best reward for the efforts spent.
Of course, you can purchase a ready-made house, but the manufacturing process itself will be fun for family members and a pet who want to participate in the process. In addition, making a house for a cat with your own hands from a cardboard box is much cheaper than buying a ready-made one. You will be confident in its quality and will be able to show your creativity.
Video: DIY cat house from a cardboard box
How to make a house for a cat with your own hands, see the video clip:
House for a cat made of cardboard, master class:
The house where the cat lives has a special atmosphere. Pets can have a different character, but they all add variety to the old measured life.
Often cats become attached to one place, spending a lot of time there. Accordingly, they leave scraps of wool, sharpen claws, play. In such cases, the question arises of creating a separate bed for the cat, its own house.
You can buy one at a pet store. In this case, you will have to spend money. Or you can make a house for a cat yourself from a cardboard box.
Varieties of cat houses
Here is a gallery of ideas from DIYers:
You can explore the range of cat houses on the market and choose the optimal design for your pet.
Most often, cat owners choose the following models:
- Various beds. Suitable for calm animals that spend most of their time watching.
- House-booth. Suitable for pets who like to spend time in solitude. It's easy to make from a cardboard box.
- Hammock bed. It can be located in any free space - under a chair, stairs, etc.
- Game complexes. Suitable for families with two or more cats. They can consist of several houses, walkways, scratching posts and hammocks. Their parameters and content depend on the desire and capabilities of the owner.

Create a cat house. What do you need to know?
Dimensions. Cardboard houses must correspond to the parameters of the animals. For a pet of medium parameters, a cubic design is suitable, the width of which will be about 40 centimeters. A hole 15 - 20 centimeters wide is enough for the entrance. If the entrance is very wide, the animal will feel unprotected. The basic rule is that the pet should fit freely in the house, lying on its side.
Important! Siamese and Bengal cats love to sit on their hind legs. It is better for them to make a cardboard house with their own hands in the form of a wigwam. Its height should be at least 60 - 70 centimeters.
The benefits of a self-made cardboard house:
- Cost savings.
- A self-created product will be in harmony with the interior of the room.
- An additional reason to please your pet.
- Minimum investment of time and effort.
- Empty boxes don't have to be thrown away.

- Cut out rectangles from a cardboard box, measuring 50 x 40 centimeters. For Siamese and Bengal cats, cut out pieces measuring 50 x 60 cm. In total, three rectangles are needed. This will be the base and the two side pieces.
- From the inside and outside, we glue the rectangles with upholstery furniture fabric.
- We connect the two parts together at an angle of 60 degrees. We attach the third part to them. We fasten the entire structure with PVA glue. We get a house in the form of a triangular prism.
- We cover the bottom of the house with padding polyester or other soft bedding.
- We set up a house near the battery to keep the cat warm and comfortable.
- We trim it with fabric, which we select in accordance with the general style of the interior.
- We paste over with white paper. Then we paint to our liking.
- We paste over with wallpaper, in accordance with the walls of the apartment.
- We decorate the house with soft toys in the form of mice, birds, other animals and insects.

You can install a scratching post next to the house so that your pet can sharpen its claws. Thus, you will protect your furniture from damage.
Precautionary measures:
- It is forbidden to use the stapler as a fixing material. Cats sometimes gnaw on cardboard. The stapler paper clip can be accidentally swallowed by a pet, or it can injure mucous membranes.
- Do not use adhesives with a pungent odor. The best is PVA glue. It does not emit strong odors and dries quickly.
- It is forbidden to use boxes found on the street. Stray cats and dogs could live in them. There is no guarantee that they were healthy.
- You can not use tight boxes. The cat will want to stay awake in a place where it is uncomfortable.
- It is forbidden to hang a cardboard house for a cat. The product may fall and the animal may be injured.
A self-built cardboard house for a cat will save the family budget and the nerves of the owners. After all, a pet will not look for a place to lie in the wrong place.
Cat lovers cherish their pets. Every owner wants to give his cat all the best. For pets, you need to purchase many different items, including couches. There are many specialty pet shops. But not everyone can afford to buy expensive things for pets.
What is a bed for a cat and why is it needed
A bed (bed) for a cat is a place where the cat will sleep (rest). The lounger is sometimes called a crib. These cribs are usually installed next to or a scratching post. After all, the pet must understand where its territory is located. The bed should be in a warm and dry place. In addition, the chosen location should be comfortable. If the cat does not like the crib, it will choose another place to sleep and rest, and the bed will remain intact.
The bed should be comfortable and cozy
When choosing a bed, you need to take into account the preferences of the cat. If the pet chooses soft places for sleeping (sofa, armchair, etc.), then the lounger should be soft. If your cat likes to sleep on your fur coat, then the bed should be fluffy. In addition, it is important to consider the place where the animal likes to sleep. So, if the cat likes to sleep, for example, under the table, then the purchased bed can be placed under the table. Later, when the cat gets used to its bed, it can be moved.
We have a store bench and, but the cat sleeps under the bed and you can't lure him out of there with any rugs, a favorite place, and even a bathroom.
Anyuta, the owner of the cat
http://m.woman.ru/home/animal/thread/4278589/
Types of beds and their features
There are several types of beds
The beds that are sold in stores differ in color and size, shape and price. But these are all just visible differences. In fact, each type of sun lounger has its own characteristics:
- Baskets-baskets (basket with a pillow). They are well ventilated, but cats love to chew on the bars of the walls.
- Plastic beds (plastic frame and pillow). Convenient in that they are easy to clean.
- The bagel bed. A kind of pillow (can be with or without sides). Bagels are made from soft materials. This will have to be washed entirely (or take out the filler before washing).
- Hammock beds. Hammocks are installed at a certain height from the floor. Cats love these cribs, but kittens or older cats may find it uncomfortable to climb.
- Closed couches. These are beds in the form of a house or a hut. Cats love to feel protected.
- The beds are tubes. These are the couches in the form of a pipe. Such a bed can be lined with a warm cloth both inside and out. The plus is that it can be installed as a suspension to the battery.
Some cat owners choose a bed for a cat based on the design of the apartment as a whole.
How to make a do-it-yourself cat bed
If it is not possible to purchase a store lounger, you can do it yourself. Plus, a homemade sunbed will be exactly what you want. Moreover, when making a bed, you can use exactly the material that the cat likes (fabric of a particular thing, cardboard from a favorite box, etc.). When choosing a material, you need to take into account not only your capabilities and preferences, but also safety. The material must not be toxic. To make a base pillow, it is best to use cotton (or semi-natural, cozy) fabric:
- coarse calico;
- jersey;
- velveteen;
- denim;
- knitted fabrics;
- corduroy (plush) or other fleecy materials.
How and where to make a hammock
A hammock is a bed in the form of a canvas attached at the corners (or in a circle) to the base. The outer side of such a couch should not touch the floor.
cats like hammocks due to the fact that the view of the room is better from a height
The hammock can be installed in any place that will be convenient for your pet. It is best to place the hammock where your cat likes to sleep. It is important to consider the height of the hammock... Ideal if the height can be adjusted. Not every cat will be able to climb to great heights.
My cat Hosya used to like to sleep in the hood of a jacket (hanging in the corridor at a height of about 2 meters from the floor). From this, there are white hairs on the blue hood. To wean the cat, I had to unfasten the hood and put it on a chair we don't use. Gradually Hosya got used to the chair, and I was able to remove this hood. Now she does not even remember about him.
To make a hammock, you need to take the canvas on which your pet sleeps and attach it, for example, to the legs of an inverted stool. Some, before hanging it, sew a pillow from this canvas. And sometimes (more skilled owners) make a frame from PVC pipes. True, men will cope better with such material. You can also attach this pillow instead of the folding chair seat. In this case, you do not need to specially train your pet, since he will not give up his favorite rag.
It is important that the bottom of the hammock does not sag too much.
Tip: to avoid having to train your cat again, do not wash the linen before the cat lies on the hammock. Let it lie on it for a couple of days to get used to the new device. Cats can smell their own scent, and if the lounger smells of laundry detergent or conditioner, the pet may reject the new bed.
Do-it-yourself bed for a cat from scrap materials
You can make a pet bed with your own hands. Each apartment has the necessary materials, you just need to search. The laziest option is to take the pillow the cat is sleeping on and place it in half of a suitcase (briefcase, diplomat). The main thing is that the suitcase fits in size. You can also arrange a cat bed in a car tire. A solid base (plywood, plank, etc.) must be placed in the overturned tire. And place a pillow on top. In such cases, you can decorate the bed at the request of the owner. More "handy" owners build a bed for a pet from robes or fur coats (most often from sweaters). In this case, the sleeves become sides (you don't even need to cut them).
A couple of years ago, my apartment was renovated. Because of this, the cat could not "find a place for itself." She hid in the corners and climbed into the rolled-up carpets. I realized that she liked the smell of carpet (the usual smell of home and wool). I chose an "older" rug and made a wigwam (cone) out of it. The edges were linked with an ordinary stationery stapler. She put a folded terry towel inside the wigwam. So we survived the renovation and the next winter. But this hut did not fit into the new interior, and later we abandoned it.
Photo gallery: examples of bedding from improvised means
A couch made of a sweater (sweaters) can be made in half an hour.To make a couch out of a suitcase, you can use any of the halves of the suitcase, but so that the wall lying on the floor is flat, such a couch is good because you can make a canopy (by attaching the canvas to the legs of the table ) the basket can be attached upside down to the wall or installed on the floor, in addition to the TV case, you can use a box from a microwave oven, monitor, etc. such benches are convenient because you can adjust the height
How to sew a do-it-yourself cat bed
Most often, cats choose soft surfaces as a crib, so the owners try to make the same soft bed (bagel). To sew such a lounger, you need to pick up the material:
- fabric for the top of the donut (sides - 1.20 x 0.20 m, base - 0.40 x 0.60 m);
- fabric for the lower part (0.40 x 0.60 m.);
- stuffing material (can be removed from an old synthetic winterizer jacket).
The list shows approximate sizes for a medium sized cat (they may be smaller or larger). When the materials are ready, you need to carve out two parts. When cutting, do not forget about the seam allowance (1 cm on each side).
You need to cut out 2 parts A and 1 part B
You will have two parts A. They need to be sewn (stitched) together along the edge that is with a notch. Then you need to connect the narrow sides of the part. Next, you need to turn out the resulting part and grind the free edges so that you get a rim (do not forget to leave a hole for stuffing). After the side is filled with padding polyester (or foam rubber), the hole can be sewn up. Now you need to sew this side to the top (detail B). This is the base of the donut. The base must be sewn to the rounded seam (usually this is a coarser fabric). Here you also need to leave a hole, and after stuffing, sew it up. As a result, one outer seam will remain. It can be crocheted, overcast, overcast, or left as is. If the fabric for the donut was not purchased on purpose, then you may be unhappy with its pattern (its absence). In this case, you can paint the fabric even before sewing.
The drawing took quite a long time (but carried away). First I made the seals: I cut out the cat's face out of porous rubber from the old rug from under the armpit. I dipped this signet in acrylic paint and made a drawing. Or it can be easier - through a stencil. Do not forget to put a newspaper under the fabric, because the paint penetrates through the fabric. Then I drew eyes, mustaches, etc. on each face with a gel pen. (This is optional, of course.)
When it is completely dry, turn it inside out and iron it with an iron (so that the paint is fixed). After the paint should not be washed off. All this was done not in one evening.Maxa, creator of the patterned bench
For those whose cat itself "chose" the material for the bed, there is another way. To sew the couch you will need: an old sweater (jacket, jumper), scissors, a needle, thread, stuffing.
Any sweater can be used (the main thing is that the cat likes it)
The neck of the sweater can be cut and sewn or rolled up. After that, you need to lay 1 horizontal stitch across the chest (from armpit to armpit). From cuff to cuff, a tube is formed. It needs to be filled with padding polyester (or other suitable material).
It is better to use threads in the same color as the material (so the seams will be less noticeable)
The sleeves must be connected together in the area of the cuffs. You will get a circle. To this circle you need to sew the sides of the sweater so that the cloth turns out to be flat. You need to leave the bottom of the workpiece unstitched (the bottom of the sweater). Through this hole you need to put a finished pillow or synthetic winterizer.

If the corners of the sweater (elastic belt) stick out from under the bed, they can be cut off (but not under the spine, but with an overlap (1.5 - 2 cm). ...
Do-it-yourself knitted bed for a cat
Some housewives do not know how to sew, but love to knit. In this case, you can knit a bed with knitting needles or crochet. To do this, you need to prepare a tool (knitting needles or hook) and yarn (threads). The yarn can be of any color. The lounger can turn out to be monochromatic or with a pattern. It all depends on your preference and patience. In general, knitting is the most painstaking and painstaking way of making a stove bench. But the finished device will be one of a kind.
If you knit, then you can separately knit parts of the same shape as the patterns, then connect them and do not forget about the stuffing. If you crochet the device, then the situation is different. You can crochet any round lounger (bagel, ball, egg, etc.). We will take a look at the lodge bed. Such a product is knitted in one piece. To do this, you need a hook (N ° 7 or N ° 8) and yarn (you can buy a new one or use leftovers). You need to start from the base. Knitting takes place in a circle:
- Cast on 3 air loops (VP), close the chain into a ring using 1 connecting post (ss). The rows will start with one run up and end with ss.
- We close 8 single crochet (sbn) columns in a circle.
- Increase x 8 (16).
- (sbn, pr) x 8 (24).
- (2 sc, pr) x 8 (32).
- 32 single crochet.
- (2 PRS, D) x 8 (42).
- 42 single crochet.
- (2 sc, pr) we observe the sequence until the end of the tier (56).
- 56 single crochet.
- (2 sbn, pr) we observe the sequence until the end of the tier.
- Column without crochet in each loop of the previous tier.
- (4 sbn, pr) repetitions until the end of the tier.
- 13 - 16 rows of single crochet in each loop of the previous tier.
- (5 sc, pr) and so on until the end of the row.
- single crochet in each loop of the previous tier.
This will create the lower convex part of the lounger.
The bottom of the bed should turn out to be flat, and the walls are slightly convex.
- We knit half a row of sc in each loop, cut the thread, leave the end (this is row 19).
- In each loop we perform sbn, and when there are only 5 left, we knit the tail left over from the previous row, we cut off the thread.
- Next, 10 single crochet - a pass, we start knitting from the place where the previous row began.
- We knit the remaining ends of the threads into the main fabric to give the product an aesthetic appearance (row 20).
- Repeat the 20th row five more times (21-25 rows).
The "window" is formed in 7 circles.
It is important to ensure that there are no protruding loops and puffs.
When the round entrance to the workpiece closes, the number of loops in the circle will decrease. Here you need to knit according to the scheme:
- 6 row we knit sbn in each loop (hereinafter kn.) Of the previous row, we close the row after knitting 8 loops above the entrance.
- 27 - 30 rows (sc in kn, repetitions until the end of the circle).
- (4 sc, dec) repeat until the end of the tier.
- 32 - 33.sc in kn, repeat to the end of the row.
- (3 sc, dec) repeat to the end of the tier.
- sbn in kp, repetitions until the end of the tier.
- 36 - 37 rows. (3 sc, dec) repeat to the end of the tier.
- 38 - 39 rows (2 PRS, UB) repetitions until the end of the circle.
- 40 - 41 rows. (sbn, ub) and so on until the end of the tier.
Here the circle should be closed. If there is a hole on top, then somewhere you missed a decrease or made an extra yarn over. Rate the product. If the shape of the lounger is beautiful and neat, then continue to decrease until the circle is completely closed. The end of the thread must be tucked inward. If desired, the cottage can be decorated with additional elements or a ribbon can be passed over the body.
Video: how to tie a bed-pillow for a cat
A house for a cat with your own hands is much more profitable in terms of financial costs, takes into account the individual characteristics of the animal, and is selected for the interior of the apartment.
There are several options for homemade houses - temporary, permanent. The first ones are built in the country, where they take a cat with them, they put it in the car when moving. The second - in the apartment
Some cat owners are perplexed, why build a special house, if animals already live in it. However, if you observe the behavior of your pet, you may notice some oddity. The cat chooses a place to sleep - curls up on the armchair, climbs into suitcases, niches for shoes, lockers for clothes. Or he constantly climbs onto the bedside table, windowsill, causing this inconvenience to the owners. And all this is due to her instincts.
The cat is a predatory animal. Her constant presence in a person's house makes her not such an aggressive hunter, but wild instincts continue to be present in her. In nature, a cat must have a den, where she sleeps during the day, hides her kittens. And also the shelter, from which the animal looks out for the victim at night, hides from enemies. A caring, loving owner must take into account the needs of his pet, make his stay in the house as comfortable as possible.
Buy or do it yourself
Nowadays, in any pet store, you can choose any housing for a kitty. The variety of shapes and designs is impressive. Stylish, beautiful, and quite expensive. This is the main problem. In addition, it often happens that a pet refuses to live in a purchased house, ignores it in every possible way, bypasses it, and looks askance in disbelief.
This behavior of the animal is explained by an overdeveloped sense of smell. The cat gets used to the smell of the house, feels calm in it, other people's aromas alert her, scare her away. The glue with which the house was assembled, the material itself, can smell. Another hindrance can be a mismatch in size.
Of course, you can pick up a house, taking into account the breed of the cat, mores, features of behavior. But, having brought it home, there is no need to rush to introduce it to the inhabitants. Initially, it should be done so that it is saturated with the "native" smell. Put it on the balcony for a few days, then keep it in the apartment for a week unassembled. Then try to introduce him to the cat.
A home made for a cat with your own hands will be more dear to her, since the smell of her beloved owner will remain in it. The cat will definitely want to stay in it and will purr loudly as a token of gratitude.
House features for a cat and a cat
You should immediately pay attention to the fact that the house of the cat and the cat  differ from each other. The cat is less demanding. All he needs is one access hole, a roof with an all-round view. In this position, the hunter looks down on everything that happens, looks out for the victim, feels safe.
The cat takes care not only of itself, but also of the kittens. She has a slightly different idea of secure housing. Her housing should have an entrance and an additional exit, the observation deck is not located on the roof at all, but a little to the side.
The cat climbs to the observation deck, observes everything that happens, at the same time, reliably protects the entrance of its shelter with kittens. And in the event of an enemy attacking her, she will be able to ward off danger from the cubs. If the enemy manages to find the entrance to the den with the kittens, they can get out through the emergency exit.
A home made for a cat with your own hands must take into account all these features.
Types of homemade houses
All of them are divided into stationary, mobile. The first ones have a more complex design, they are made taking into account the fact that they will not be periodically disassembled, moved to another place. Mobile houses are simple, sometimes made with a quick hand from improvised means. Suitcases, baskets, old clothes, sheets, bags are used. Anything that has enough imagination. Such houses should be lightweight, quickly assembled. Pets are placed in them when traveling by car, shopping, street walks.
A home made for a cat with your own hands can be of different colors, since they are poor at distinguishing colors. Therefore, this nuance depends entirely on the personal preferences of the owner. The animal makes claims to the material from which the house is made.
The following classification of types of housing for cats is based on the form:
- Hammocks are soft loungers that are attached in different ways to the legs of chairs and tables. A cozy cradle is under the cover of a chair or table.
- Loungers are a simple option that does not require much effort to manufacture. Consists of a small elevation, a mattress. For example, you can go to the basket. Put faux fur, a mattress made of foam rubber in a wide box.
- Booth - different materials are used, most often plywood, polystyrene. Covered with a soft cloth, the shape is square or rectangular, there must be a scratching post.
- Cardboard house - done very quickly, a cardboard box or separate sheets are used to create housing of any shape. Nice, fast, but short-lived.
- Wigwam - some breeds of cats in the wild live in hollow hollows of old trees, constantly climb on their hind legs in order to look out from there. A wigwam is built according to this principle.
- Houses with a complex structure. They are built-in, free-standing. They consist of several booths, observation platforms, sun loungers, scratching posts.
The list can be continued, since there are no limits to human imagination. A house made of an old T-shirt, basket, suitcase, burlap, thread, etc. The layout of each of them is quite simple, the drawings do not take much time.
DIY cat lazelki: photo


A house made for a cat with your own hands out of the box

Surely in every house there is a box in which a cat can easily fit. It is quite suitable for creating a house for a quick hand. The easiest option is to put a pillow, mattress, faux fur in the box. A home made for a cat with your own hands is ready. You can put such a house anywhere. Suitable as a mobile home.
The second option is to cut several holes in the box. One - for the entrance, with a diameter of about 25 cm. The rest are cut out in the form of windows. Such an adaptation is done very quickly and does not require special skills. Several individuals can be placed in a large box at once. The main disadvantage is its fragility. And the advantage is that you can quickly make a new one for replacement.
T-shirt house instruction
A house made for a cat from a T-shirt will surely appeal to a pet. With the condition that the old T-shirt will be used. The construction resembles a tent. The material is the simplest, always available in the household, is done in 5 minutes, the diagram is clear, drawings are available.
Manufacturing instruction
Materials for making:
- T-shirt;
- Scotch;
- Pins;
- Wire;
- Cardboard sheet - 40 * 40 cm;
- Wire hanger - 2 pcs.
Scheme and drawings of the work process: 
- Cut off the upper part - hook from the hanger - tremple. Bend the rest of the wire in the form of an arc, as for a tent.
- Cover the cardboard with tape. So it will look a little better, it will become stronger.
- Fasten 2 wire arches crosswise. In this position, they can calmly stand.
- Fit this semicircle to the dimensions of the cardboard, pierce the ends in each corner. Wrap, from the bottom of the cardboard, fix with tape.
- Put on the structure, cover it with a T-shirt. The neck should be at the front of the tent - this is the entrance. Behind the excess part of the T-shirt, sleeves, fasten with pins, or sew it by hand.
To prevent the house from tilting to the side, you need to securely fasten the wire at the base. For greater reliability, durability, instead of cardboard, a sheet of plywood, foam, chipboard is used. The T-shirt can be easily removed, you can periodically replace it with another one, cats do not distinguish the color, they will not notice changes.
A house for a cat with your own hands from a T-shirt can be used as a stationary, mobile one.
Cat's house from an old monitor
A non-working TV is still quite useful on the farm. It turns out a beautiful, durable, reliable house for a family of cats.
Manufacturing material: 
- Water-based paint;
- Soft fabric for interior upholstery;
- Mattress fabric, foam rubber;
- Stickers;
- Glue gun.
Scheme and drawings:
- Remove the inside from the old monitor, take out the screen;
- On the side, cut a round hole that will serve as an entrance.
- Paint the monitor with paint of any color, but the main thing is that it is water-based.
- Sew upholstery for the inside of the house. The material should be used in such a way that it does not electrify, since the constant friction of the wool can provoke a discharge. The upholstery is secured with glue.
- Sew a mattress to fit the monitor.
- Different stickers are glued to the plastic screen, you can draw something. Kittens will look at them with interest, but for people it will look like a computer monitor, and live kittens or a cat will be the screensaver.
A house for a cat with your own hands is ready. However, such a moment should be taken into account. Plastic does not allow air to pass through, belongs to synthetic materials. Being in such a house is unsafe for health. Therefore. Nevertheless, it is better to refuse such a house.
Wigwam for cats
A house made for a cat with your own hands, in the form of a wigwam, is made like a dwelling from a T-shirt. Its height should be 60 cm. Cardboard, chipboard, polystyrene, plywood are used as a solid base. The main task is to make a solid frame. For this purpose, strong wire, wooden strips are suitable. The upper fabric for covering the wigwam must be natural. Put it on over the structure, the ends can be tied with strings, ribbons. See instructions for making T-shirt housing.
DIY cat house from a suitcase
It couldn't be easier. An old suitcase will be needed. If the upholstery looks  not too good, you can put on a self-sewn cover on top. The easiest option is to open a suitcase, put a pillow, a mattress in it. A house for a cat with your own hands is ready.
To make it all look more interesting, proceed as follows. Prepare the legs. They can be carved from wood, who understands this, buy ready-made in a furniture store, use simple wooden planks. If there are several animals, you can make a two-story house out of one suitcase. Detach the suitcase lid. Attach the legs to the bottom of both parts. Set as a bunk bed, secure.
Plywood house instructions
A house made for a cat with your own hands from plywood is the most  practical, durable. Any complex structure can be made. As a rule, it contains a booth, an observation deck, and a scratching post.
Manufacturing material:
- Plywood sheets up to 12 mm thick, it is better not to use chipboard, since the material contains an odor;
- Hemp rope, rope for making scratching posts;
- PVA glue, after drying, it does not leave a smell;
- Dry stick, at least 15 mm in diameter;
- Foam rubber;
- Quilted synthetic winterizer for making bedding;
- Upholstery furniture fabric from an old sofa, armchair.
Scheme and drawings:
- The interior of the space should be comfortable to lie on. The average size of the box is 40 * 60 * 40 cm. For large breeds, recalculation is made based on the size of the body.
- The diameter of the hole in the upper part of the box should be such that the cat can easily walk. Average diameter 20 cm.
- The observation deck is made at a height so that the cat can easily climb, standing on its hind legs. The playground itself should be such that the pet can fit well on it.
- The stick is greased with PVA glue, the rope is tightly wound without gaps. This will be a scratching post.
Plywood drawings can be very diverse. A typical house looks something like this:


Tools:
- Hacksaw or jigsaw;
- Screwdriver;
- A hammer;
- Scissors;
- Awl;
- Ruler;
- Glue brush;
- Pliers.
Open: 
- All the elements of the house and observation deck are drawn on plywood. Cut with a jigsaw. You will need 4 rectangles 40 * 60 cm for the side parts of the house, the base is 80 * 120 cm. The house will be attached to it. The roof is made either voluminous, then additional parts are cut out, or with a rectangle - the size is 70 * 70 cm.
- A round hole is cut in one of the rectangles for the entrance. And also on plywood, which will serve as a roof, a hole for picking up the observation deck.
- Prepare 2 sticks of equal size. One will be installed on the roof, the other on a plywood base.
- It is better if the roof is removable. This will make it easier to clean the house.
- Cut out foam rubber for upholstery of the inside of the house, the observation deck.
- Prepare the base for the mattress.
Drawings and dimensions are individual.
Assembly instruction:
- From the inside, the house should be soft. Foam rubber is glued to the plywood, on top of the fabric, on the outside the upholstery material from the old sofa.
- A claw sharpener is prepared, installed with glue on the base.
- All parts of the house are glued together, installed on the base, and fixed with glue.
- An observation deck is installed last.
A house made for a cat with your own hands will become a real decoration of the apartment. It should be installed where the cat loves to spend time. If she likes to climb onto the windowsill, watch what is happening outside, it is worth putting the house closer to the window. If the cat craves warmth, closer to the radiator or in a sunny place.
We will not go into thought, but we will only say one thing: your beloved cat or cat definitely needs its own small house. If you do not provide the four-legged with his own home, then he will do it for you by arranging a place to sleep and rest in a closet, under a sofa, in a washing machine, and even in any convenient corner. And how to make a house for a cat with your own hands, we will tell you in this article.
No artificial materials!
Cats, like humans, are very sensitive to various materials. And it is especially unpleasant for them if a sharp, unpleasant smell is heard from the material, because they have a heightened sense of smell. That is why give preference only to natural materials: change the plastic to wood, read the composition of the pillows, and buy all fabrics only with a natural composition like cotton. Synthetics not only can smell unpleasant, but also poorly let in air, and also often electrify, which will be very, very unpleasant for a cat with thick hair. So arm yourself with the most natural ingredients to create a home.
Glue? Only classic PVA or any other water-based one!
The glue used should not emit a terrible unpleasant odor after drying, and you should also give preference to the glue that is as safe as possible for the animal, i.e. PVA and its analogues. The fact is that the cat may try to chew on the glued element, because of which the glue can get inside with saliva. Pay attention to this.
When making a house, use PVA glue
Do not skimp on the sizes!
Of course, you do not need to overdo it either, but houses for cats should be made in such a way that the pet can sleep both curled up and stretched out along its entire length. And, of course, consider the size of your individual when designing a house.
We fix the dwelling on the floor
Don't want to spoil an expensive laminate or parquet floor? Come up with some other mounting option, for example, to a wall. The cat will run into his house with a running start, jump on it, so the structure should be more or less rigidly fixed. And when designing, be sure to take into account the weight of the animal: the larger it is, the stronger the base should be.
Fix a new pet house
Option number 1 - from a regular T-shirt
For this simple masterpiece, we need a square piece of thick cardboard or plywood, two pieces of wire about 5-7 mm thick, as well as a pillow, a T-shirt and something to fix it.
House from a cardboard box
You can also take a low stepladder (about a meter high), wrap the vertical beams with twine, and lay sheets of plywood between the steps, having previously upholstered them with some soft material. And on the sheets that lie on the lower steps, you can make a full-fledged house. So you get three in one at once: a cat's house with your own hands, and a scratching post, and shelves on which the pet can lie down and enjoy peace.
Many needlewomen and needlewomen are familiar with this technique. Its essence is simple: you take sheets of paper (newspapers), a certain object whose shape you want to repeat (for example, mold a large fish from plasticine), and then gradually glue the object with paper using PVA glue. As a result, you will get a solid multi-layer construction in the desired shape.
How is a cat's house made using this technique? Very simple! We take a large enough package that needs to be filled with towels, rags (do not take large ones, let there be many, but small ones. Next, we give the package the desired shape (for example, a large stone) and begin to cover it with newspapers. We advise you to do this: soak the first layer with a little newspaper And just cover the bag without glueing. And immediately glue the second layer on wet newspapers. And each subsequent layer just glue the newspapers with PVA glue and glue, glue. We advise you to make enough layers so that the structure is very strong.
When all this is dry, cut a hole for the cat with a knife on one side. Under the newspaper, of course, you will find the same bag, cut it open and take out all the rags from the inside, one by one. In the final, pull out the package itself, it will get it without any problems, because the first layer was not pasted over with water, not glue. Next, let the future house for the cat dry a little, and then glue the space inside with several more layers.
House made of papier-mâché. It remains to decorate
Our frame is completely ready, now you can paint it, if you want to make a stand, put a pillow inside. We advise you to make an imitation of a stone, in combination with the papier-mâché technique it will look very beautiful, it will create the feeling that you have carved a house for your pet in the stone.
We take a regular corrugated cardboard and cut rings out of it. Then the rings are glued one to one, after which we get a shell-house, like a snail. You can find pictures of similar designs to better see how it all looks. For work, you only need glue and the cardboard itself, and the result is very original and interesting.
Corrugated cardboard house
Option number 5 - a triangle of plywood and carpet
It is extremely easy to make such a house for a cat with your own hands, you only need an angle profile, self-tapping screws, carpet and plywood. Take three plywood rectangles, make them in the shape of a triangle, fasten with a profile and self-tapping screws, and then make a back wall of plywood in the shape of a triangle.
After that, sheathe the resulting structure with a carpet - and you're done, you can hand over the work to your pet, let him evaluate it.
Cat house toilet
Well, then modify to your taste. You can fix the scoop inside on the wall, you can screw the wheels from below, sheathe this whole structure with colored fabric, make a soft seat, so that you end up with something like a pouf or a bench. In general, there are a lot of ideas here. By the way, the same closed tray can be assembled from an old cabinet with an opening door. Just cut a hole in the door with a jigsaw, put the tray inside - and you're done!
Do-it-yourself cat houses with a scratching post are also a necessary thing, because many representatives of felines, over time, begin to tear everything that came under their claws. Do-it-yourself scratching is very easy: a wooden or plastic post is taken, which is simply wrapped tightly with twine or other thick rope. Just do not fasten the turns with nails!
How to combine a scratching post with a home? Yes, in absolutely any combination! We take a sheet of plywood, install the house itself on it, next to it a post with a scratching post, and nail a soft couch on the post. That's it, the simplest design is ready! You can simply attach the sharpener to the dwelling itself, build a complex multi-level structure, place the scratching post under the dwelling, above it - as you wish!
House for a cat with a scratching post
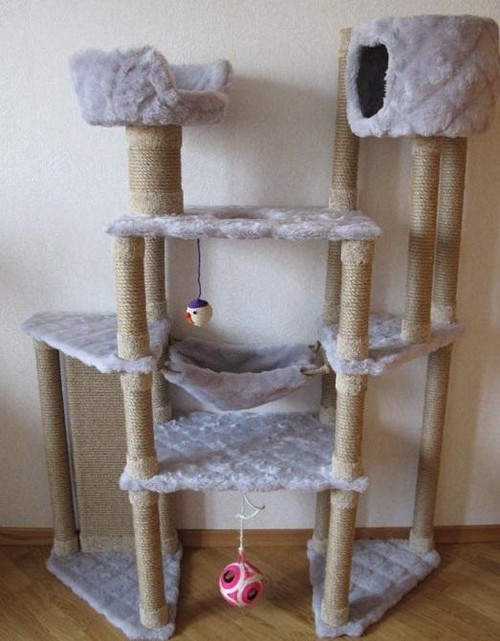
Option number 10 - a whole cat complex with your own hands!
If you have a lot of time and energy, you adore your pet, then you can build a huge complex! Here you can envisage stairs, and suspended structures under the ceiling, and soft pipes that go around the sofa, and houses in the walls. Set up multi-tiered cottages, decorate all this with artificial or live plants and much, much more. On the Internet, there are a lot of ideas, how to make a cat house with your own hands, and how to build huge complexes in which you can even get lost! And the most interesting thing is that there are no restrictions: you can aim at work of the most impressive scale.
We showed you the cat houses, and also gave ten options at once on how to equip a cat's home on your own. We tried to tell you how to make a beautiful house with your own hands, starting from the simplest options, and ending with complex cottages for a real cat elite!
We hope you enjoyed it and found for yourself the solution that will make all your ideas come true. Modify our solutions as you please, creating non-standard and creative cottages for your pets.
Overview of chargers for car batteries
Measurements Ultra-low resistance measurement
How to make or change the start page in Opera, Google Chrome, Mozilla Firefox, Yandex browser, Internet Explorer
Applications for reading books on a computer Download a program for fb2 files Windows 10
Open and convert dbf file to EXCEL Convert dbf file to xls